In this tutorial I show how to accurately slow down high frame rate video using Sony Vegas Pro and Sony Movie Studio Platinum.
Many modern video cameras and DSLR cameras can shoot in frame rates above 24, 25 and 30 fps, like 50 fps and 60 fps (frames per second). Some of the newest cameras like the Go Pro Hero 3 Black Edition can now shoot at 1280x720-100p and 1280x720-120p.
The main advantage of shooting video at these higher rates, is that it gives you the ability to create very smooth and clean slow motion video effects, once you slow the video down using the tools in Sony Vegas and Movie Studio. To get the best quality slow motion video, you should be aiming to reduce your original high frame video back down to a standard frame rate like 24p, 25p or 30p.
Methods for Slowing Down Video
There are three different ways you can slow down video with Sony Vegas Pro and two ways with Sony Movie Studio Platinum.
Method One
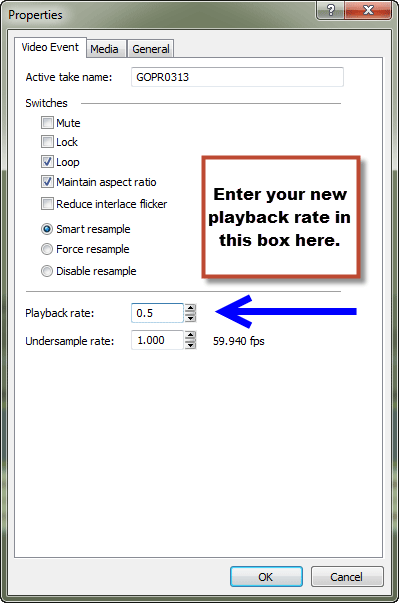
You can manually change the playback speed within the Video Event Properties box for the video. This method is the quickest way to slow down your video very accurately, each and every time.
Here is a quick reference speed conversion chart you can use. Find the original frame rate in the left column that matches your source video. Then enter the playback speed rate from the right column into the Playback Rate box.
Method One can be used in both Vegas Pro and Movie Studio.
Speed Conversion Chart
 Original Video New Video Playback
Frame Rate Frame Rate Rate
30 fps → 24 fps = 0.80
30 fps → 25 fps = 0.83
50 fps → 25 fps = 0.50
60 fps → 30 fps = 0.50
50 fps → 24 fps = 0.48
60 fps → 24 fps = 0.40
100 fps → 25 fps = 0.25
120 fps → 24 fps = 0.20
120 fps → 30 fps = 0.25
200 fps → 25 fps = 0.125*
240 fps → 30 fps = 0.125*
*Please Note
Since making this tutorial, I have discovered that Vegas can only be slowed down to a minimum of 0.250 Speed. If you need to slow any video down below this value, like 0.125, you will need to do a TWO STEP process.
Slow it down to the limit of 0.250 first and then render your video to 60fps. Then drop this new video back into Vegas and slow it down to 0.5 speed. When this gets rendered a 2nd time, it should be equivalent to 1/8th speed.
Method Two
The second method involves holding down the CTRL button on your keyboard and then hovering and holding down your mouse pointer on the right edge of your video in the timeline, and then dragging the video to the right to slow it down. If you want to speed it up, just drag to the left instead.
When you hover the mouse pointer on the right edge of your video, the icon will change to a box with a two way arrow and squiggly line underneath.
A percentage speed box should appear in the Audio Layer for the video, once you have slowed it down. If the information box does not show, then go into View in the top toolbar and turn Active Take Information ON.
Method Two can be used in both Vegas Pro and Movie Studio.

Method Three
The third method can only be done in Sony Vegas Pro only. Vegas Pro has a powerful tool called a Velocity Envelope, which gives you the ability to vary the video playback speed continuously over time. By adding keyframe points along the Envelope, you can set the playback rate to change from point to point. You can even set the nature of the curve between each keyframe point, which means you can change the degree of accleration bewteen each point.
To activate the Velocity Envelope tool in Sony Vegas Pro, simply right-click on your video in the timline and go to Insert/Remove Envelope - Velocity.

How to create a High Quality Render of your Slow Motion Project
To create a really high quality render of your project, you can turn ON Two Pass rendering.
If you go to Render As and select Mainconcept AVC/AAC .mp4 and then select one of the sub-templates like Internet HD 1080p, then press Customize to access full settings.
Now go to the Video tab and turn Two Pass rendering ON.
Two pass rendering does exactly what it sounds like. It renders your video once like normal and then goes back for a 2nd pass to create a finer detailed render.
Buy the latest version of Vegas Pro here !


About Derek Moran
Derek Moran is the author of all articles on Movie Studio Zen.
You can find me on YouTube, Facebook, Twitter, Read more about Derek...
