
Solved Working with mixed video formats

When I try to render videos in Movie Studio in the same resolution (720 * 576), the final video contains a small black bar on the top and on the bottom of the screen. If the video contains a sidebar (an image with text and graphics on it) with the video squeezed in to the right of it (using track motion), the sidebar is slightly stretched out, covering a tiny portion of the video beside it. The first attachment shows an example of how the video looks like during editing, and how it should look like after rendering. The second attachment shows how the video actually looks like after rendering, with the differences highlighted.
I suspect that there are some settings that I have overlooked or not understood fully. The videos I use in my projects come in two frame sizes. The intro that I use for my videos is 720 * 576. The main video in the project is 320 * 240. Full screen images are at 1280 * 720. Is there a solution to this problem? Are there any special settings I need to use for working with media with different frame sizes?
.jpg)
.jpg)
Please Log in or Create an account to join the conversation.
I have been very busy so that's why it took a while to reply.
If most of your source videos are very low resolution, it would be best if you used YouTube's 480p settings.
You could try 720p as well, but I think 480p would be better.
Because most of your source video is also using 4:3 aspect ratio and not 16:9 widescreen, you need to be very careful when import videos and setting the Project Properties. Here is what I advise you try.
1. Open the Project Properties and set everything exactly the same as this.
This is the exact same settings YouTube uses for all 480p videos. These settings are for widescreen, but that's OK, because any 4:3 videos should fit nicely inside the wide frame and not end up with black bars at the top and bottom. I looked at your last video and it was using 25fps, so that is why I used 25fps. You need to use the same frame rate your original videos used.

2. This is the MOST important thing to be careful of.
Because you are going to use Custom Settings, you need to make sure Movie Studio DOES NOT un-do what you just did in the Project Properties.
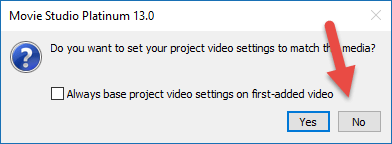
So when you import the first video onto the timeline, make sure you DON'T say Yes to this question - always so no.
Normally when working with 1080p videos, you would say yes, but in your special case you need to say no.
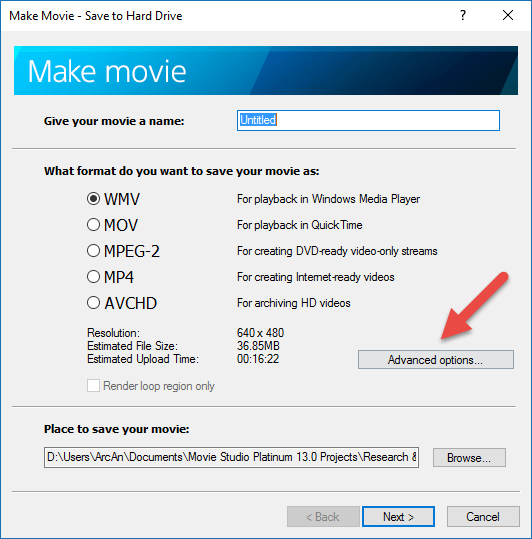
3. When it is time to render/export (Make Movie) the project, you need to go into Advanced Settings every time.
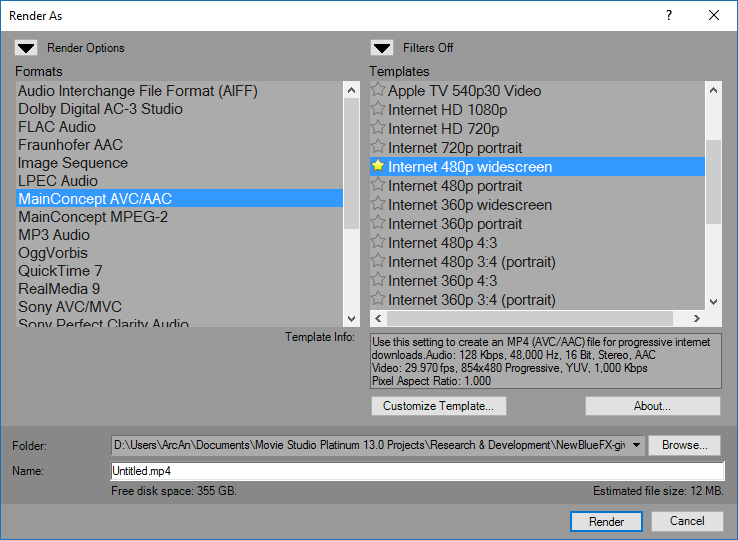
4. Select Mainconcept AVC/AAC .mp4 and Internet 480p Widescreen.
Then press Customize Template.
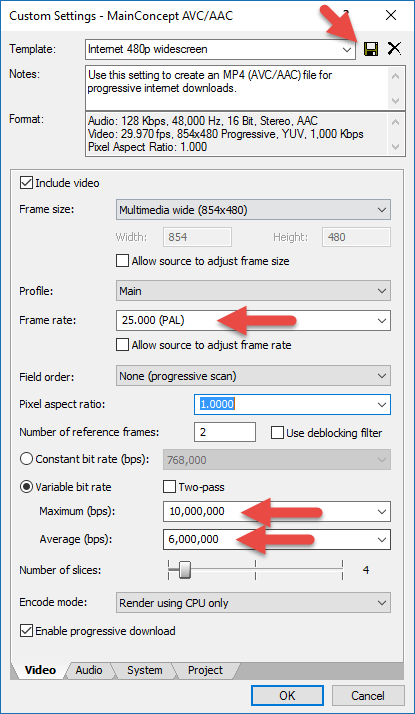
5. Make sure to set the Frame Rate to be the same as your videos and what you used in the Project Properties.
Change the Bit Rates to what I have shown for better quality video.
You can SAVE a Custom Template at the top for next time.
Press OK.
Make sure to check the Folder location is set correctly before you start the render.
Now you are ready to go.
Let me know how you go and send a link to your next YouTube video that uses these settings, so I can have a look.
You could also use 1280x720 settings is you want to try that as well.
Just change 854x480 to 1280x720.
When it is time to render, use the 720p template.
Regards
Derek
")
Unplugging is the best way to find solutions to your problems. If you would like to share some love, post a customer testimonial or make a donation.
Please Log in or Create an account to join the conversation.
With these settings, it looks like I no longer have to squeeze the video together to fit it into the frame whenever I have a sidebar next to it, like I had to do with Pinnacle Studio. I just have to shift the sidebar and the video to the left/right to fit them neatly next to each other.
Can I modify the project settings on existing projects so that they use the settings you recommended, or do I have to start with a brand new project? I feel like it's safer to ditch the old projects and start over again with a new one. And what about the match media settings function? Should I avoid using it, now that I have these custom project settings?
I still have some more testing and tweaking to do, and the next days are busy days for me, so I'll post a link to the finished video when I get that done.
Please Log in or Create an account to join the conversation.
Yes you can try to modify, however starting fresh is probably a safer idea.Can I modify the project settings on existing projects so that they use the settings you recommended
The main problem with changing the project properties after a project has been created, is if you have added any Text Media events. The frame size of these will not automatically change to the new settings and has to be done manually. If you screw this up, Text can end up looking awful.
Don't use it, if you are mixing different video frame sizes that are smaller than 854 x 480 pixels.And what about the match media settings function?
If on the other hand you started working with normal 1280x720p or 1920x1080p video, then you could use Match Media.
Unplugging is the best way to find solutions to your problems. If you would like to share some love, post a customer testimonial or make a donation.
Please Log in or Create an account to join the conversation.
Video link.
Please Log in or Create an account to join the conversation.

Unplugging is the best way to find solutions to your problems. If you would like to share some love, post a customer testimonial or make a donation.
Please Log in or Create an account to join the conversation.
To make things a bit more clear, here's my current workflow from recording to the finished product:
1. Recording videos in Nintendo DS emulator. Records in AVI format (compression is Microsoft Video 1).
2. Processing videos with VirtualDub. Still in AVI format with frame size 256 * 192.
3. Converting videos from AVI to WMV with Movie Maker. Now with frame size 320 * 240.
4. Editing and rendering videos with Movie Studio. Ends up in mP4 format with frame size 854 * 480.
When the videos are converted from AVI to WMV, the quality is slightly reduced and pixelation can also occur from time to time. This is really a minor inconvenience, but I would like to get around this issue if possible.
As I've mentioned, I would like to skip item nr. 3 in my workflow. Any thoughts on this? Can I still use the project and rendering settings you suggested?
Please Log in or Create an account to join the conversation.
It's about the worst video format you could have chosen to edit with, because it is a final video format.
I have no idea what Nintendo DS emulator is, but I do know what a Nintendo is.
If you are screen recording videos games being played on a computer, I think it would be better if you used Open Broadcaster Software to capture the video, which records to .mp4 format and can be imported directly into Movie Studio for editing. This is what I use to record all my tutorials now and it is becoming increasingly popular with gamers. It is very technical to set up for the first time, but once set it is easy to use and extremely powerful.
Hitfilm just uploaded a video about this today.
I will be making my own tutorial about how I use it, in the next couple of weeks.
Unplugging is the best way to find solutions to your problems. If you would like to share some love, post a customer testimonial or make a donation.
Please Log in or Create an account to join the conversation.
I have no idea what Nintendo DS emulator is, but I do know what a Nintendo is.
A video game console emulator is a computer program designed to emulate the hardware and behaviour of a video game console. For example, a Nintendo DS emulator will allow you to play Nintendo DS games on your computer. Most emulators have the ability to record gameplay video, and more often than not these emulators record in the AVI format. Screen capture is something I never use, because when I record, I frequently switch between different windows in my computer. By recording directly through the emulator, I can for example switch between the emulator and a word document or my web browser without interrupting the recording or capturing something I don't want.
Converting to WMV is a terrible idea, so stop doing that.
It's about the worst video format you could have chosen to edit with, because it is a final video format.
So it will work out fine to edit with the AVI format, and render the final video to the mP4 format without changing any settings?
Please Log in or Create an account to join the conversation.
I've never heard of anyone doing that before. This is something that could be better done after your have recorded your gameplay, when you are editing all the footage in Movie Studio.
I still highly recommend using OBS software, which does have the ability to set up different recording modes that you can switch to during screen capture.
Yes you can edit with Video for Windows .avi, however the file sizes will be absolutely massive, because this is an un-compressed format.
Many years ago I stuffed around with trying to screen capture to Microsoft Video 1 and just drove myself around in circles. Thankfully today, there is a huge range of screen recording devices and software programs, that use very good formats for screen capture, like OBS.
Unplugging is the best way to find solutions to your problems. If you would like to share some love, post a customer testimonial or make a donation.
Please Log in or Create an account to join the conversation.
Forum Access
- Not Allowed: to create new topic.
- Not Allowed: to reply.
- Not Allowed: to edit your message.
