Using Sony Movie Studio Platinum 13, I show how to prepare and render 1080p HD video for YouTube.
Learning how to render your video projects is ultimately the most important step in any project. If you can't create a high quality video at the end of editing a project, it can be very disappointing. So now I will take you through all the steps from beginning to end with no step skipped. Please note that the templates I am about to show you, are not limited to just making YouTube or Facebook videos. The output is very good quality and can also be used for playback on your home computer or TV.
Update 2016 - Working with High Frame Rate 50p or 60p Video
If you are working with high frame rate video like 50p or 60p, please read and watch this alternate tutorial.
How to Render 50p & 60p Video using Sony Movie Studio Platinum
If you are using normal Frame Rate video like 24p, 25p and 30p, please continue with the tutorial below.
Step 1: Using the New Project Wizard
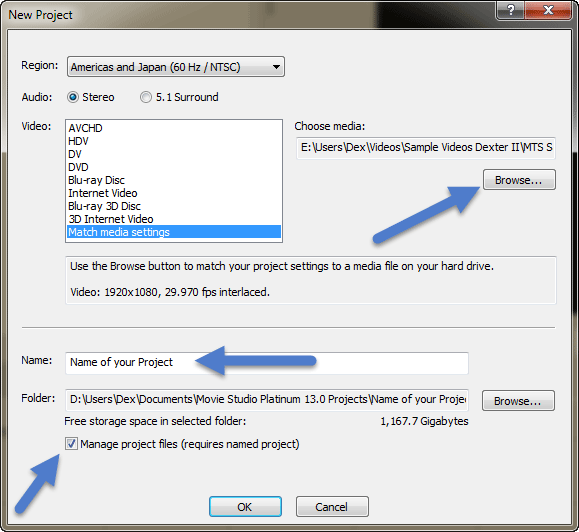
Sony Movie Studio Platinum 13 includes a New Project Wizard which makes it very easy to get started with a new project. It includes all the major templates for different project output types. I have tried many different templates over the years, but the one I prefer to use almost every time is the Match Media Settings. This gives the best results almost every time, so that's what I am going to teach you right now.
- Select Match Media Settings.
- Press Browse and look for the main video you would like to use for your New Project - select it.
- Name your project.
- CHECK Manage Project Files.
Steps 3 & 4, will make sure you have a proper folder structure for your project to live in. This comes in very handy in the future, when you are looking for older projects and trying to find your videos.
Step 2: Importing your media files
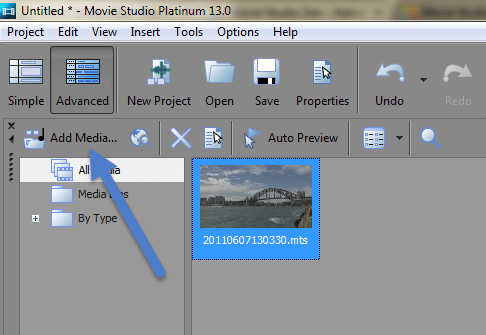
Press Add Media to import your videos, still images and audio files.
Step 3: Creating Video Proxy Files
This is a brand new feature in Movie Studio Platinum 13 and a much sort after tool. The number one problem that everyone experiences from time to time when video editing, is lag in the preview window. The more complex a project becomes, with more and more layers and Video Fx, the more your CPU has a hard time in playing back everything in real time.
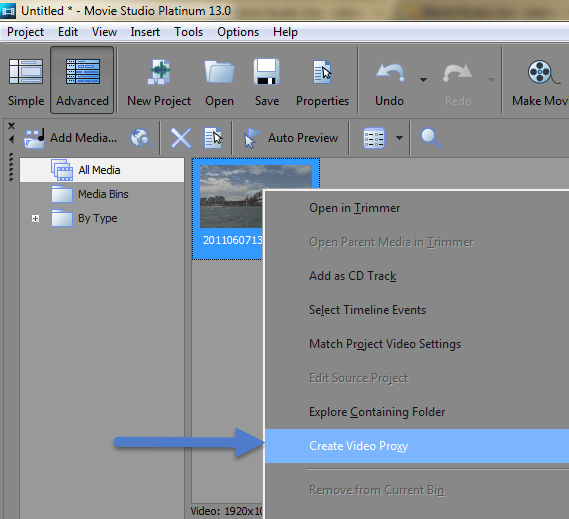
Create Video Proxy files for any large HD videos that may be in your project. This is an optional step that will make all your video files play back much more smoothly in the Preview Window.
Right-click each video file that needs to be converted and select Create Video Proxy. You can select more than one video at a time and just press the button once. Please note that the program will intelligently use the Proxy Versions during editing only. When it comes time to do the final render (Make Movie), Movie Studio will go back to using the original HD versions automatically.
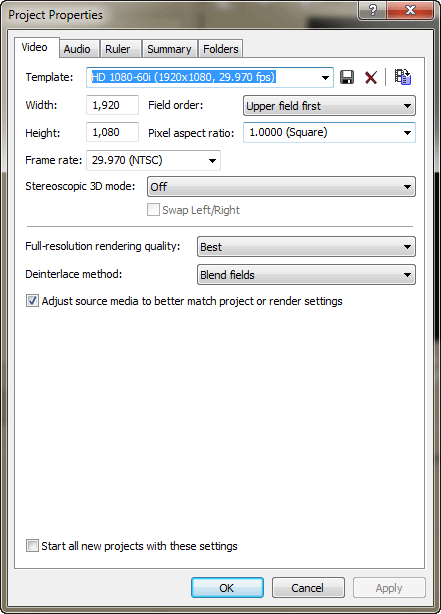
Step 4: Check your Project Property settings.
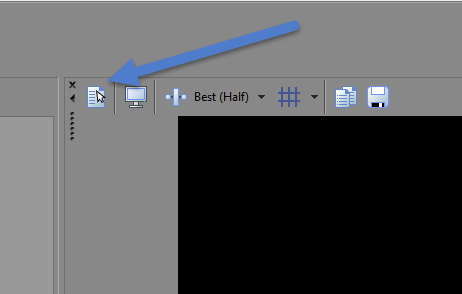
1. Press this icon here to access Project Properties window.
2. In the Video tab, make sure you set the Full Resolution Rendering Quality = BEST
3. Also go to the Audio tab and set Resample and Stretch Quality = BEST
This is the window that now shows the results from the New Project Wizard settings.
Step 5: Make Movie
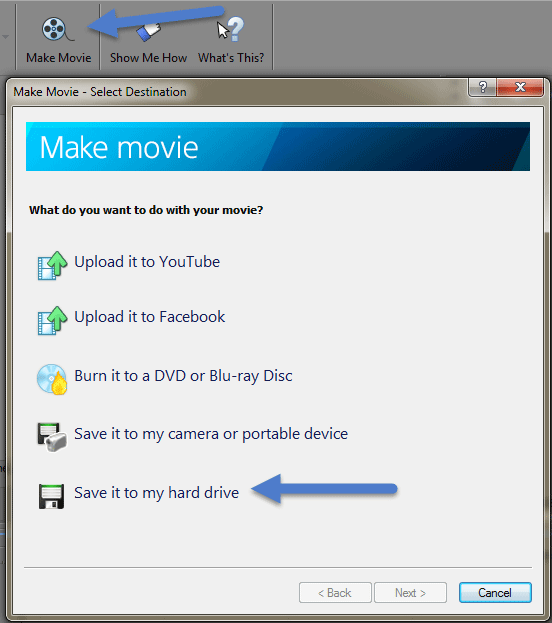
In all older versions of Movie Studio, there use to be a Render As and Make Movie functions. In Movie Studio Platinum 13, the Render As button has been removed and replaced with only the Make Movie button. Make Movie and Render As are the same thing.
Press Make Movie and then make your selection from the 5 choices. For this tutorial, I would like you to select "Save it to my Hard Drive". This is the best option for rendering a new video from your project. In the video tutorial that is at the bottom of this article, I explain why I don't like to use the Upload to YouTube option.
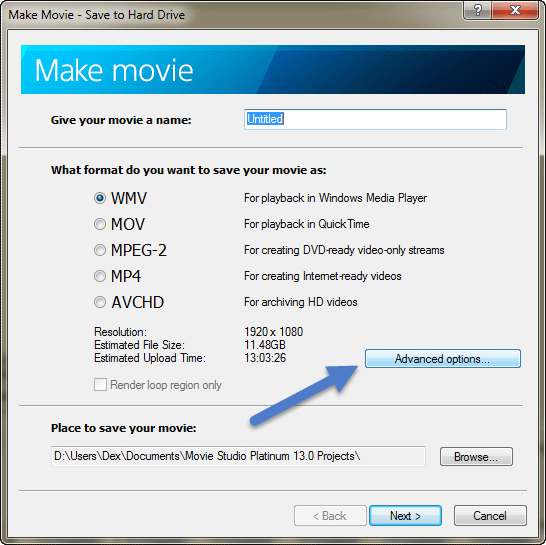
Step 6: Make Movie - Save to Hard Drive
Please do not bother trying to use any of the very simple options on this screen. Go straight to the Advanced Options for access to the entire Candy Store of Options.
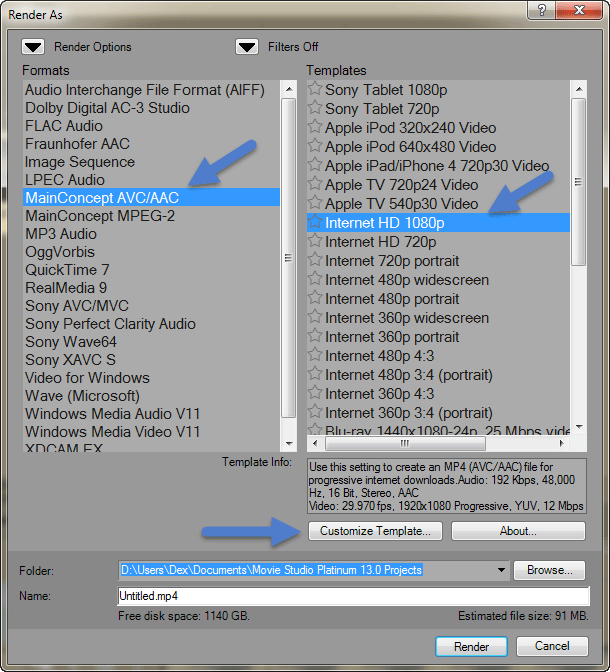
Step 7: Render As window
Select Mainconcept AVC/AAC from list of Formats, then Internet HD 1080p from Templates list.
Then select Customize Template.
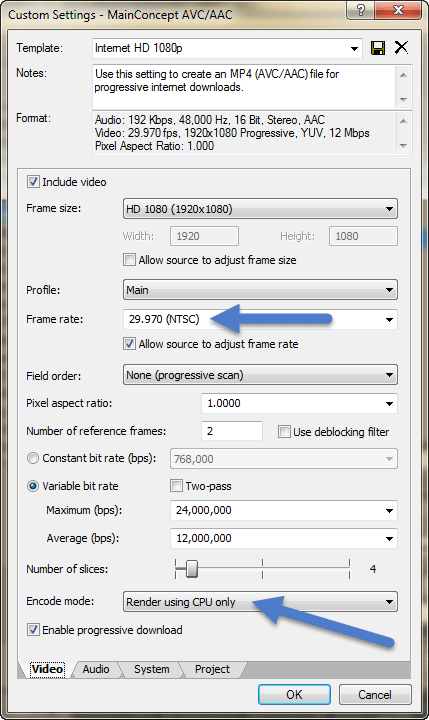
Step 8: Video Settings tab
1. Make sure to set the Frame Rate to Match your Project Property settings.
Generally speaking, anyone from North America will be using 29.97fps. Countries and regions like Australia, UK, Europe and Asia, use 25 fps.
2. Set your Encode Mode. This setting will require you to do some degree of experimentation, to find out which encode mode works best for your computer. Encode Mode is influenced directly by the hardware configuration of each person's computer. In the video tutorial I explain more detail about this.
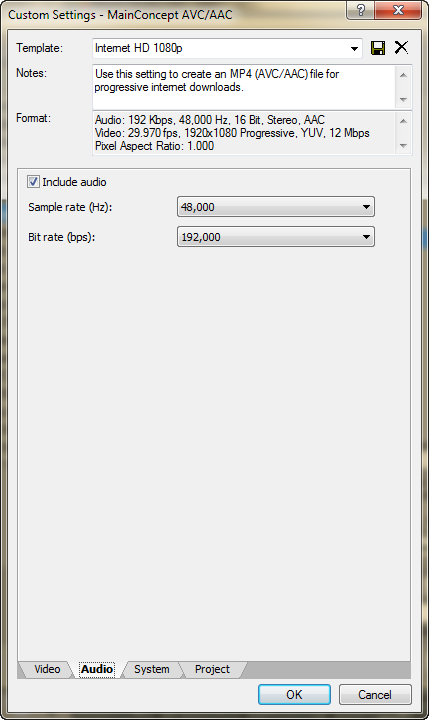
Step 9: Audio Settings tab
The default setting is pretty good for a normal video and probably does not need changing.
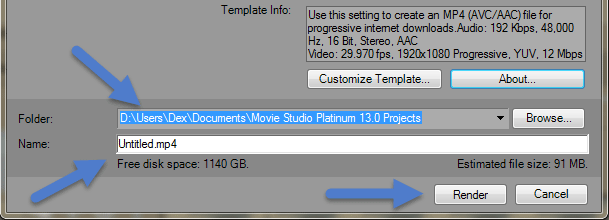
Step 10: Start Rendering (Making Movie)
Press OK and then check the Output Folder address, to make sure your new video is saved to the correct folder.
Also check that the name of your new video to be is correct.
Then finally press RENDER !

About Derek Moran
Derek Moran is the author of all articles on Movie Studio Zen.
You can find me on YouTube, Facebook, Twitter, Read more about Derek...

