Using HandBrake/x264 to encode a video, could result in better picture quality and smaller file sizes, compared to encoding the same video in Vegas Pro using Magix AVC, MainConcept AVC or Sony AVC.
I often get asked about how to render video from Vegas Pro into Handbrake. For many years, the gurus and power geeks of the Vegas Pro community, have known the secret of how to frame-serve output from Vegas Pro directly into Handbrake and use the Handbrake x264 encoder to render their projects instead of using one of the included Vegas Pro encoders. I will admit that I resisted trying this approach for a long time, because reports on various Vegas Pro forums, seemed to suggest that setting up this workflow was complicated and sometimes problematic. In hindsight I should have experimented with this rendering technique a long time ago, because it can definitely help render better quality video in particular circumstances.
IMPORTANT UPDATE! It appears that an update to Vegas Pro 18 has broken the process, which means it no longer works with Vegas Pro 18.
Alternate solution! If you can't get this complicated process to work in your version of Vegas Pro, I recommend you try a much easier option which uses a new plugin called Voukoder.
This alternate method means you will not be using Handbrake to render your video, but instead use Voukoder. Voukoder uses the same H.264 encoder that Handbrake does and offers similar custom settings.
https://www.voukoder.org/
You will need to download Voukoder 7.2 and the Vegas Pro connector - 2 downloads.
Open Vegas and go to Render As and select Voukoder and the first Audio template.
Then press Customize template and Show Voukoder dialog.
It can take a few seconds to open up and then you can make all your settings.
Personally I think this is the BEST option now, instead of what I showed in this tutorial.
Topics covered in this Vegas-to-Handbrake tutorial
Origins and Developers of the Vegas-to-Handbrake technique
What is Handbrake and why Render Video with it ?
Can you render video directly from Vegas Movie Studio Platinum to Handbrake ?
What is Frame Serving ?
Preparation and Warning before you start - please read!
Instructions for Vegas Pro to Handbrake Video Rendering
Special Note about Virus Scanners and .exe files inside of Folder
How to use Vegas-to-HandBrake in Vegas Pro
Origins and Developers of the Vegas-to-Handbrake technique
 I cannot take credit for most of the information in this tutorial. Much smarter people than myself, have provided instructions on how to setup frame-serving from Vegas Pro into Handbrake. However the instructions for how to do this, are spread out on various websites and forums and to my knowledge, no one has written an updated instruction set that works correctly in the latest versions of Vegas Pro, like Vegas Pro 14 and 15.
The best tutorial that existed for this technique was originally created by www.vegasvideo.de, however this website has since shut down. Some parts of this new Movie Studio Zen version have been copied directly from the original web page and from new information posted by Marco and Nick on the official Vegas Pro forums. I thank both people for sharing their knowledge on how to setup the Vegas-to-Handbrake workflow.
What is Handbrake and why Render Video with it ?
HandBrake is a free open-source video transcoder for converting video from nearly any format to a selection of modern, widely supported codecs. The advantage of using Handbrake, is that it has many advanced settings that can be customised for specific types of video environments. Having access to these advanced settings for transcoding video, gives you the ability to export superior quality video with smaller file sizes - this is basically the Holy Grail of video encoding.
Handbrake is well known and respected in the Vegas community, as a top shelf video converter. It also offers superior deinterlacing and scaling using Lanczos 3.
To involve HandBrake, usually you would render a very high quality intermediate from Vegas Pro. An intermediate video is typically extremely large in file size, because it is not compressed like a final delivery version of your project should be.
You would then import this intermediate into HandBrake to start the AVC encoding. Unfortunately this introduces a certain amount of additional render time and needs large amounts of hard drive storage space, before you could even start the encoding within HandBrake. It's a laborious process which takes even more time if you need to make corrections to your original Vegas Pro project.
Instead of rendering your video twice (first in Vegas Pro and second in Handbrake), you can use a process called frame-serving to send the output from Vegas directly into Handbrake for encoding to a final delivery format, ready for upload to YouTube or where ever it will be viewed.
Can you render video directly from Vegas Movie Studio Platinum to Handbrake ?
The technique taught in this tutorial, will only work in Vegas Pro. You cannot frame-serve video directly from Vegas Movie Studio Platinum to Handbrake, because VMSP does not have a Script function like Vegas Pro does.
However, you can render video from Vegas Movie Studio Platinum with Handbrake, by doing a double render.
You will first have to render to a high quality intermediate format like Avid DNxHD and then manually import your video into Handbrake and do a second render.
I have created two unique tutorials specifically for Vegas Movie Studio Platinum users, which show the best ways for exporting a high quality "intermediate" video, ready for a 2nd encode with Handbrake.
How to render Avid DNxHD video from Vegas Pro and Vegas Movie Studio
How to Render Video from Vegas Movie Studio Platinum to Handbrake
What is Frame Serving ?
Frame-serving is a process by which you directly transfer video data from one program on your computer to another. No intermediate or temporary files are created. The program that opens the source file(s) and outputs the video data is called the frameserver.
The original method of rendering video with Handbrake from Vegas Pro, was developed by www.vegasvideo.de - their method automates all the annoying steps, replacing them by a single mouse-click. At the same time rendering an intermediate is replaced by using frameserving. It's just like you would use HandBrake as a plug-in in Vegas Pro.
Preparation and Warning before you start - please read!
To follow is the Movie Studio Zen recipe for how to frame-serve Vegas Pro output into Handbrake and use the x264 encoder to render your projects. This is an Advanced tutorial and requires patience and precision to setup correctly. No steps will be skipped in this guide!
This workflow was successfully tested with (Sony) Vegas Pro 13, (Magix) Vegas Pro 14 and 15 on Windows 10 (64 bit) version 1809 (OS build 17134.81).
You will need to install Handbrake, DebugMode FrameServer, AviSynth, Pismo File Mount and AVFS, and two scripts need to be copied to the Vegas Pro Script Menu folder and a certain folder containing some batch and .exe files need to get moved to the main partition C:\. Links to all these files and tools will be available in the article below.
The initial installation and configuration will take at least 20 minutes. Keep in mind that you only have to set this workflow up once and the automation offered afterward, will save you a lot more time in the future.
Please note that Movie Studio Zen is not responsible for any problems you may experience, with the software required to make this tutorial work. To proceed with this tutorial, you do so at your own risk. I always recommend users take a backup of their computer and create a Windows Restore Point, before installing new software and scripts. In the unlikely case that something goes wrong, you will be able to restore your computer back to full health. During my own testing of this workflow, I experienced no problems or errors after installing all of the required programs and files.
Instructions for Vegas Pro to Handbrake Video Rendering
Step 1 - Install Handbrake
Download and install Handbrake.
Please note!
For this tutorial to work, you must install Handbrake on your C-Drive and also have Vegas installed on your C-Drive. If you have either program installed on your D-Drive, you will have to manually edit different files for the process to work correctly. To keep things simple, all my instructions assume you are installing the necessary programs on your C-Drive only!
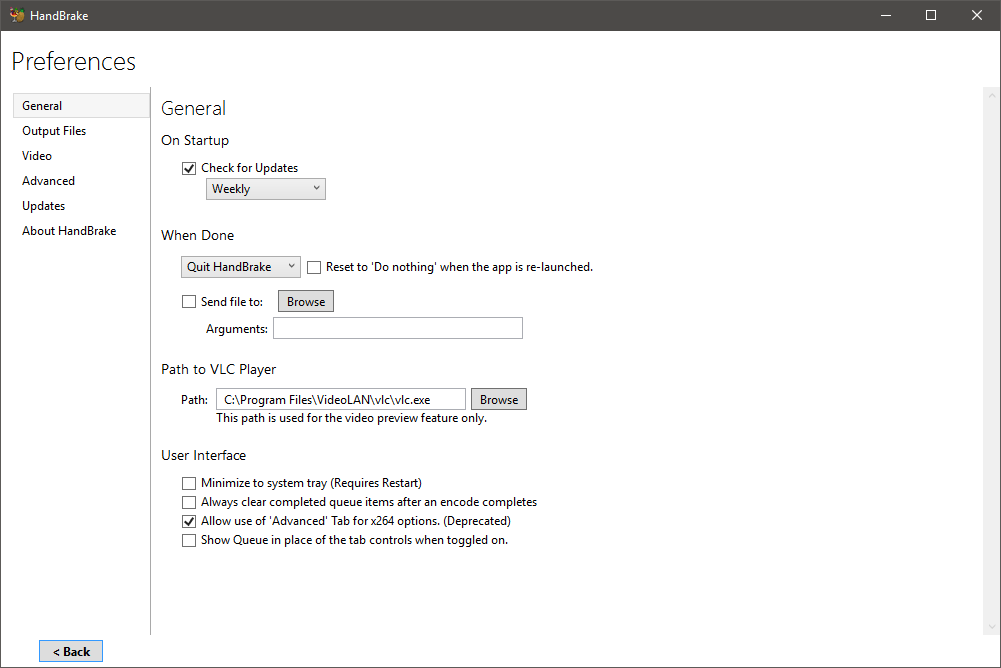
Step 2 - Configure Handbrake Preference Settings
- Start HandBrake and go to menu Tools/Preferences.
- Go to menu item General and set When done = Quit HandBrake.
- Go to menu item Output Files and set Automatic File Naming = Automatically name output files.
- At Default path press Browse and select the output folder location for your video renders.
- At File Format predefine a desired file name for your output file. Leaving the default at {source}-{title} is OK for most people.
- At MP4 File Extension select Always use MP4.
- Quit HandBrake. This saves the preferences made.

Step 3 - Customizing Handbrake Settings
Beginners Guide for how to use Handbrake
If you would now like to render your final delivery video using Handbrake, I recommend you read and watch my detailed beginners guide for how to use Handbrake here:
How to use Handbrake 1.1.1 - Beginners Guide for Exporting Video
There is an online instruction manual for the use of HandBrake at HandBrake.fr.
There are lots of other detailed descriptions of HandBrake adjustments, just like the ones at mattgadient.com.
Step 4 - Install DebugMode FrameServer
UPDATE August 2021: Since writing this tutorial, DebugMode Frameserver version 4.0 has now been released. If you already have versions 2.15, 3.0 or 3.1 installed and would like to update to the new version 4.0, you need to first un-install the older version, then install v4.0 and make sure to follow the instructions below precisely!
There are now three different versions of DebugMode FrameServer available, as of August 2021. The older versions were all free, but the newest version is now a paid product and costs $24.95 ($US). Version 4 contains some bug fixes, so it really is the best version to use now.
Version 4.0 is now 64-bit and works with Vegas Pro 13, 14, 15, 16, 17, 18 or 19.
Download v4.0 here
Version 3.1 is compatible with Vegas Pro 13, 14, 15, 16, 17 or 18.![]() Download v3.1 here (right-click and select Save As)164.14 KB
Download v3.1 here (right-click and select Save As)164.14 KB
Version 3.0 is compatible with Vegas Pro 13, 14, 15, 16, 17 or 18.![]() Download v3.0 here (right-click and select Save As)135.03 KB
Download v3.0 here (right-click and select Save As)135.03 KB
Version 2.14 is compatible with Vegas Pro 12 or older.![]() Download v2.14 here (right-click and select Save As)202.39 KB
Download v2.14 here (right-click and select Save As)202.39 KB
Before you install DebugMode FrameServer, please read the following instructions very carefully.
Vegas Pro 12 or older
Install version 2.14 with no modifications
Vegas Pro 13, 14, 15, 16, 17 or 18
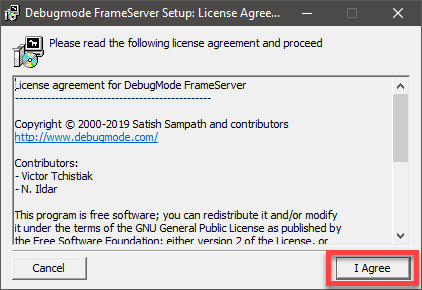
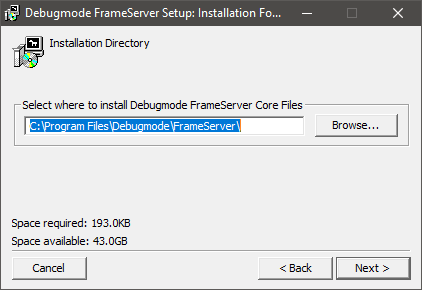
When you begin the installation of DebugMode Frameserver 3.1, go very slowly and make sure to use the same settings shown in the screen shots below. Proceed slowly through each window during the installation process, until you reach the Installation Directory window for Magix Vegas Plugin.
If you only use Vegas Pro, only select one of the Magix Vegas Plugin options.
If you also use Adobe Premier Pro, you may like to install the Frameserver plugin for Premier as well.
In the new version of DebugMode FrameServer 3.1, there are now 2x different options, depending on which version of Vegas Pro you are using. If you are using Vegas Pro 17, 16, 15, 14 or 13, select Magix Vegas Plugin - upto Vegas 17.

If you are using Vegas Pro 18, select Magix Vegas Plugin - from Vegas 18.

Install Debugmode Frameserver in the default directory - you do not need to change anything here.
STOP !!!
In the final installation window, you need to install the FrameServer Plugin into the version of Vegas Pro you are currently using.
If you have more than one version of Vegas Pro installed, you will have to manually select which version you want FrameServer to use.

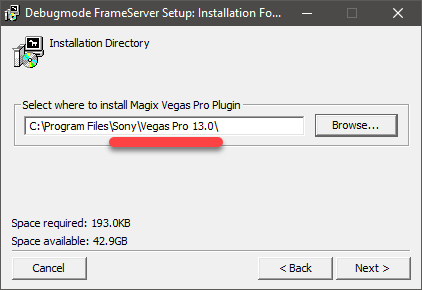
Vegas Pro 13 instructions & modifications for last window of installer
For Vegas Pro 13 users, change the installation directory for Magix Vegas Pro Plugin to
C:\Program Files\Sony\Vegas Pro 13.0
Vegas Pro 14 instructions & modifications for last window of installer
For Vegas Pro 14 users, change the installation directory for Magix Vegas Pro Plugin to
C:\Program Files\Vegas\Vegas Pro 14.0

Vegas Pro 15 instructions & modifications for last window of installer
For Vegas Pro 15 users, change the installation directory for Magix Vegas Pro Plugin to
C:\Program Files\Vegas\Vegas Pro 15.0

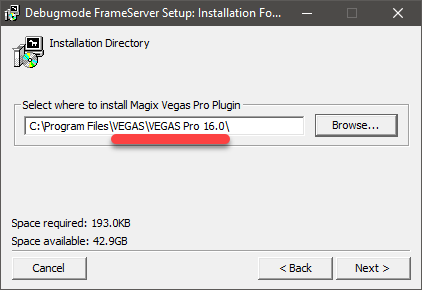
Vegas Pro 16 instructions & modifications for last window of installer
For Vegas Pro 16 users, change the installation directory for Magix Vegas Pro Plugin to
C:\Program Files\Vegas\Vegas Pro 16.0
Vegas Pro 17 instructions & modifications for last window of installer
For Vegas Pro 17 users, change the installation directory for Magix Vegas Pro Plugin to
C:\Program Files\Vegas\Vegas Pro 17.0

Vegas Pro 18 instructions & modifications for last window of installer
For Vegas Pro 18 users, change the installation directory for Magix Vegas Pro Plugin to
C:\Program Files\Vegas\Vegas Pro 18.0

Step 5 - Configuring Preferences for DebugMode FrameServer
After FrameServer is installed, start Vegas Pro and import a video into the timeline.
Go to File / Render As.
Select DebugMode FrameServer as the Format and Audio: 48.0Khz, Video: project default as the Template.
I recommend you ONLY use the Audio 48.0Khz option in the templates, since this is the default sample rate for most videos in the universe. The older versions of DebugMode FrameServer only had 44.1Khz listed as an output option, which is not suitable for video output and normally used for audio CDs only.

Press the Render button to open the FrameServer window.

Set Video Output = RGB32
Select Write Audio as PCM samples in Signpost AVI
Press Next, to start frameserving and after a short while press Stop to quit frameserving again.

Finally you can quit Vegas Pro. This saves the preferences made to DebugMode's FrameServer.
Step 6 - Install AviSynth
Download and install AviSynth_260.exe
Press green download button to download file.
Begin installation of program and when you get to the Choose Components window,
set Select the type of install = Standard.

Step 7 - Install Pismo File Mount Audit Package
Go to Pismotec.com and locate Pismo File Mount Audit Package at top of page.
Select Download Windows Install Package 4MiB
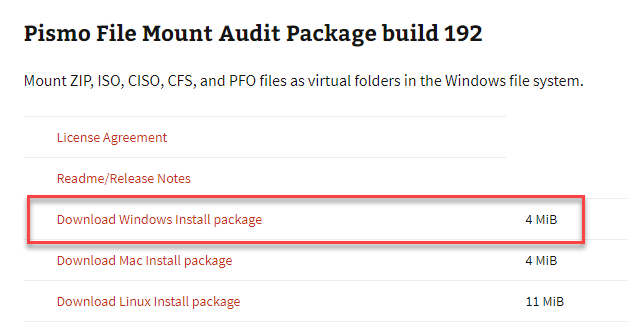
Double click this file to begin installation: pfmap-192-win.exe
Step 8 - Download FrameServer Scripts
Update - November 2019: Please note that if you have just watched the video tutorial on YouTube, I have now simplified Step 8 and Step 10, and have already edited the Frame Server script files, so that they now work without having to do any manual edits! All you have to do is download the zip file below and install using the instructions at Step 9.
The original scripts were created by www.vegasvideo.de. As I mentioned at the start of this article, the original website that created the first Vegas to Handbrake tutorial, no longer exists. I saved a carbon copy of the original file, then edited it slightly so that it works with the latest versions of Vegas Pro and have uploaded it to the Movie Studio Zen server.
Update - Please select correct version of Frameserver Scripts that works with your version of Vegas Pro!!!
Download this zip file for use with Vegas Pro 13: ![]() fs2hb_en_05_v3.1_48KHz-only_vp13-only.zip1.08 MB
fs2hb_en_05_v3.1_48KHz-only_vp13-only.zip1.08 MB
Download this zip file for use with Vegas Pro 14, 15, 16, 17 or 18: ![]() fs2hb_en_05_v3.1_48KHz-only_vp14-18.zip1.08 MB
fs2hb_en_05_v3.1_48KHz-only_vp14-18.zip1.08 MB
To un-zip downloaded file, right-click and select Extract All...
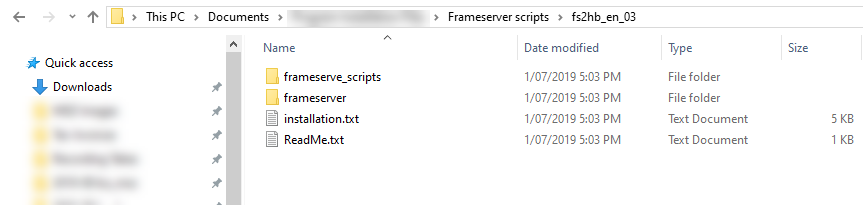
Inside the folder you will find 2 folders and 2 text files.
frameserve_scripts
frameserver
installation.txt
ReadMe.txt
Step 9 - How to Install the Frameserver Scripts
Step 9.1 - Move folder "frameserve_scripts" into folder "Script Menu"
From Step 8, you need to move the folder frameserve_scripts into a folder called Script Menu, which will be located inside of your Vegas Pro program files. It will probably be easier if you open 2 different windows, so you can drag the folder from the original location into the Vegas Pro location.
Vegas Pro 13 users move folder frameserve_scripts into this folder here:
C:\Program Files\Sony\Vegas Pro 13.0\Script Menu\
Vegas Pro 14 users move folder frameserve_scripts into this folder here:
C:\Program Files\Vegas\Vegas Pro 14.0\Script Menu\
Vegas Pro 15 users move folder frameserve_scripts into this folder here:
C:\Program Files\Vegas\Vegas Pro 15.0\Script Menu\
Vegas Pro 16 users move folder frameserve_scripts into this folder here:
C:\Program Files\Vegas\Vegas Pro 16.0\Script Menu\
Vegas Pro 17 users move folder frameserve_scripts into this folder here:
C:\Program Files\Vegas\Vegas Pro 17.0\Script Menu\
Vegas Pro 18 users move folder frameserve_scripts into this folder here:
C:\Program Files\Vegas\Vegas Pro 18.0\Script Menu\
Step 9.2 - Move folder frameserver into C:\
Next move the folder frameserver from Step 8 into the main partition C:\ of your computer.
This is critical because all the scripts and batch files used in this process refer to this path.
In this folder there also is AVFS, a virtual file system for AviSynth. AVFS - Avisynth Virtual File System

Progressive vs Interlaced Video
The given workflow is based on using progressive video only. If you use interlaced video only and your Vegas Pro project properties are set to interlaced video, you need to modify the AviSynth script used. If you use interlaced video, open the file "vegas.avs" (path C:\frameserver) using Windows Notepad, delete the line "Assume FrameBased ()" and save the modified file anew.
Step 10 - Adding Script Shortcuts to Vegas Pro
Now open Vegas Pro and refresh the script menu.
Go to Tools / Scripting and select Rescan Script Menu Folder.
You will now see your new script installed here:

If you would like to add Shortcuts to your Vegas Pro Toolbar, do this:
Open menu Options / Customize Toolbar
In the left pane of the Customize Toolbar window, select the script Send2HandBrake and press Add button.
In the left pane of the Customize Toolbar window, select the script unmount and press Add button.
Now quit Vegas Pro.


Special Note about Virus Scanners and .exe files inside of Folder
This warning is from the original documentation posted on www.vegasvideo.de. I have not experienced any problems with virus scanners on my own computer, but thought I should include this info, just in case you experience this problem. Inside the folder located here C:\frameserver\batch you will find enter.exe and stop_render.exe.
Maybe a virus scanner like Avast will scan the files enter.exe and stop_render.exe each time you'll start this process. This would delay some important processes and bug the timing of the automation so it could no longer work correctly. If this happens you either need to stop frameserving manually and then in Vegas Pro click the script icon "unmount". Or you need to start the file "unmount.bat" (path: C:\frameserver\batch) to quit still running background automation processes.
Maybe you'd better let both files "enter.exe" and "stop_render.exe" (path: "frameserver/batch") scan once manually by your virus scanner and then define an exception for these two files to prevent re-scanning again and again.
Important: False positives from Virus Protection programs - please don't worry!
Some users have reported that their Anti-Virus software reports that enter.exe and stop_render.exe files contained a Trojan virus. There is definitely no Trojan viruses hiding in the two tiny .exe files needed in this tutorial. Recently one Vegas user submitted the .exe files to Symnatec (Norton), because they were being flagged as unsafe. Symantec reported back that the two .exe files are indeed safe and that the anti-virus program had accidentally reported a false positive. Symantec has updated their database to mark these files as safe.
Congratulations!
You have now completed all the installations and configurations needed!
Now it is very easy to use HandBrake for your AVC encoding from Vegas Pro.
How to use Vegas-to-HandBrake in Vegas Pro
Step 1 - Create a project
Drag a clip (or several clips) into the Vegas Pro timeline and edit your project.
Step 2 - Add a 1 second buffer before you send to Handbrake
UPDATE AUGUST 2021! new DebugMode Framserver v4.0 does not contain Audio Bug - it has been fixed!
If you are using DebugMode Frameserver 4.0, you can skip Step 2 and go directly to Step 3.
If you are using DebugMode Frameserver 3.1 or older, you still need to do Step 2, to fix the audio bug.
You need to add a 1 second buffer to the end of your timeline, to correct an audio bug in FrameServer. To do so, use an empty event or a solid color event (or something else) of exactly 1 second length or use the loop-region expanded to exactly 1 more second. Personally I have found creating a Loop-Region is the best method.
Loop-region method
2.1 Locate the true end of your project and take a note of the Timecode at cursor. Example 00:01:00;17
2.2 Add 1 second of time to timecode at cursor. Example 00:01:00;17 + 00:00:01;00 = 00:01:01:17
2.3 Add a new Marker by pressing M at the +1 second point (calculated above) at end of last event on timeline.
2.4 Drag out a Loop-Region on your timeline, that extends from 00:00:00;00 - to the +1 second Marker point.


Step 3 - Sending Vegas output to Handbrake
If you added a shortcut to the Vegas Pro toolbar, click the icon Send2HandBrake
OR
Go to Tools / Scripting / frameserver_scripts / Send2HandBrake
Now be very patient !!!
It will take about 10 seconds to send the current Vegas Pro project to HandBrake (complex or long projects could need longer). While you are waiting, do nothing. Don't press any key and do not click anywhere. Just wait until HandBrake gets started and finishes scanning the input video. Many different windows will open and close, while your project is prepared for Handbrake...
If you created a loop-region in the Vegas timeline, this process will automatically use only the timeline section of your loop-region for encoding. So before starting the Vegas2HandBrake process, always remember to create your +1 second loop-region.
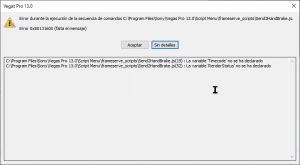
A Windows Security Warning may pop up. If this happens, do not worry. Allow file to Run.
Microsoft uses a database of known and trusted software publishers, to make sure a file is safe to run. Independent (small) software publishers are often not part of their database, which is why the Microsoft installer reports "unknown publisher".

The Command Prompt and FrameServer windows will now pop-up and start to run.
Be patient and wait for everything to process. Handbrake will open last and scan through your project first.
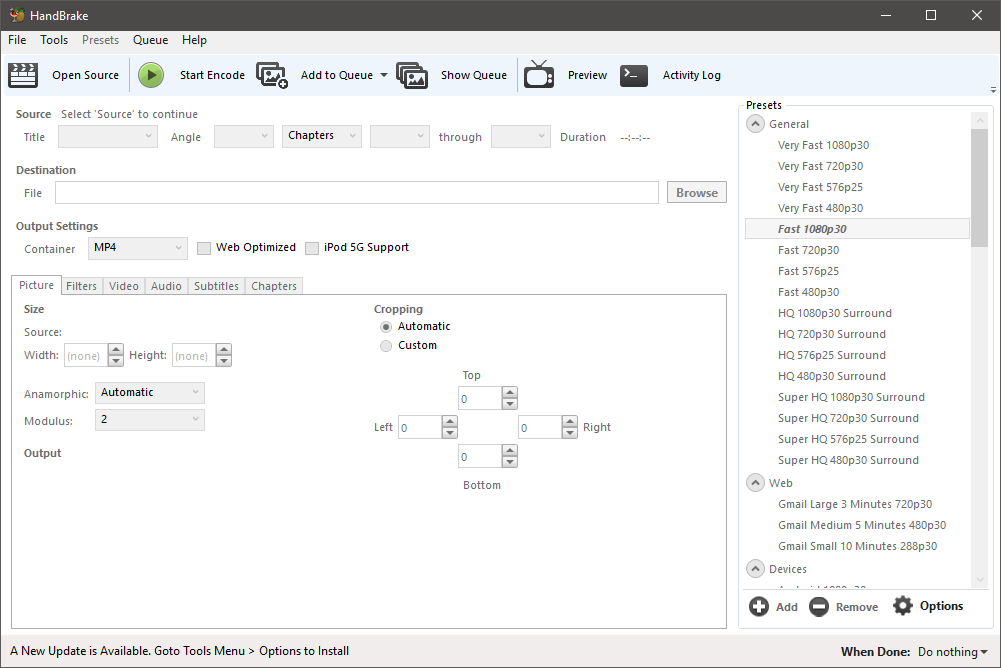
Step 4 - Select a Preset or Create your own Presets in Handbrake
After Handbrake has finished scanning your project, you then need to tell Handbrake which render settings you want to use. You can select one of the included Presets or manually use your own settings and create a new custom preset.
The two most important things to check in Handbrake before you Start Encoding (exporting/rendering) your video, is to make sure the Frame Rate is set to match your Project Properties in Vegas and that it is also set to Constant Frame Rate and not Peak Frame Rate.
Please note that I have an in-depth tutorial on how to use Handbrake here:
How to use Handbrake 1.1.1 - Beginners Guide for Exporting Video

Step 5 - Start Encoding your Video
To begin rendering your video, press the Start Encode button. When HandBrake has finished the render process, HandBrake will quit automatically. If there is an empty Command Prompt window left open in Vegas, type exit to close the window.
If this process is interrupted, intentionally or not, quit the frameserve process manually in Vegas Pro, then in the toolbar click the icon unmount. If Vegas Pro crashes, freezes or is already closed (so you can't access the icon unmount) you could also start the file unmount.bat (path: C:\frameserver\batch). If you experience any other errors that refuse to clear, simply re-boot your computer.
That's it. You have officially reached the end of this epic tutorial.
Once again, I cannot take any credit for the invention of this Vegas-to-Handbrake "recipe". My objective in this tutorial, was simply to collate all the latest information from various sources and present it in an easy to follow guide. If you experience any problems with this workflow, please remember to triple check that you followed all the steps correctly!
Understanding the Settings in Handbrake
Next week I will upload a new tutorial, which explains the many of the important settings in Handbrake.
Related Topics and Tutorials
How to export Cineform video with Vegas Pro and Vegas Movie Studio Platinum
How to export Avid DNxHD video with Vegas Pro and Vegas Movie Studio Platinum
How to export video from Vegas Movie Studio Platinum to Handbrake
How to use Handbrake 1.1.1 - Beginners Guide for Exporting Video
Buy the latest version of Vegas Pro here !


About Derek Moran
Derek Moran is the author of all articles on Movie Studio Zen.
You can find me on YouTube, Facebook, Twitter, Read more about Derek...