Today’s Sony Vegas Zen Tip #4 is another old Sony Vegas chestnut, that’s been kicked around the Internet for years.
Why does the colour change in my videos, after I have rendered them? The colours after rendering to Mainconcept AVC now look more saturated, slightly darker and have a little more contrast.
The first reaction some people normally have to discovering this effect, is to completely freak out. I’ve actually seen people wearing sack cloth in the street, covering themselves with ash and wailing for hours. Then threatening to start using Final Cut Pro.
Check that your Computer Monitor is Correctly Calibrated
Seriously though, there are many contributing factors if you are seeing this effect and it is not the fault of Sony Vegas. The first thing that everyone should check, is to make sure your computer monitor has been properly calibrated. If it isn’t, YOU may think all your videos look perfect in Sony Vegas Pro or Movie Studio Platinum, but the reality is that everyone on your island has purple skin and green hair.
I can personally admit to having badly calibrated monitors. When I was using Photoshop, all my blues looked purple. I discovered that the Gamma controls for my monitor were completely set wrong. There is a basic calibration app built into Windows you can use. There are also special devices you can buy to help calibrate for you.
Here is an article that explains how to calibrate using the Windows inbuilt application:
How to calibrate your monitor
Different Media Players display Videos slightly differently
The next BIG thing that can make your videos look different after they have been rendered, is what you use to play the video back with. Windows Media Player and YouTube’s player, have a tendency to crush your blacks and whites, which makes everything look more contrasty and saturated. If you upload the exact same video to Vimeo, you will see a different look again. Vimeo is definitely the best video service on the Internet, if you want to see as close to perfect results. Other Media players that you can try are VLC player, Realplayer, Quicktime and Cyberlink’s PowerDVD. What you will probably find, is that your video looks slightly different in each player.
Apply Some Colour Correction to Your Videos!
If we jump back into Sony Vegas or Movie Studio for a moment, there are things you can do to help normalize your video and produce better results. If you’re really serious about producing great looking video, you need to apply some level of Colour Correction to all your projects.
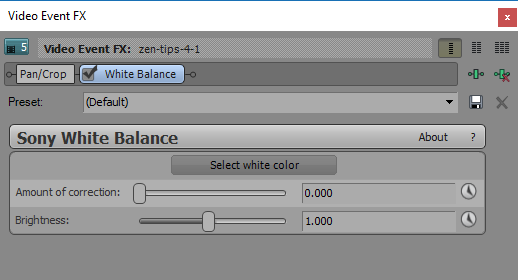
The first most important thing, is to make sure your White Balance is set correctly. This is best done when filming your videos, by setting the White Balance in your camera. Different lighting conditions known as colour temperature, are what cause the White Balance to look different. If you forgot to set the White Balance in the camera, you can correct this in Sony Vegas by using the White Balance Video FX plugin.

I actually have a complete beginners guide tutorial on Colour Correction which I highly recommend everyone read and watch if you haven’t already done so. The most important thing to note in regards to today’s topic, is that making your video broadcast safe will help to produce a better looking video on YouTube. My Colour Correction tutorial shows exactly how to achieve this.
A Quick Fix by Applying a Levels Filter to the Video Output FX
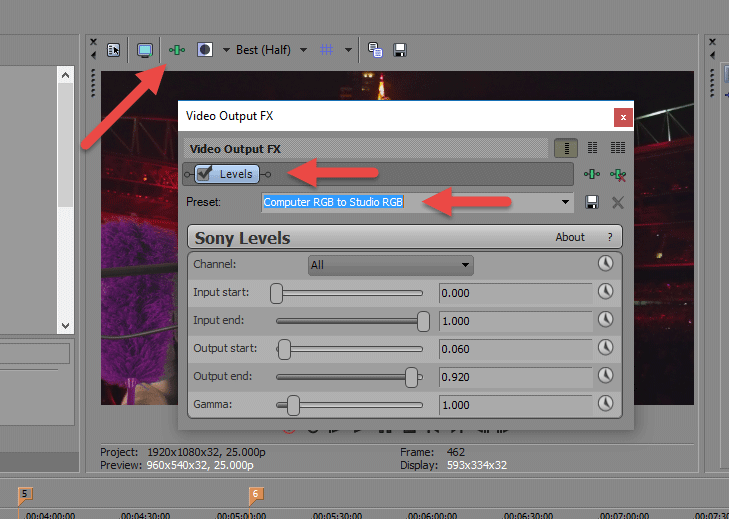
If you have no time and patience for finessing your video productions before you render them, there is an easy hack you can apply to all your videos, which will help to stop them looking darker on YouTube. You can apply a Levels filter to the Video Output FX bus in Sony Vegas and Movie Studio. This button is found just above the Preview Window. When you add an effect here, it applies it equally to absolutely EVERYTHING in your project.
Find Sony Levels (Vegas Levels) and apply the Computer RGB to Studio RGB preset filter. This basically forces your project to be broadcast safe, by clamping everything down. It isn’t perfect, but does a good enough job for most people who like quick fixes.

Compatibility
The information in this tutorial applies to all versions of Sony Vegas Pro and Sony Movie Studio Platinum.

About Derek Moran
Derek Moran is the author of all articles on Movie Studio Zen.
You can find me on YouTube, Facebook, Twitter, Read more about Derek...

