
DISCLOSURE: Movie Studio Zen is supported by its audience. When you purchase through links on this site, we may earn an affiliate commission.
Solved Rendering Vertical Video for Youtube Shorts and Instagram using VEGAS Movie Studio or VEGAS Pro
- Van Of Action .com
-
 Offline Topic Author
 - Zen Newbie
-

- Video Blogger About My Van Build and Experiences
- Posts: 6
- Thank you received: 1
Rendering Vertical Video for Youtube Shorts and Instagram using VEGAS Movie Studio or VEGAS Pro was created by Van Of Action .com
Posted 09 Mar 2022 10:05 #1 Hi Derek been a follower since forever - thanks for all you're shared - I'm using Movie Studio Platinum 17 (and got the upgrade last week !!!!! THANKS) - Thanks for the forum link !!! . I've been experimenting with SHORTS on You Tube and REELs on Instagram and have found the results to be very encouraging. I have a Van Build Series on my Channel and the subs have definitely been climbing since I started. My challenge - I'm generating the shorts by clipping my longer form videos. But the shorts need to be rendered vertically (9:16) and my videos are all recorded 1920 x 1080. I have created a panel overlay so I can move / resize the video so it will play properly in the exposed window but I can't figure out how to render the video as 9:16, or by my calculations 640 x 1080. If I change the project properties it shrinks the raw video proportionally and have not found a template I can edit to render in. Searching the web has been fruitless. So far I have been rendering in 1920 x 1080 then using a program called Kapwing to convert it. It adds a ton of steps and time and there are limited conversions without watermarks. I can't believe it isn't possible with Platinum 17 - any help would be greatly appreciated .... be well Dave
Dave Chomitz
VanOfAction.com
VanOfAction.com
Last Edit:11 Mar 2022 13:49 by Van Of Action .com
Please Log in or Create an account to join the conversation.
Replied by DoctorZen on topic Rendering Vertical Video for Youtube Shorts and Instagram using VEGAS Movie Studio or VEGAS Pro
Posted 10 Mar 2022 23:12 #2 Hi Dave - welcome to the MSZ Forum.
I have deleted your 2nd duplicate message. Your first message was there, but it was not public until I approved it. All new messages will go public automatically now.
Sorry for the delay in replying. My new Windows 11 install crashed to "blue screen of death" and I've spent 2 days getting my computer back into working condition.
Here are the instructions for how to edit and render Portrait style video.
1.1 Import all your videos first and don't worry if the Preview Window doesn't look correct.
1.2 Tip! To stop videos having too much motion blur, select and highlight ALL videos on timeline, then right-click on one video and go to Switches - set to Disable Resample.
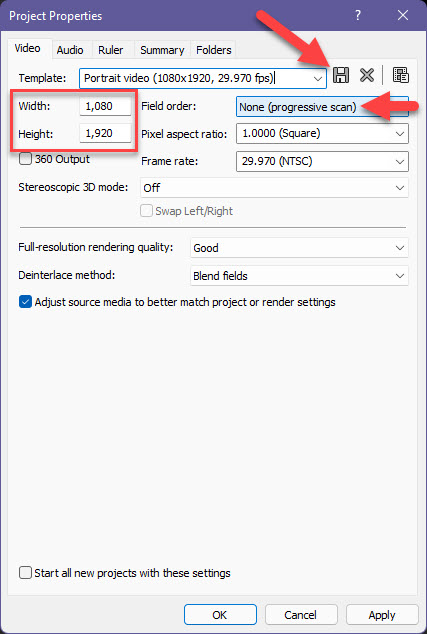
2. Open Project Properties (cog above Preview)
Set Width = 1080
Set Height = 1920
Field Order = Progressive
Your Frame Rate needs to be set to the same Frame Rate your source videos were recorded with.
To find frame rate, go to Project Media window, select a video and the read out below will tell you.
You can give your Template a custom name and then press SAVE button.
Next time you do a project, select this template from Template drop down list.
3. Make sure to not place any videos on the Picture in Picture track - this is for Pic in Pic effects only.
I would recommend you delete this track.
To add new video tracks, press CTRL + Shift + Q
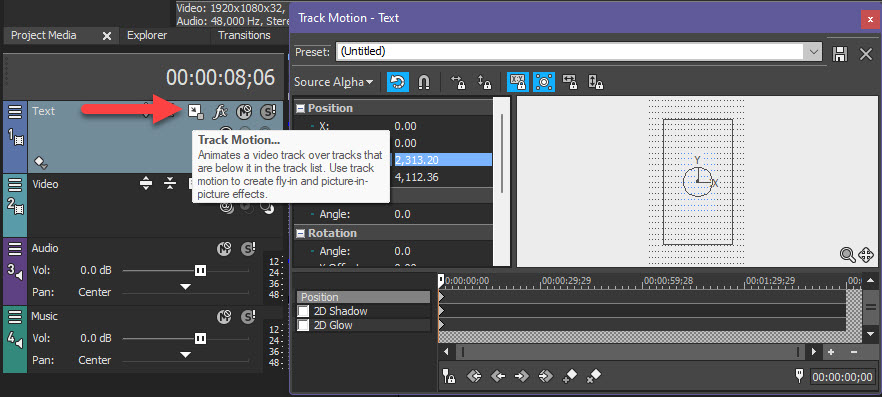
4. Go to track control box for each Video Track you have 16 x 9 videos on.
If you haven't already turned on all functions, press "hamburger" button (row of horizontal lines).
Select Edit visible button set - Show All - OK
You can do the same thing for Audio track as well.
5. Press Track Motion button and then drag corner of window to make as large as you need.
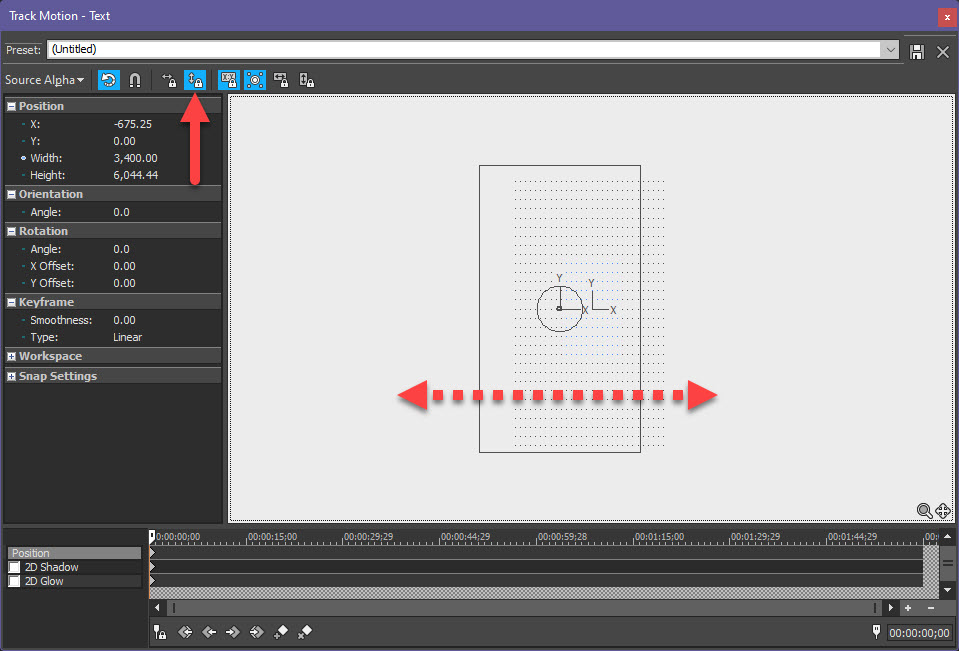
6. If you set the Project Properties to 1080 x 1920, you can enter a Width of 3400 in the Track Motion window and it will snap perfectly to fill the frame.
You can also manually drag corner of frame to re-size.

7. If you need to find a different vertical section of the video, turn on Prevent Movement Y.
Then you can easily drag the video left or right and it will stay in the frame.
8. When it is time to render your project, go to Project / Render As
Select MAGIX AVC/AAC MP4
Select Internet HD 1080p and one of the options that uses same Frame Rate your project is set to.
Then press Customize.
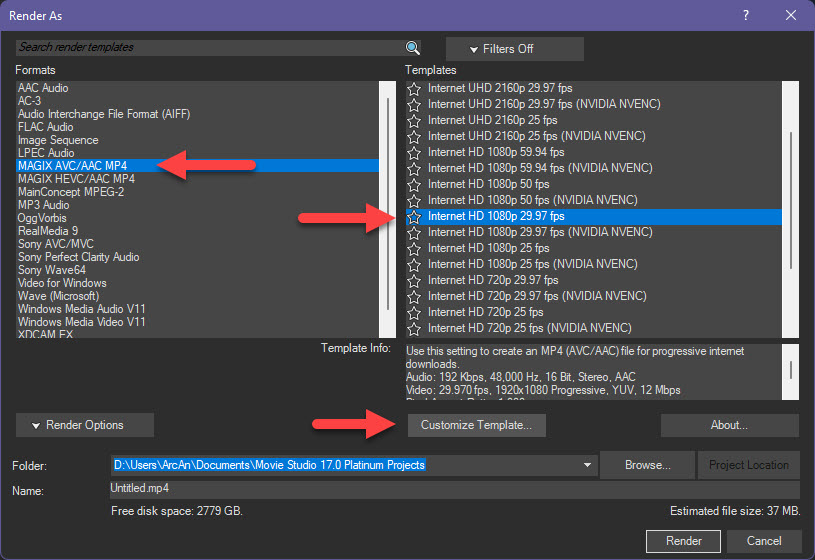
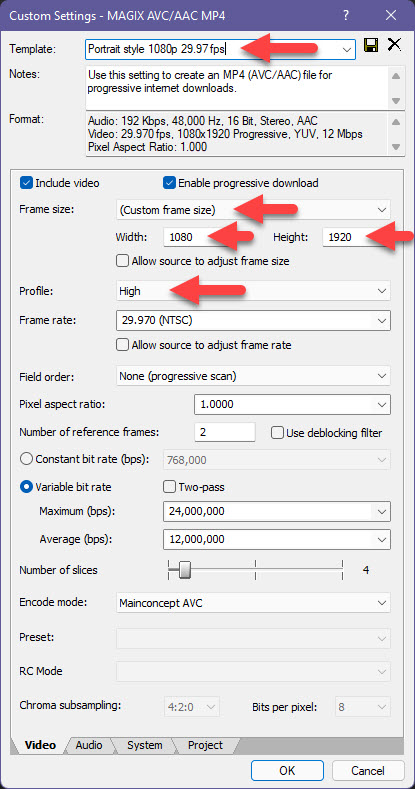
9. Set Frame Size = Custom frame size
Set Width = 1080
Set Height = 1920
Set Profile = High
Make sure Frame Rate is correct
You can give the Template a custom name like "Portrait Style" and press SAVE button, for use next time.
Next time you render a video, scroll down to bottom of Templates and you will find custom template - press star to save as favourite.
Press OK
Make sure output folder location is set correctly, so you know where the video will be saved to.
10. Press Render. That's it!
Another tip: Often a good idea to save your project regularly while editing and re-booting your computer before you start a render. This clears your RAM and reduces the chance of crashes.
Regards
Derek
I have deleted your 2nd duplicate message. Your first message was there, but it was not public until I approved it. All new messages will go public automatically now.
Sorry for the delay in replying. My new Windows 11 install crashed to "blue screen of death" and I've spent 2 days getting my computer back into working condition.
Here are the instructions for how to edit and render Portrait style video.
1.1 Import all your videos first and don't worry if the Preview Window doesn't look correct.
1.2 Tip! To stop videos having too much motion blur, select and highlight ALL videos on timeline, then right-click on one video and go to Switches - set to Disable Resample.
2. Open Project Properties (cog above Preview)
Set Width = 1080
Set Height = 1920
Field Order = Progressive
Your Frame Rate needs to be set to the same Frame Rate your source videos were recorded with.
To find frame rate, go to Project Media window, select a video and the read out below will tell you.
You can give your Template a custom name and then press SAVE button.
Next time you do a project, select this template from Template drop down list.
3. Make sure to not place any videos on the Picture in Picture track - this is for Pic in Pic effects only.
I would recommend you delete this track.
To add new video tracks, press CTRL + Shift + Q
4. Go to track control box for each Video Track you have 16 x 9 videos on.
If you haven't already turned on all functions, press "hamburger" button (row of horizontal lines).
Select Edit visible button set - Show All - OK
You can do the same thing for Audio track as well.
5. Press Track Motion button and then drag corner of window to make as large as you need.
6. If you set the Project Properties to 1080 x 1920, you can enter a Width of 3400 in the Track Motion window and it will snap perfectly to fill the frame.
You can also manually drag corner of frame to re-size.
7. If you need to find a different vertical section of the video, turn on Prevent Movement Y.
Then you can easily drag the video left or right and it will stay in the frame.
8. When it is time to render your project, go to Project / Render As
Select MAGIX AVC/AAC MP4
Select Internet HD 1080p and one of the options that uses same Frame Rate your project is set to.
Then press Customize.
9. Set Frame Size = Custom frame size
Set Width = 1080
Set Height = 1920
Set Profile = High
Make sure Frame Rate is correct
You can give the Template a custom name like "Portrait Style" and press SAVE button, for use next time.
Next time you render a video, scroll down to bottom of Templates and you will find custom template - press star to save as favourite.
Press OK
Make sure output folder location is set correctly, so you know where the video will be saved to.
10. Press Render. That's it!
Another tip: Often a good idea to save your project regularly while editing and re-booting your computer before you start a render. This clears your RAM and reduces the chance of crashes.
Regards
Derek
ℹ️ Remember to turn everything off at least once a week, including your brain, then sit somewhere quiet and just chill out.
Unplugging is the best way to find solutions to your problems. If you would like to share some love, post a customer testimonial or make a donation.
Unplugging is the best way to find solutions to your problems. If you would like to share some love, post a customer testimonial or make a donation.
Last Edit:11 Mar 2022 13:49 by DoctorZen
Please Log in or Create an account to join the conversation.
- Van Of Action .com
- Offline Topic Author
- Zen Newbie
-
- Video Blogger About My Van Build and Experiences
- Posts: 6
- Thank you received: 1
Replied by Van Of Action .com on topic Rendering Vertical Video for Youtube Shorts and Instagram using VEGAS Movie Studio or VEGAS Pro
Posted 11 Mar 2022 11:42 #3 Deker !!! You sir are a VERY GOOD MAN !! I have been kicking this around for months, you have no idea how much your time is appreciated. You have saved my bacon over and over again with the You Tube tutorials you shared over the years. it's really nice to have you back. I'm thrilled that you told me about the forum as well - that may be something to add to the endings of your videos. Be well my friend.
Dave Chomitz
VanOfAction.com
VanOfAction.com
Last Edit:11 Mar 2022 13:49 by Van Of Action .com
The following user(s) said Thank You: DoctorZen
Please Log in or Create an account to join the conversation.
Forum Access
- Not Allowed: to create new topic.
- Not Allowed: to reply.
- Not Allowed: to edit your message.
Moderators: DoctorZen
Time to create page: 0.762 seconds
