Q: Can I work on the same project using two different computers?
Answer: Yes you can is the simple answer.
MAGIX software (the new owners of Vegas) allow you to install Vegas Movie Studio or Vegas Pro on up to 2x different computers. Typically you may have a laptop computer for on the road and a desktop computer at home.
What happens if you want to work on the same project with both computers ?
There are two ways you can do this. One would be to have all your media files on a shared External Hard Drive, Computer or Cloud Service. So no matter which computer you are using, the media files all have the same folder address.
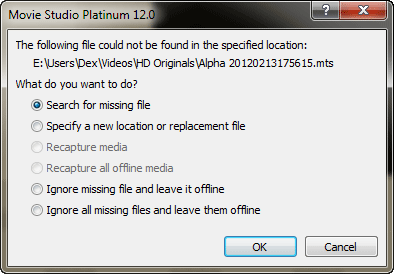
Another way you could do this, is to have a copy of all your media files on both computers. You may be on the road and want to do some video editing each night on your laptop computer. However, a problem will arise when you get back home and wish to transfer your project from the laptop to desktop or vice versa. When you open up the project on your desktop, a pop up window will tell you that "The following file could not be found in the specified location". Which means you need to tell "The Project" where the media files are located and then re-save the project, so that the new file locations are locked in.
Instructions for relocating missing Media Files
Vegas Pro and Movie Studio Platinum have an excellent search function which makes it easy to locate missing files. It does not matter if you are transferring from the Laptop to Desktop or Desktop to Laptop - follow the exact same instructions.
Step 1
Open project file from laptop/desktop.
You will be greeted by this window.
Select Search for missing file and OK.

Step 2
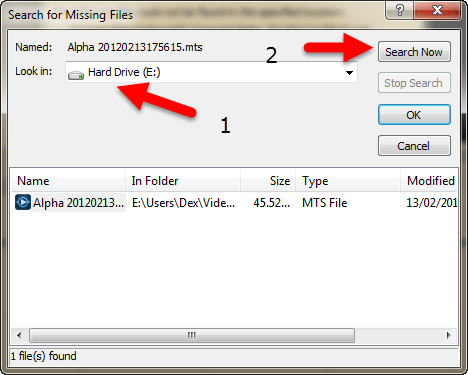
If you have more than one Drive on your desktop/laptop computer, make sure to select the correct drive that has the files.
Then press Search Now.
Once first file is found, select it and press OK.

Step 3
The following window will then pop up, saying that more media files have also been found.
Select Yes to All
This will now load up the remaining files.
Once project has loaded up, make sure to immediately Save As the project, so that the new file locations are locked in. This step is very important !

If the files are spread out on multiple hard drives, you will have to go back to Step 2 and select each hard drive one at a time and follow the instructions all the way through again.

