In this tutorial I show how to render a video for DVD or Blu-ray Disc with Menus and how to Import it into DVD Architect Pro.
The method I show in this tutorial involves using Sony Vegas Pro 13 to render your video first and then sending the video to DVD Architect Pro, where you can then add Menus and burn a DVD or Blu-ray Disc.
If you don't need to create menus and simply want to burn a quick DVD or Blu-ray Disc, please use this alternate tutorial here: How to Burn a DVD or Blu-ray Disc using Sony Vegas Pro
Topics Covered in this Tutorial
Importing your Videos
Checking your Project Properties and Matching Media Settings
Create your Project
"Render As" Window Settings
Selecting a Video Template for Rendering/Exporting to DVD
Selecting an Audio Template for Rendering/Exporting to DVD
Selecting a Video Template for Rendering/Exporting to Blu-ray disc
Selecting an Audio Template for Rendering/Exporting to Blu-ray disc
Importing Video File into DVD Architect Pro
Importing Video into DVD Architect Main Menu
Making the DVD or Blu-ray disc
Writable DVDs and Blu-ray discs
How do I Preview the Audio in my DVDA project?
Step 1 - Import your Videos
Import your Videos into the Vegas Pro timeline.
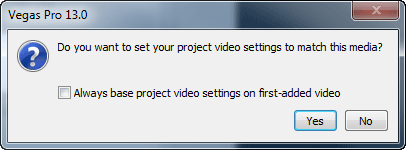
As soon as you import your first Video into the timeline, Vegas Pro may open up a new window that says: "Do you want to set your Project Video Settings to Match this Media" ?
If this window does pop up, please say YES. This will automatically set your Project Properties for you.
If this window does not open up, do not worry. This normally means your Project Properties already match the media you have just imported. However you should not assume that this is always true. In the next step I will show you how to check that everything is set correctly.
Step 2 - Check your Project Properties and Match Media Settings
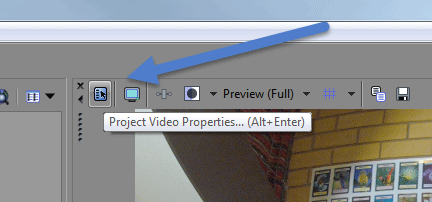
Look above the Preview Window and press the Project Properties button to open the window.
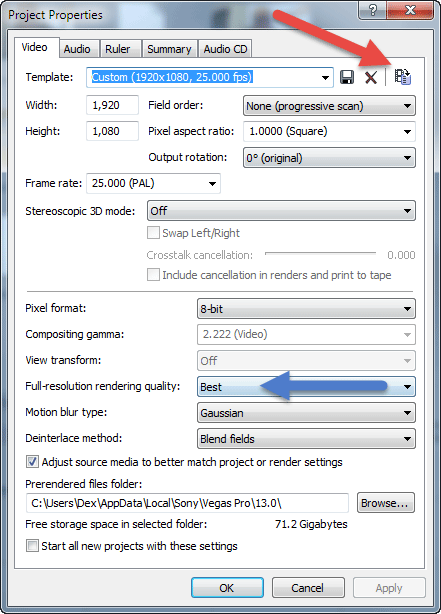
If the pop up window from Step 1 did not appear for you, press the Match Media Video Settings button which is marked with the red arrow below. Now navigate through your computer and select the same video you imported into your project above. If you imported more than one video, you only have to do this process once. This will automatically match your original videos properties to be the same as the Project Properties for the entire project.
The advantage of doing this, is that it should give you much smoother playback in the Preview Window while you are edting and also make sure you will be outputting to the correct video type for your DVD or Blu-ray Disc.
One of the biggest mistakes I see people making all the time, is setting the wrong Frame Rate for their projects. Using the Match Media function, will help to reduce the chance of this happening and take some load of your CPU. If your project properties frame rate settting is different to the frame rate for the videos you are using, this can make your CPU have to do a lot of unnecessary work. Setting these values the same or in even mutliples of the original, improves performance with the program and quality of the final product.
While you are in this window, make sure to also set the Full Resolution Rendering Quality to Best.
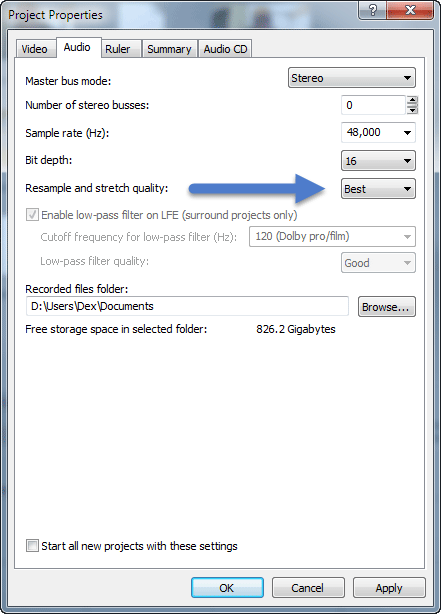
Then go to the Audio tab and make sure the Resample and Stretch Quality is also set to Best.
Step 3 - Create your Project
Edit and create your project as you normally would. Remember to Save As, create a folder for your project and name it. Sometimes people forget this simplest of steps before rendering video and wonder why they can't find their videos later !
Step 4 - "Render As" window settings
When you prepare video for a DVD with Menus or a Blu-ray Disc with Menus, you must render the Video and Audio components as separate files. All DVDs and Blu-rays in the Universe follow this protocol, so don't think I am trying to teach you something that you can do differently. Your separate Video and Audio files must be given the exact same name and saved to the exact same folder location. The reason why this is important, is because DVD Architect Pro needs to know which files are meant to be synced together.
Start by Rendering the Video file. Go to File - Render As.
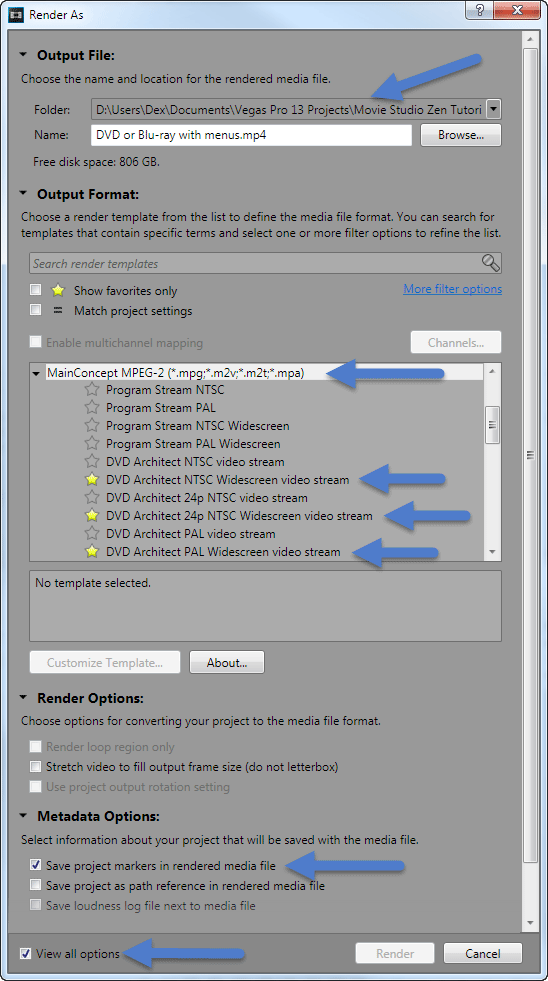
First make sure the Output Folder location has been set correctly, so that the video is saved to your project folder.
If you have added any Chapter Points to your video, make sure to select View all options at the very bottom of the Render As window. This will activate further settings.
Then select Save project markers in rendered media file.
*Please note that you will probably need to expand the window to a much larger size and use the side slider, in order to see all the controls.
Step 5 - Select Video Template for Rendering/Exporting a DVD
If you want to render a Video for Blu-ray Disc with Menus, go directly to Step 7.
Select Mainconcept MPEG-2 from the list of available formats and press the little triangle to reveal all template options.
I have marked the three most likely templates you would choose from with a yellow star. These three templates are all suitable for 16:9 Apect Ratio Widescreen Video output.
If your Project is using a Frame Rate of 29.97fps, 30fps, 60fps or 120fps,
select DVD Architect NTSC Widescreen video stream.
If your Project is using a Frame Rate of 23.976fps, 24fps or 48fps,
select DVD Architect 24p NTSC Widescreen video stream.
If your Project is using a Frame Rate of 25fps, 50fps or 100fps,
select DVD Architect PAL Widescreen video stream.
Once you have selected the correct template that Matches your Project Properties the best, you can press Render to begin rendering the video.
Step 6 - Select Audio Template for rendering/Exporting a DVD
Once you have rendered your video file, you now need to go back into Render As and do a second render for your Audio file. There are a couple of different Audio Formats you could render to for a DVD. To keep things simple, I think it is best to stick with the most commonly used audio template for video.
Find Dolby Digital AC-3 Pro, open it up and select Stereo DVD.
Press Render and Audio file will render.
Once this is finished, you are ready to import your video into DVD Architect Pro. Go to Step 9 now.
If you want to render video for Blu-ray Disc, proceed to Step 7.

Step 7 - Select Video Template for Rendering/Exporting to Blu-ray Disc
Blu-ray Discs support a wider range of Formats and Bit Rates compared to DVDs. For a start Blu-ray is mainly designed for storing 720p and 1080i HD Video, whereas good old fashioned DVDs can only support 480i Standard Definition video.
Please start by going briefly back to Step 4 and make sure all the boring settings look good.
You have a choice between rendering to Mainconcept MPEG-2 for Blu-ray or Sony AVC/MVC for Blu-ray. MPEG-2 will allow you to render to a higher Bit Rate, whereas Sony AVC/MVC will allow you to use GPU Acceleration for your video processing, if you have a compatible Graphics Card. I normally use MPEG-2, however I suggest you do some experiments yourself and see which format you prefer.
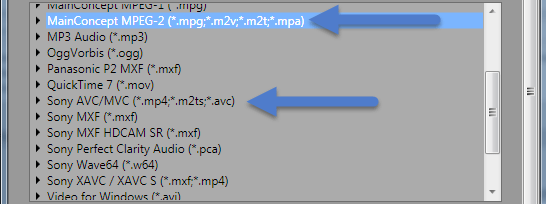
Once you have chosen a format, press the little triangle to reveal full list of templates.
Use the same information I taught about Frame Rates for DVD and apply this to selecting the correct output format. Selecting the correct Frame Rate is extremely important if you want good quality video !
Mainconcept MPEG-2 templates
Best templates marked with yellow triangle.
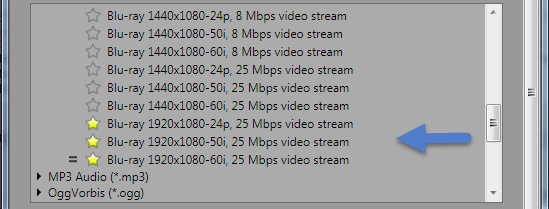
Sony AVC/MVC templates
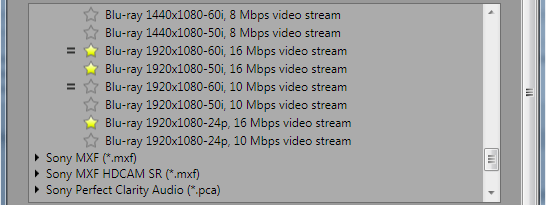
Once you have made a selection, press Render to start rendering your video file.
Step 8 - Select Audio Template for Rendering/Exporting to Blu-ray disc
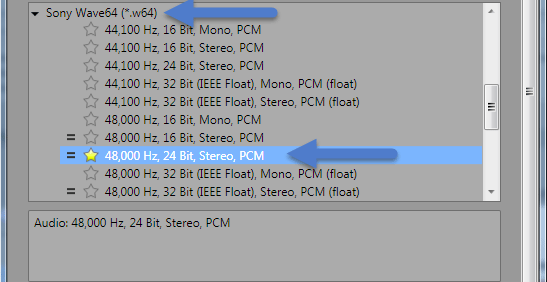
There are many different Audio Formats you can choose from for Blu-ray Disc production, however in the interests on keeping this as simple as possible, I will show you my favourite Audio Format for making a Blu-ray. I normally use Sony Wave64 and select the 48,000Hz, 24 Bit, Stereo, PCM template. Wave64 audio files are un-compressed, which means you get the best quality audio possible.
Once you have made a selection, press Render to start rendering your audio file.
Step 9 - Importing Video file into DVD Architect Pro
Boot up DVD Architect Pro 6.0 and go to File - New to create a new Project.
The most important step now is to set your Project Properties in DVD Architect Pro to match excactly the type of Video and Audio you rendered with Vegas Pro. If you can do this correctly, it will mean that DVD Architect does not have to do any major rendering. It will be able to burn directly to disc your video and audio from Vegas Pro. If you get this wrong, DVD Architect will re-render your project and drastically increase the time it takes to make your disc.
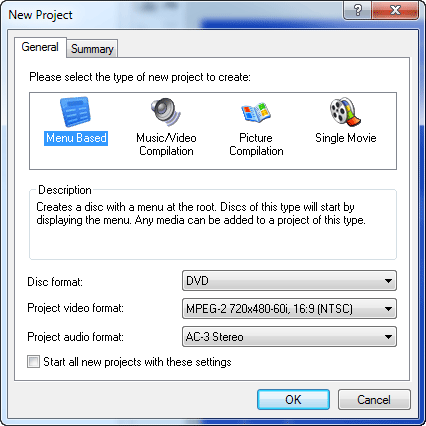
Settings for DVD
Make sure to watch the video tutorial for detailed instructions. If you need some help, go all the way back to Step 5 for guidance on which video format you should select.
Remember that if you are in a PAL country, you will be using 720x576-50i.
AC-3 Stereo = Dolby Digital audio. This is the most likely choice for making a DVD.
Settings for Blu-ray Disc
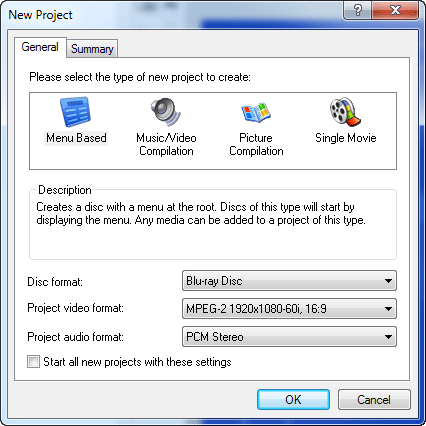
There are a large selection of video formats, so take your time and make sure to select the same one you used in Vegas Pro to render your video file.
PCM Stereo is the setting to use if you rendered to a Wave64 audio format.
How to Import your Video file ?
There are a many different ways you can import video into DVD Architect Pro, however there is one way that is superior to all other methods because it gives you maximum control inside the programs technical settings.
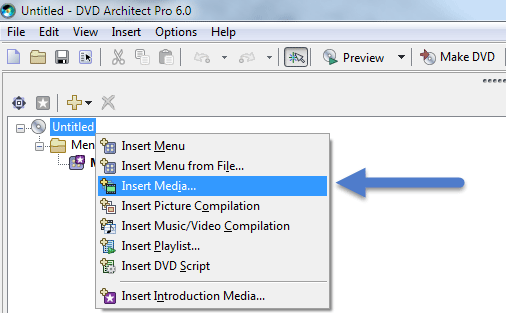
Right-click on Untitled and select Insert Media.
Navigate through your computer and find the .mpg video file if you are making a DVD.
If you are making a Blu-ray Disc, it should have a file extension of .m2v
You DO NOT have to import the audio file as well. DVD Architect will automatically import this file for you, behind the scenes.
Once you have imported all the videos for your project, remember to name and save your new DVD Architect Pro project file.
Go to File - Save As
If there is no folder inside My Documents called DVD Architect Pro 6.0 Projects, create one now and save all your DVD projects to here - this is your Master Folder.
Now create a New Folder for your current project and name it. Then open this new folder and name/save the actual project.dar project file.
Step 10 - Import Video into DVDA Main Menu
The purpose of this tutorial is not to explain how to make fancy menus with DVDA. I have other tutorials about that topic you can find on Movie Studio Zen. So we can complete the tutorial, drag your video/videos onto the Main Menu screen. Now you can spend hours and days making a glorious masterpiece.
To make sure your project is working properly, press the Preview button.
Once you have finished building your DVD/Blu-ray Menus, remember to do one final Save As.
Step 11 - Making the DVD or Blu-ray Disc
When you are ready to burn the actual disc, go to Make DVD or Make Blu-ray Disc.
Select Burn
Select Current Project
Press Browse and then read below for further instructions.
DVD Architect Pro does this weird thing I do not like, which I think creates lots of confusion. It will want to save the disc files to an automatically created folder called My Discs. That is OK, however My Discs will not be sitting inside your new project folder. To fix this, press Browse, find the new My Discs folder and drag it into your new project folder. Finally, make sure to select the My Discs folder and press OK.
Press Next and check any messages about your project. Some may need attending to, but most are just silly warnings that are of no real consequence.
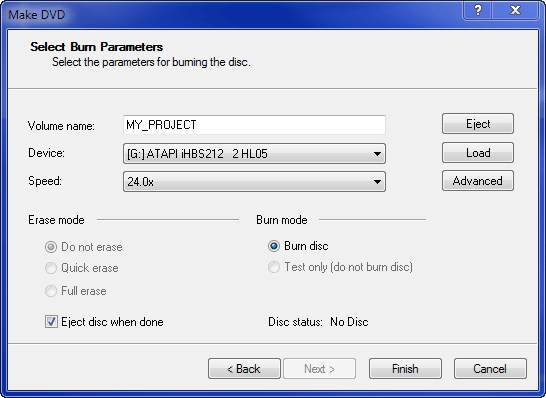
The final screen will look like this. Make sure to insert the right type of DVD or Blu-ray Disc and press Finish. DVDAP will prepare, render menus and then finally burn disc. End of story.
Writeable DVDs and Blu-ray Disc Capacities
Single Layer 4.7GB discs can hold about 60-90 minutes of best quality MPEG-2 Video for DVD.
If your video is too big for a single layer 4.7GB disc, you can use Dual Layer 8.5GB discs which can hold 120-180 minutes of best quality MPEG-2 Video for DVD.
If you only have 4.7GB Single Layer discs and the estimated size is larger than 4.7GBs, you will have to use a different method for creating your DVDs.
Please read this article for futher instructions:
How to Compress and Fit a Long Video onto a DVD
Single Layer 25GB Blu-ray Discs can hold about 90 minutes of best quality MPEG-2 Video for Blu-ray.
Dual Layer 50GB Blu-ray Discs can hold 180-240 minutes of best quality MPEG-2 Video for Blu-ray.
How do I Preview the Audio in my DVDA project?
When you make a DVD, the audio file and video file are always rendered separately.
Because they are rendered separately, you won't hear any audio if you try and play back the video file by itself.
Step 4 explained the importance of naming and saving the audio and video in the same folder and using the same file name.
You only have to import the Video file into DVD Architect.
DVD Architect will automatically find and import your audio file for you.
The only way to hear the audio, is to use the Preview function in DVDA.
Preview shows exactly what the DVD will look and sound like.

About Derek Moran
Derek Moran is the author of all articles on Movie Studio Zen.
You can find me on YouTube, Facebook, Twitter, Read more about Derek...

