In this tutorial I show you how to manually render a video, suitable for turning into a Blu-ray disc using Sony Movie Studio Platinum 12 and DVD Architect Studio.
The workflow shown in this tutorial is almost identical for Sony Vegas Pro users, so you can follow along as well. In fact, the workflow I show for the actual rendering part of this tutorial, is the ONLY way Vegas Pro 12 users can prepare a video for BluRay. The reason being is that Vegas Pro does not have the automated wizards that Movie Studio has. Movie Studio is more user friendly because it is aimed at users with a "new to intermediate" skill level. Vegas Pro assumes that you have a lot more knowledge in basic workflow.
Why should I manually render my video to make a Blu-ray disc ?
Learning how to create a video for BluRay manually, gives you a lot more control than using the "Make Movie" wizard inside Movie Studio Platinum 12. If you like to use the automated Make Movie wizard and it works well for you, then always do what makes most sense for yourself. However, if it all goes horribly wrong when using the Make Movie wizard, and you're left up poo creek without a clue and no beer, then the fastest way back to the pub is learn the workflow I am about to teach you.
What can most commonly go wrong when you use the Make Movie wizard, is the step between the video finishing rendering in Movie Studio and then it's transfer into DVD Architect Studio 5.0. If you get confused or DVD Architect Studio doesn't launch properly, then typically people can lose the Video and Audio files that were just rendered. Searching high and low on your computer for the missing files leads to zero results. This normally causes an instant explosion of F-Bombs by the user and children laughing in the lounge room because Mum or Dad has flipped out once again.
The location of those missing files - secret revealed
Here is a secret I am only sharing through this article. The missing files are normally located in the Temporary Cache for Movie Studio. It can be difficult to find if you don't no where to look, because it is NOT in your My Documents folder. The location is actually displayed at the bottom of the Preferences window inside the Options Menu.
In Movie Studio Platinum 12, this is the temporary files address:
C:\Users\Dex\AppData\Local\Sony\Movie Studio Platinum\12.0\
All of your Sony programs have a similar cache. If you find any old video or audio files buried in here, it is safe to delete them.
How to Render your Video for a Blu-ray disc ?
The first most important thing you must know about making BluRay Discs or DVDs, is that the Video Stream and Audio Stream are actually rendered separately. This is just the way it is done. So you do TWO renders - one for the video and one for the audio. Please make sure when you do this, that both files are given the exact same name and live in the exact same folder. If you don't do this, DVD Architect Studio 5.0 (for Movie Studio Platinum 12 users) or DVD Architect Pro 6.0 (for Vegas Pro 12 users) will not be able to match the files up and you will end up with no audio on your BluRay Disc and a Charlie Chaplin inspired silent movie.
Which Formats to chose from in the Render As window ?

Video Stream
There are two choices you can make to create your video file.
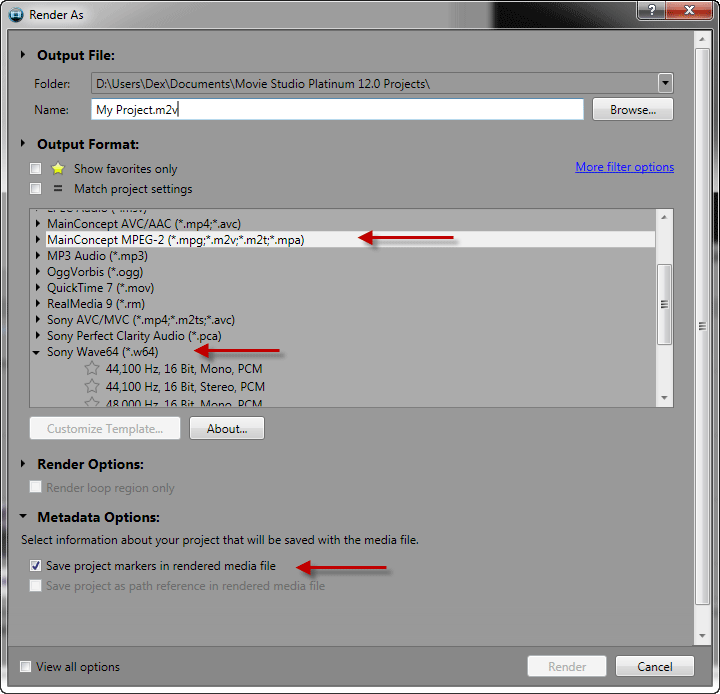
You can render to one of the MainConcept MPEG-2 (.mpg, .m2v, .mpa) BluRay Templates
OR
You can render to one of the Sony AVC/MVC (.mp4, .m2ts, .avc) BluRay Templates
MPEG-2 probably produces the highest quality output, but the choice is always yours. As I frequently say in my video tutorials, experiment to your Heart's content and discover for yourself what your own preferences are.
Scene Selection Marker Points
If you added any Scene Selection/Chapter Selection/Marker Points into the project and want them to also work in DVD Architect, you must go to Metadata Options at the bottom of the Render As window (above) and select Save Project Markers in Rendered Media File.
Audio Stream
There is one main choice for the Audio Stream that works best for BluRay.
Sony Wave64 (.w64)
Importing files into DVD Architect Studio 5.0 or DVD Architect Pro 6.0
I am not going to talk much about using DVD Architect, because I have already covered using this program and how to set it up in other tutorials. For a list of all my articles and tutorials follow this link here:
Related DVD Architect Studio Tutorials and Articles
You only have to Import the Video file Stream into DVD Architect for it to work properly.
You DON'T have to Import the Audio file Stream as well, because DVD Architect will automatically do this for you. Provided it has the same name and same location as the Video file, DVDA will match it perfectly.
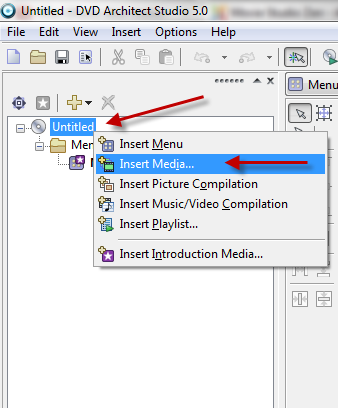
The best way to Import your Video file/s is to right-click Untitled next to the Disc icon in the left hand side menu and select Insert Media.

Now navigate into your Documents Folder - DVD Architect Projects Folder - Your Project
Look for the biggest file - it will be massive. Select it now.
If you have more than one Video file to Import, simply repeat the process. From here you can simply drag your video files onto the Menu Page for the project.
That's it ! Now you can spend hours and days creating your Masterpiece in DVD Architect.
Please watch the video tutorial below for full instructions on how to do create your Video for a BluRay Disc.

About Derek Moran
Derek Moran is the author of all articles on Movie Studio Zen.
You can find me on YouTube, Facebook, Twitter, Read more about Derek...

