HandBrake is a free open-source transcoder for converting video from nearly any format to a selection of modern, widely supported codecs.
 The advantage of using Handbrake, is that it has many advanced settings that can be customised for specific types of video environments. Having access to these advanced settings for transcoding video, gives you the ability to export superior quality video with smaller file sizes - this is basically the Holy Grail of video encoding.
I am by no means an expert in using Handbrake. There are more experienced "power nerds" than myself on various websites and forums, who have advanced recipes for setting up Handbrake. This beginners guide on how to use Handbrake is intended to be exactly that - a beginners guide only. I will make sure to keep this article as up to date as possible for the foreseeable future, so if I learn something new or discover superior methods, I will modify the instructions.
As stated in the article title, this guide is using version 1.1.1 of Handbrake, which is the latest build version as of 21st June 2018.
Topics covered in this tutorial
Where can I download Handbrake from ?
Other resources for Handbrake
QUICK-START guide for using Handbrake
Step 1 - Boot up Handbrake
Step 1.5 - Configure Preference Settings
Step 2 - Import your Video/s
Step 3 - Selecting a Preset
Step 4 - Setting your Frame Rate and type of Frame Rate
Step 5 - Select a Destination (Output Folder Location)
Step 6 - Start the Encode
DEEPER-DIVE guide for using Handbrake
Step 1 - Import your Video/s from Source into Handbrake
Step 2 - Settings Summary
Step 3 - Dimensions Settings
Step 4 - Filters Settings
Step 5 - Video Settings
Step 6 - Audio Settings
Step 7 - Adding Subtitles
Step 8 - Chapter Markers
Step 9 - Advanced Video Settings for Versions 1.1.1 or older
Step 10 - Saving Custom Presets
Step 11 - Experiment in your new Handbrake Lab!
Where can I download Handbrake from ?
Make sure to only download Handbrake from the official website here!
https://handbrake.fr/
Other good resources for Handbrake
If you experience any problems with using Handbrake, like discovering a bug in the program, please don't tell me! Instead, there is an excellent Community Handbrake Forum which is the best place for reporting any bugs, requesting new features and asking detailed technical questions.
You can also read the official Documentation for Handbrake here.
Quick-Start guide for using Handbrake
This Quickstart Guide is for a Windows PC environment, but can be easily adapted for Mac and Linux.
It is perfectly normal to feel overwhelmed the first time you boot up Handbrake, because it is an advanced video transcoder and many of the settings use technical terms that you may not be familiar with. Like all advanced software programs, it is best to start simple and not dive too deeply and blindly into the ocean, like a baby fur seal in Cape Town. If you don't learn the basics first, you will end up frustrated and possibly lose a limb or two. So please be patient and start with some simple experiments. Once you gain an understanding of the basics, then you can branch out and try more complex configurations.
Step 1 - Boot up Handbrake
![]()
Step 1.5 - Configure Preference Settings
Before you start using Handbrake, I recommend you have a quick look at the Preference Settings.
Go to Tools/Preferences in the top toolbar.
General - the options here are self explanatory.
Output Files - here you can set your output folder location and file format.
Another important setting is MP4 File Extension, which I recommend most people set to Always use MP4.
When done - tell Handbrake what you want the program to do when each encode is finished.
Video - Tell Handbrake which hardware device you want to use for encoding video.
If you have a computer with an Intel CPU that includes integrated graphics (normally basic laptops), select Intel QuickSync Encoders.
If you have a computer with an AMD Radeon graphics card, select AMD VCE Encoders.
If you have a computer with an Nvidia graphics card, select Nvidia NVENC Encoders.
Advanced - this is for advanced power users and can be ignored for most people.
Updates - check to see if a newer version of Handbrake is available.
About Handbrake - reports your current build version for Handbrake.
Step 2 - Import your Video/s
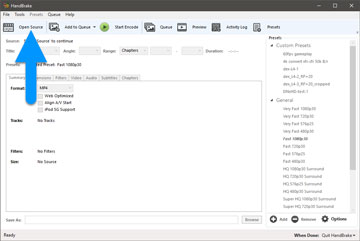
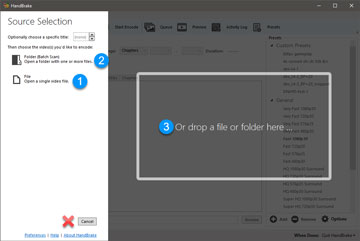
Handbrake refers to your video as the Source. When you first boot up Handbrake, it automatically opens to the import window, called Source Selection. If you pressed the Cancel button at the bottom, you can re-open the Source Selection window by selecting Open Source.
There are three ways you can import your Source video:
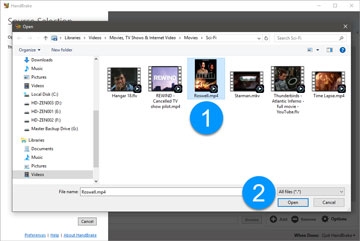
- File allows you to Open a Single Video File.
- Folder (Batch Scan) allows you to import a group of videos inside the same folder.
- Drop a File or Folder here... allows you to drag and drop a file or folder into the centre of window.
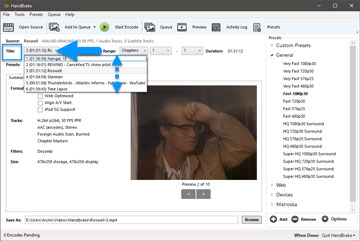
If you want to batch import Titles (videos) from the same Source (folder) or have opened a Blu-ray disc or DVD (sources), you will often have to make a selection from multiple Titles.
Open the Titles drop-down list and select the Title you want to convert.
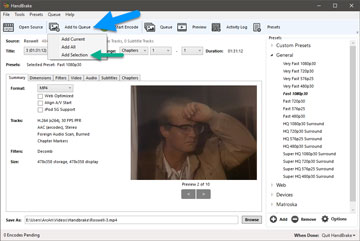
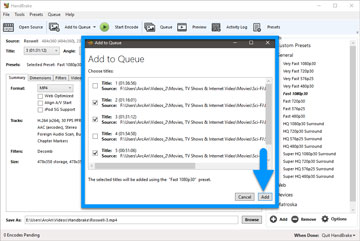
If you want to add more than one Title (video) from the same Source (folder), press Add to Queue and Add Selection.
The Add to Queue window will then open, where you can manually select which Titles you want to Add to your Queue.
Step 3 - Selecting a Preset
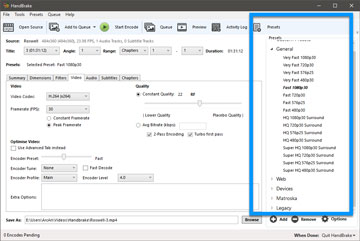
HandBrake provides a number of settings Presets to make your new video work well with your playback devices and software. The latest version of Handbrake includes a large selection of Presets for different devices and common usages.
The default Fast 1080p30 preset is often a good choice because it’s fast and compatible with most devices.
Step 4 - Setting your Frame Rate and type of Frame Rate
This step is not spoken about in the official Handbrake Quickstart Guide, but is actually incredibly important if you want to get good results! The Movie Studio Zen website helps people from every country in the world, not just the population of North America. Many video editing and software guides assume you are using the default "American" NTSC Frame Rate of 30fps or 60fps, but if you are living in Europe, Asia, Australia, South America or Africa, you may be using a PAL Frame Rate of 25fps or 50fps, or something completely different again, like 23.976, 24, 100, 120, ......
Remember this part of the article is just the Quickstart Guide - in the second part, I will go more in-depth on the advanced settings.
MediaInfo - how to find detailed properties about your Source Titles
Have a close look at your Source Title (video) and find out what Frame Rate your video is actually using. If you can't work out what frame rate your video is using, download the free tool called MediaInfo and install it. Once it is installed, it will become an option in the right-click menu for Windows. Right-click on top of the video you need to inspect and select MediaInfo - here is a detailed readout of the metadata for your file.
Handbrake Video tab
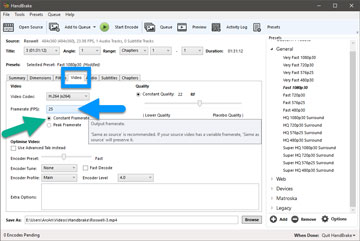
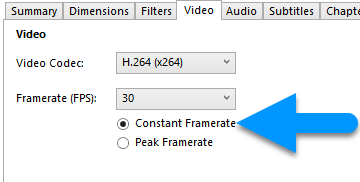
Now open the Video tab in Handbrake and set the Frame Rate (FPS) to match your Source Video's frame rate. Also set to Constant Frame Rate - most video editing programs need your video to be using a Constant Frame Rate.
Step 5 - Select a Destination (Output Folder Location)
HandBrake calls the file name and location of your new video the Destination.
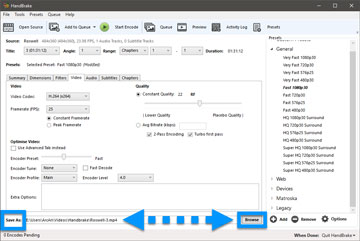
Save As is the file destination path and file name for your new encoded video. You can change it by typing directly in the box.
You can also select the Browse button to choose a different output folder location.
Please take special care to note your destination. Otherwise, you won’t be able to find your new video. You can move it later if you desire.
Step 6 - Start the Encode
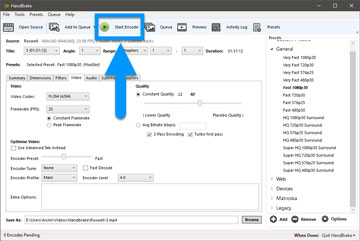
Press the Start Encode button to render your new video.
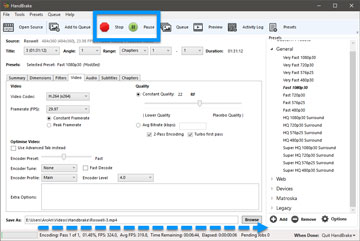
If you have made a mistake you can press the STOP button or Pause to temporarily pause encoding.
HandBrake will report its progress at the bottom of the window while it’s working and alert you when it’s finished.
Congratulations! You now have a new video encoded with Handbrake.
Deeper Dive guide for using Handbrake
 Source: Collection of the Historical Society of PrincetonNow let's take things to the next level. If you have never used Handbrake before, please read the Quick-Start Guide above first, before attempting this Deeper Dive. In this section I will explain the core group of customizable settings in Handbrake. I am not going to go full Einstein here, because I am still learning myself about the "professor level" settings which are available for truly experienced and advanced users. Consider this deeper dive a mid-level training program, before you get your hands on some plutonium.
Most of the good stuff in Handbrake, happens in the seven tabbed windows. The main settings windows are: Summary, Dimensions, Filters, Audio, Subtitles, Chapters and Advanced. The Advanced window truly is advanced and only activates if you turn it on in the Video window. I will not be exploring the Advanced window in this guide - that is for you to learn once you have mastered the basics in this deeper dive.
Step 1 - Import your Video/s from Source into Handbrake
Import your Titles (videos) from your Source (file, folder or disc), as shown in the Quick-Start guide above.
Step 2 - Handbrake Settings Summary
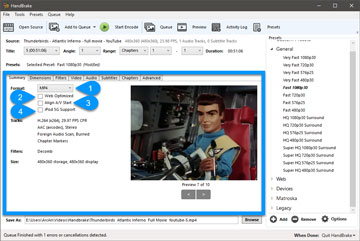
The Summary tab shows a combination of Format settings and a summary of the overall settings that have been selected for your encode.
Format
1. There are 2 types of video containers (file extensions) you can encode your video to: MP4 or MKV. Most people will want to select .mp4, especially if your video is going to be uploaded to a video sharing website like YouTube, Vimeo or Facebook.
2. Select Web Optimized if your video is going to be uploaded to YouTube, Vimeo or Facebook. Web Optimized means the same as Fast Start. After encoding, data is recognized and rewritten to allow immediate playback over a network, without needing to download the entire file.
3. Align A/V Start - this setting aligns the initial timestamps for all audio and video streams, by inserting blank frames or dropping frames. It may improve audio/video sync for broken players that do not honor MP4 edit lists. Only select this if you experience problems.
4. iPod 5G Support - another setting that most people can ignore. It adds a special MP4 marker to allow playback on vintage iPOd 5th generation devices.
Tracks, Filters, Size and Preview
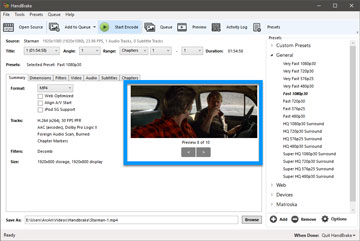
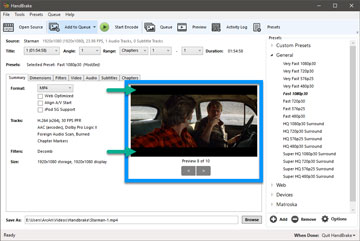
This is a summary of other settings controlled in the next windows. Preview gives you some thumbnail previews spread throughout the video that is about to be encoded.
Step 3 - Handbrake Dimensions Settings
I will admit that the Dimensions settings in Handbrake will often give me a headache, when I'm working with video I sourced from the outer realms of the Universe. Sometimes you may need to tweak the settings in this window after your first encode, if it doesn't turn out the way you expected it to. To say it simply, the Dimensions settings control the Aspect Ratio of your video. If your Source video was originally encoded as an Anamorphic video, you need to pay close attention to your settings here, otherwise your encoded video may end up looking stretched or squished. There is nothing more annoying than watching a long forgotten favourite movie or TV show on YouTube, that looks stretched or squished, because it wasn't encoded correctly.
Source video PAR (Pixel Aspect Ratio) and Cropping (Borders)
Basically there are three types of videos to be aware of, that will affect how Handbrake sees your video and then displays that video in the Dimensions window and back in the Summary/Preview window. Remember that every time you change a setting in the Dimensions window, it will automatically update in the Summery window.
- Videos that use a non-square pixel aspect ratio (PAR)
- Videos that use a square 1:1 pixel aspect ratio (PAR)
- Videos that have black borders at the top/bottom or sides
PAR (Pixel Aspect Ratio)
- If you import video from a DVD, NTSC and PAL Widescreen video uses a non-square PAR (Pixel Aspect Ratio).
- If you import video from a Blu-ray disc, 1920x1080p or 3840x2160p, it will normally be using a square 1:1 PAR.
- All video you see on YouTube, uses a Square PAR (Pixel Aspect Ratio) of 1:1.
Cropping (Border cropping)
If you import a video that has black bars at the top and bottom or sides of the video, the default setting in Handbrake will automatically Crop (remove) the black bars, so that when your video is transcoded, only the actual video image is rendered into a new video, minus the black bars.
Removing any black bars will save space and your media player will add black bars if necessary, when you play the newly encoded video.
If you want to keep any black bars from the original source video, you can do that by turning off Automatic Cropping and configuring a Custom Crop instead.
Anamorphic
There are 4x settings available: None, Automatic, Loose and Custom.
If you hover your mouse pointer over Automatic, the info window will explain what each mode is for. For most users, Automatic or None are the best options to work with. If you are an advanced user and trying to repair some dodgy aspect ratios, Custom will be a good choice. I'm really not sure when someone would want to use Loose?
Modulus
I cannot explain what Modulus actually does, but Handbrake recommends leaving this setting at 2.
Examples of different PARs and Cropping
PAL and NTSC Widescreen Standard Definition video
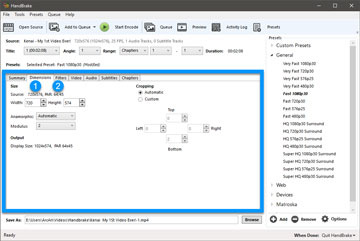
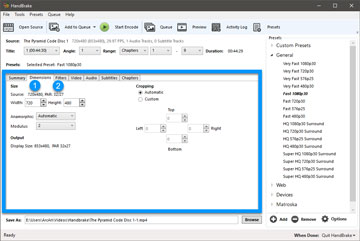
The first two examples here are typical videos sourced from a DVD or Standard Definition video camera. Example #1 shows what PAL DVD Widescreen 720x576 (#1) video looks like and Example #2 shows an NTSC DVD Widescreen 720x480 (#1) video. Both of these videos did not show any border cropping, therefore the Cropping controls are left at zero. Notice that the PAR (Pixel Aspect Ratio) (#2) for a PAL video and NTSC video are different.
1920x1080p HD video with a 1:1 PAR and No Crop
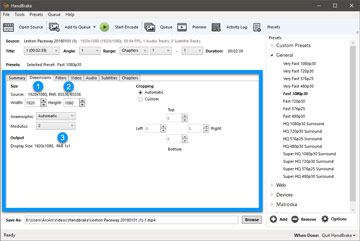
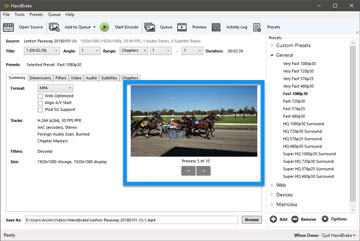
The next example is a 1920x1080p (#1) 1:1 PAR (#2, #3) video with no border crop. In the Summary window, we see that it is displaying like any 16:9 Aspect Ratio video you would see on YouTube or your TV.
If you are a beginner, please note that PAR (Pixel Aspect Ratio) and AR (Aspect Ratio) are referring to two completely different things. Aspect Ratio is referring to the dimensions of the viewable part of a video. Pixel Aspect Ratio is referring to the aspect ratio of each pixel that makes up the video image. All video on the Internet uses a 1:1 PAR.
1920x1080p HD video with a 1:1 PAR and also a Top/Bottom Border Crop
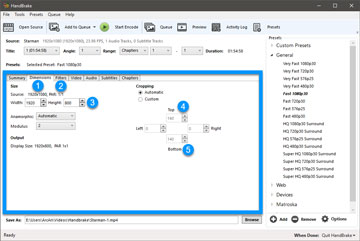
The next example is another 1920x1080p video, but this time it is using a classic Hollywood style cinema crop which adds black bars at the top and bottom of the video frame, to create a narrower Aspect Ratio of 2.4:1. Notice in the first image that the Source Dimensions (#1) are 1920x1080, the PAR (#2) is still 1:1, but the Width x Height (#3) is showing 1920x800.
To explain what is going on here, look at the Cropping and see that the Top (#4) and Bottom (#5) of the video frame have been cropped equally by -140 pixels each. Handbrake has auto-detected the black bars in the original source video and is removing them for you. Also take note of the Preview view in 2nd image.
How to remove a Top/Bottom and/or Left/Right Border Crop
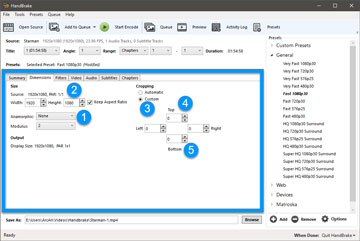
Not everyone may like to encode their video with the black bars removed. To remove the automatic cropping, do all of the following:
- Set Anamorphic = None
- Set Width x Height = Source Width x Height
- Set Cropping = Custom
- Set Top = 0
- Set Bottom = 0
- Set Left and Right = 0 if applicable
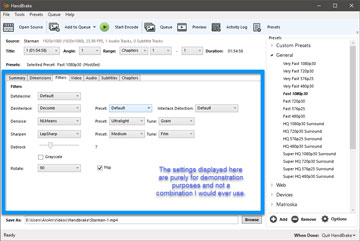
Step 4 - Handbrake Filters Settings
Detelecine
If your source is telecined, it’ll detelecine automatically if set to Default. This filter removes combing artefacts that are the result of telecining, which is a process that adjusts film frame rates that are 24fps to NTSC video frame rates which are 30(29.97)fps.
Deinterlace
Deinterlace removes comb artefacts from the picture. Yadif is a fast and popular deinterlacer. Decomb switches between multiple interpolation algorithms for speed and quality. If you need to deinterlace your video, Decomb is normally the best setting.
I have no idea what the advanced Preset and Interlace Detection settings do - that's above my current pay grade.
Denoise
Noise is referring to video noise which can result from things like film grain, compression artefacts, poorly shot video in low light situations, etc... Denoising in its' simplest form, smooths/blends out noisy pixels into the surrounding environment. It can also help to further reduce the file size of a video. Going into great detail about using the De-Noise filter is beyond the scope of this article. For a more detailed explanation of what some of these Denoise settings mean, I highly recommend Matt Gadient's article on this topic here.
Handbrake v1.1.1 comes with two de-noisers: hqdn3d and NLMeans
hqdn3d has 4x different strength Presets: Weak, Medium, Strong and Custom
NLMeans has 5x different strength Presets and further Tune presets to optimize for specific scenarios.
Presets = Ultralight, Light, Medium, Strong and Custom
Tune = None, Film, Grain, High Motion, Animation, Tape and Sprite
Sharpen
Sharpening enhances the appearance of detail, especially edges. Overly strong Sharpen settings may damage picture quality, by creating ringing artefacts and enhancing noise, which can reduce compression efficiency. I would recommend using small amounts sharpening if needed and not overdoing it, otherwise you can end up with a steaming pile of overkill.
UnSharp is a general purpose unsharp masking filter. It sharpens by blurring, then calculating the difference between the blurred picture and the original.
Presets = Custom, UltraLight, Light, Medium, Strong, Stronger, Very Strong
Tune = None, Ultrafine, Fine, Medium, Coarse, Very Coarse
LapSharp sharpens using convolution kernels approximating Laplacian edge filters, sometimes producing higher quality results than unsharp masking.
Presets = Custom, UltraLight, Light, Medium, Strong, Stronger, Very Strong
Tune = None, Film, Grain, Animation, Sprite
Both Sharpen filters can be configured with a combination of Presets and Tune settings.
Deblock
Deblock reduces blocky artefacts caused by low quality video compression. If you turn it on, it tends to blur the video to remove any blockiness. It can also destroy noise and film grain. There is a slider with 0 to 15 strength settings.
Grayscale
Grayscale removes the colour component of the video and make it Black and White.
Rotate and Flip
Rotate will rotate the picture clockwise in 90° increments. This is great for fixing video from a mobile phone that is not displaying correctly.
Flip mirrors the picture on the horizontal axis.
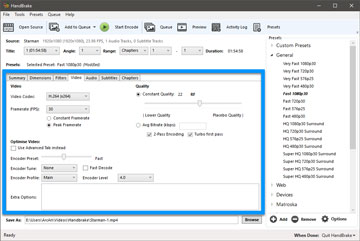
Step 5 - Handbrake Video Settings
Video is one of the most important, if not the most important window for configuring your video encode settings. There are groups of settings: Video, Quality and Optimise Video.
Video Settings
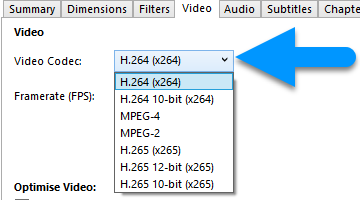
1. Video Codec
In Handbrake v1.1.1 there are 7x different Video Codec encoder options to select from: H.264 (x264), H.264 10-bit (x264), MPEG-4, MPEG-2, H.265 (x265), H.265 12-bit (x265) and H.265 10-bit (x265)
H.264 (x264) is HandBrakes default encoder. It provides excellent performance, file sizes and quality.
2. Frame Rate (FPS)
Frame Rate (FPS) is an extremely important setting to get right! Always make sure you know the Frame Rate your original Source video was encoded with and match Handbrake to use the same frame rate, unless you are trying to fix or convert a video into a different frame rate.
Setting to Same as Source is probably the safest option for most people, but because I like to do everything manually, I normally set the Frame Rate myself.
If you are converting variable (peak) Frame Rate video shot with a mobile phone, make sure to set the Frame Rate manually and don't use Same as Source! Example: Phone video might report 27.5 fps video - set to 30 fps to get a stable constant frame rate for Vegas Pro/Movie Studio.
3. Frame Rate - Constant vs Peak
Most users in 2018 will probably be working with Constant Frame Rate video, unless it came from a phone.
Apparently if you set Handbrake to Peak Frame Rate and the Source video is using a Constant Frame Rate, Handbrake with output a Constant Frame Rate video.
If you set to Peak Frame Rate and the Source video uses a Variable Frame Rate, Handbrake will output a Variable Frame Rate video.
The default setting in Handbrake is Peak Frame Rate (variable). If your video is going to end up in a Video Editing program like Vegas Pro, Vegas Movie Studio Platinum or sent to YouTube, Vimeo or Facebook, you need to encode your video to a Constant Frame Rate. I am only aware of some phones using a variable frame rate.
If a more advanced user than myself knows something better, please post a comment below and I will update this part of the article. I am still learning this stuff myself...
Quality Settings
There are 2 basic ways you can encode a video with Handbrake: encoding with a Constant Quality or using an Average Bit Rate.
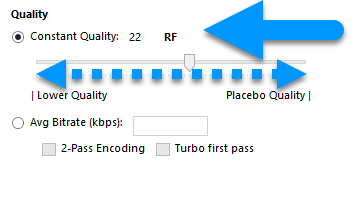
1. Constant Quality
The Quality slider (RF value) ranges from (Low Quality) 51 to 0 (High Quality) for good quality output at reasonable file sizes. Setting to RF51 will use maximum compression, whereas RF0 applies no compression. It is lossless: it compresses the source without throwing away practically any detail. Please note that the Quality slider is not linear for x264 encoding, it is logarithmic like the Richter scale. This means small movements in the RF numbers can have large results.
Recommended RF Settings
RF20 is a good place to start when working with Standard Definition DVD quality video. 18-20 is a suggested range.
RF22 is a good starting value when working with High Definition Blu-ray quality video. 20-23 is a suggested range.
What setting you ultimately end up using, is up to you. Do many experiments with different values and find the sweet spot that works best with your videos.
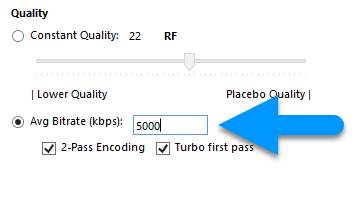
2. Average Bit Rate
The Handbrake guide says that unless you really need to aim for a target file size (which we recommend against), it is highly recommended that you use Constant Quality.
If you do select Average Bit Rate, you need to enter the average bit rate you want the video encoded with, in kbps. When you set an average bit rate, the encoder will vary the number of bits given to any one portion of the video, but try to keep everything at the average you set.
It is recommended that you use 2-Pass encoding. This will provide better quality and better bit-rate distribution. A single pass will lead to sub-optimal results.
The Turbo checkbox will make the first pass quicker at the expense of quality. Most of the time this loss is minimal and not appreciable by the viewer. The downside is it can take up to twice as long to encode a file.
Optimise Video Settings
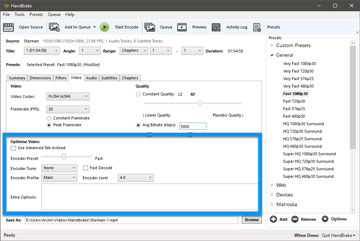
Optimise Video is another extremely important area in Handbrake, to configure correctly. This is where the large collection of Presets in Handbrake can help give you some direction. If you select different Presets from the right side menu, you will see many of the settings here change, depending on what the final destination of the video will be.
1. Advanced
The first setting is Use Advanced Tab Instead. If you select this, an 8th tabbed window called Advanced will open. The Advanced window is truly for experienced users and is beyond the scope of this article.
2. Encoder Preset
The Encoder Preset slider ranges from Ultrafast to Placebo. The selection here adjusts the encoder and is a trade off between compression efficiency versus encoding speed. UltraFast is very high speed encoding, but requires much higher bit-rates to maintain quality. This means you can expect much larger file sizes. Placebo is extremely slow encoding but provides the best Quality and/or filesize for a given source. - This option is often considered a placebo because it offers diminishing returns in terms of quality and file size.
3. Encoder Tune
The x264 Encoder Tune options assign some additional options which will optimize the encoder for certain types of content. If you are unsure or your content doesn’t really fit into one of the following tunes, you can simply leave this option set to None.
Encoder Tune options are:
- Film is for real life footage, films etc may benefit. (Not Cartoons or Anime). Typically won’t do any harm if left on for most content.
- Animation is used for hand-drawn animated content.
- Grain is typically used for very grainy or old content.
- Still Image can be used for Slideshows, Presentations etc where there is very little moving content.
- PSNR is used for benchmarking quality. Should not be used for normal use.
- SSIM is used for benchmarking quality. Should not be used for normal use.
- Zero Latency is optimised for faster decoding. Useful for low power devices that struggle to decode the video.
4. Encoder Profile
Encoder Profile defines the features and capabilities that the encoder can use.
You can think of the profile as the level of complexity required in encode / decode. The higher the complexity, the more CPU power is needed to encode/decode. Setting a profile, constrains the encode to using settings that are allowed for that profile level.
Typically, devices will advertise that they are compatible for a particular profile and level, so you can simply set the option that matches your device for the best chance of compatibility. However if you output to a profile (too high) that is not supported by your device and/or media player, the video will not work.
Encoder Profile options are:
- Auto is recommended and will automatically set the profile based on all the options that have been selected. It is also recommended that you use this option unless you need to set a profile to ensure compatibility for a particular device.
- Baseline encodes are the most basic form of encoding. While decoding is much easier, it may also require much higher bit-rates to maintain the same level of quality.
- Main is the middle ground. Most modern / current devices will support this profile.
- High profile is the best quality and file size at the expense of CPU time in both decode and encode.
5. Encoder Level
The Encoder Levels are another form of constraints that define things like maximum bitrates, framerates and resolution etc. The wikipedia article lists the relevant information for each level. https://en.wikipedia.org/wiki/H.264/MPEG-4_AVC#Levels
Most devices (and sometimes, software decoders) support a maximum level. When the video’s specifications exceed that level’s constraints, the decoder won’t be able to decode the video properly (it may simply refuse to play the file).
HandBrake’s H.264 encoder, x264, sets the appropriate level automatically based on all the other settings. To make sure your video doesn’t exceed a specific level, you simply have to make sure the other parameters fit within the constraints imposed by the level.
It is recommended that you leave this setting on Auto unless you require to set it for device compatibility.
6. Extra Options
Extra Option is for experienced users and is beyond the scope of this article.
Step 6 - Handbrake Audio Settings
Handbrake supports most of the major audio formats in use today. Audio settings are fairly straight forward and offer a good range of encoding options.
Audio Tracks
If you would like to add multiple (different) Audio Tracks for the same video, press the Add Track button.
Configuring Audio Output
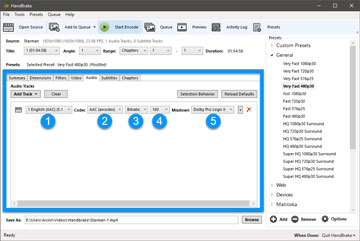
#1 Shows the audio codec/format your Source video is using.
#2 Is where you can select which codec you want the audio encoded with. You can convert the audio into something different like AAC (avcodec), MP3 or AC3 or use one of the pass-thru options: Auto Passthru, AC3 Passthru, DTS Passthru, DTS-HD Passthru, AAC Passthru, MP3 Passthru. Auto Passthru is probably an easy option for most people.
#3 Select Average Bit Rate or Quality based encoding. HandBrake supports average bitrate for all audio encoders except FLAC. Quality based encoding is supported for the following codecs: - AAC - MP3 - Vorbis. The scale of the quality if much less pronounced compared to the video quality slider, so changes do not have nearly as big an impact on file size.
#4 If you do not select one of the Passthru options, you need to set your Bit Rate for audio.
#5 Select a Mixdown option from Mono, Stereo, Dolby Surround, Dolby Pro Logic II or 5.1 Channels. The default setting is normally the best option.
Step 7 - Adding Subtitles
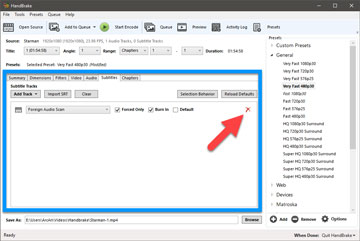
Multiple Subtitles tracks can be added to your video in the Subtitles window. You can also Import SRT subtitles that have been saved to a .srt file extension.
if your video contains no subtitles or you need to remove the subtitles, I recommend deleting the Subtitle track by pressing red X.
Step 8 - Chapter Markers
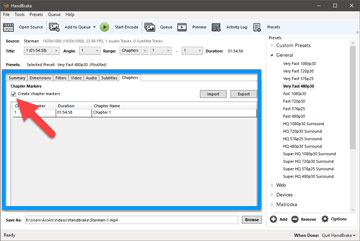
Chapter Markers can be imported and exported from this window.
If you don't want to encode any chapter markers with your video, I recommend turning off chapter markers.
Step 9 - Advanced Video Settings for Versions 1.1.1 or older
V1.2.0 - Important Update about Advanced Settings!
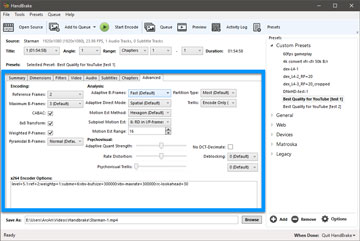
With the release of Version 1.2.0, the Advanced Settings tab has been removed from the program. If you would like to know more about the removal of this feature, please read this thread on the official Handbrake Forum.
Why has the advanced tab been removed completely?
If you selected Use Advanced tab instead in the Video window, an 8th tabbed window called Advanced will open. The Advanced window is for experienced users and is beyond the scope of this article.
Step 10 - Saving Custom Presets
Handbrake v1.1.1 has a large range or Presets you can select from, that have already been optimised for best purpose and quality. You can also create, save and edit your own Custom Presets.
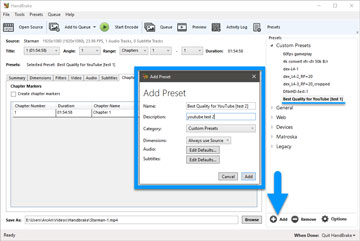
To create a new Preset, press the +Add button located in bottom right corner. The Add Preset window will then open. Name your Preset and make any further configurations, then press the Add button. Whatever settings you had configured in Handbrake with before pressing the Add button, will now be saved to this new preset.
All your new presets will be available to use in the Custom Presets folder.
Step 11 - Experiment in your new Handbrake Lab!
If you have reached Step 12, you are ready for action. For some people this will be an enjoyable experience, because you can now spend hours, days and years experimenting with different combinations of settings in Handbrake and search for the Holy Grail of Video Production - the highest quality video using the smallest possible file size.
If any advanced users happen to stumble upon this article and have any tips to share, please do so in the comments section below. If anyone discovers something wrong in my article, please let me know and I will make the appropriate edits.
All the best with your Handbrake experiments!
Derek (Dr Zen)
Movie Studio Zen
Related Topics and Tutorials
How to export Cineform video with Vegas Pro and Vegas Movie Studio
How to export Avid DNxHD video with Vegas Pro and Vegas Movie Studio Platinum
How to export video from Vegas Pro to Handbrake
How to export video from Vegas Movie Studio Platinum to Handbrake

About Derek Moran
Derek Moran is the author of all articles on Movie Studio Zen.
You can find me on YouTube, Facebook, Twitter, Read more about Derek...

