In this Sony Sound Forge Audio Studio tutorial, I show how to add special Audio FX to a Video or Audio file and how to automatically save the changes back into your Sony Movie Studio Platinum project.
If you own any of the "Suite" versions of Movie Studio Platinum like Movie Studio Suite 13, you also get Sound Forge Audio Studio 10, which is a basic Audio Editing program. If you go into the Preference Settings of Movie Studio Platinum, you can link Sound Forge with Movie Studio. This gives you the ability to open any Audio Event on the Movie Studio timeline into Sound Forge. Here you can do more detailed audio editing, add Audio FX and then save the changes directly back into Movie Studio without having render or move files around yourself.
Topics covered in this Tutorial
How to Set Sound Forge Audio Studio as your Preferred Audio Editor
Setting Audio Device Type in Movie Studio Platinum and Sound Forge Audio Studio
Reset Sound Forge to populate FX Favourites Menus
Creating Regions/Markers in your Movie Studio Platinum Project
How to Open Copy of Audio Event in Sound Forge Audio Studio
Creating Regions on Timeline in Sound Forge
Adding Audio FX with Sound Forge Audio Studio
Saving your Audio file and Updating changes back into Movie Studio Platinum
Short Film "Magic Strawberries"
How to Set Sound Forge Audio Studio as your Preferred Audio Editor
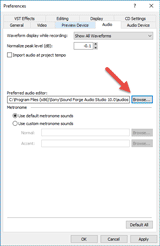
Boot up Movie Studio Platinum and go to Options/Preferences/Audio
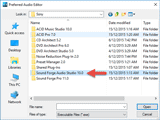
Press Browse next to Preferred Audio Editor
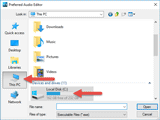
Then go to the top level of your Computer and select This PC, Computer or My Computer
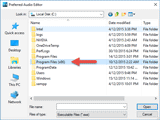
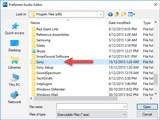
Open Local Disk (C:)/Program Files (x86)/Sony/Sound Forge Audio Studio 10
Find and select audiostudio100.exe - your Preferred Audio Editor is now set.
press thumbnails to view screen shots full screen & use keyboard arrows for control
Setting Audio Device Type in Movie Studio Platinum and Sound Forge Audio Studio
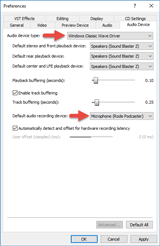
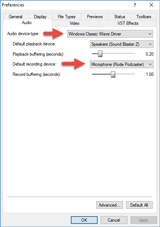
By default, Sony normally sets the Audio Device Type to Microsoft Sound Mapper, however it is better for most people to set it to Windows Classic Wave Driver. Do this for both programs.
Please note that everyone's computer is likely to be very different in the Audio Hardware/Software department. In my screen shots you see Microphone (Rode Podcaster) listed as the Default Recording Device. Unless you use the same microphone, it is gong to be different for you. Just be aware of the options and select what looks correct for you.
In Movie Studio Platinum, go to Options/Preferences/Audio Device and set Audio Device Type = Windows Classic Wave Driver.
In Sound Forge Audio Studio, go to Options/Preferences/Audio and set Audio Device Type = Windows Classic Wave Driver. It is a good idea to close Movie Studio Platinum before you open Sound Forge.
Reset Sound Forge to populate FX Favourites Menus
Extremely important that everyone read this section!!!
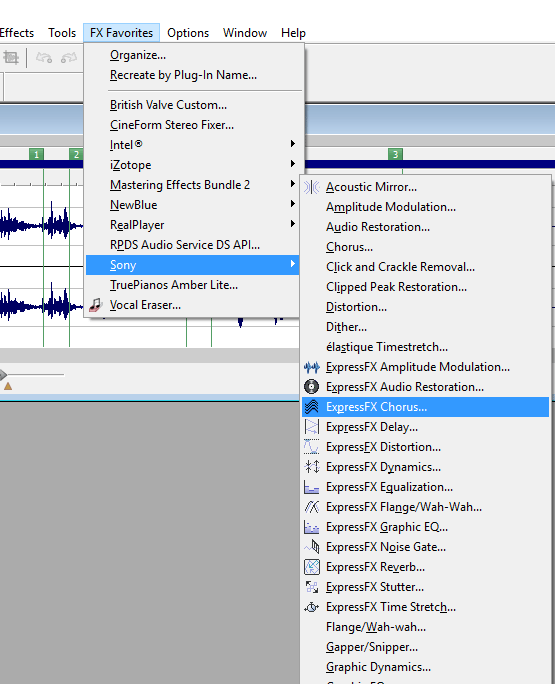
Here is a little insiders trick, that will add some extra functionality to Sound Forge Audio Studio. In the video tutorial I used the Pitch Shift FX quite a lot, however it was not until after I recorded the video that I realized this is a Movie Studio Platinum Audio Effect only. However you can force Movie Studio Platinum Audio FX to appear in Sound Forge, if you reset Sound Forge. This will auto-populate all compatible Audio FX from Movie Studio into Sound Forge. Once you have done this, go to FX Favourites (top menu) - Sony and you will see a large list of Audio FX you can apply to your project.
To reset Sound Forge do this:
Turn Sound Forge Off.
Hold down CONTROL and SHIFT keys at the same time AND ALSO AT THE SAME TIME double click program icon on Desktop to Boot program.
Window will pop up.
Select Delete Cache and Yes.
Creating Regions/Markers in your Movie Studio Platinum Project
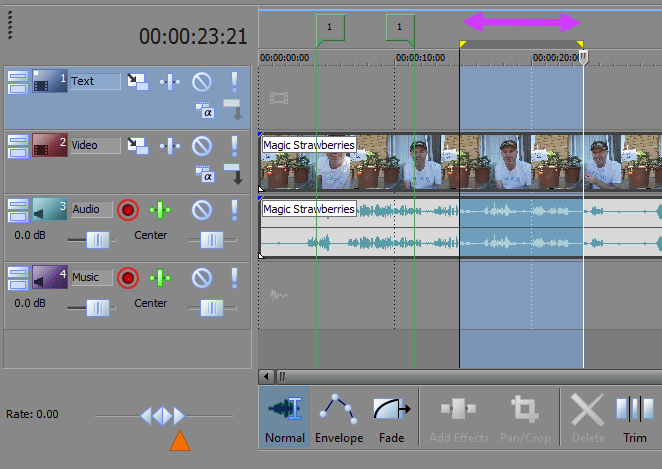
Start a new project in Movie Studio Platinum and import your media files to the timeline, exactly like you normally would. It's probably best to do all your main editing first, before you begin to create and add your Audio FX. When you are ready to start working in Sound Forge, the first thing I like to do is create some Regions and/or Markers on the Movie Studio timeline, to indicate the specific areas I want to add Audio FX to.
If you drag your mouse pointer just above the Timeline Ruler, it creates a Loop Region. Let go of your mouse button and then press R on the keyboard to create a Region or just find a spot you want to mark and press M for Marker. You can't import these markers into Sound Forge, however by talking note of the Timeline Timer, you will know which sections to work on. The audio waveform is also very handy for identifying specific areas.
To find tune the area you want to apply an effect to, you can turn on Loop Playback and then press Play. Then drag the beginning and end of region loops to fins exact section you want.
How to Open Copy of Audio Event in Sound Forge Audio Studio
When you are ready to add some Audio FX using Sound Forge Audio Studio, makes sure to Save As your Project before proceeding to the next step.
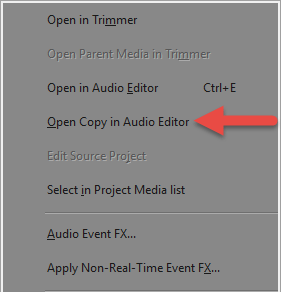
Now right-click the Audio Track on timeline you want to open in Sound Forge Audio Studio and select Open Copy in Audio Editor. A .wav audio file copy of the audio track will now render in Movie Studio and then open up in Sound Forge Audio Studio.
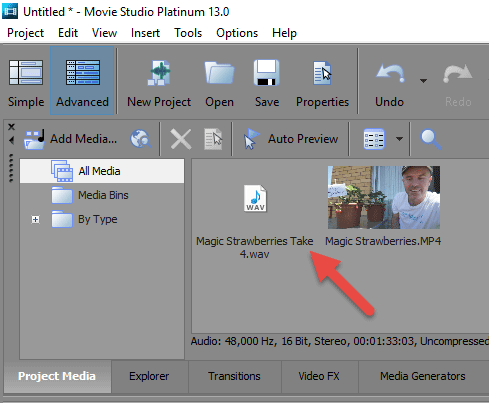
Quickly go back into Movie Studio, go to View (top menu) and turn on Active Take Information. Now go to the Project Media tab and you will see the new .wav audio file. Then have a look at your timeline and you will see that the original audio track has been replaced with the .wav audio file copy.
Creating Regions on Timeline in Sound Forge
The first thing I like to do is roughly locate the regions where I want to add Audio FX and insert Regions and Markers. Because you can't transfer Regions/Markers directly from Movie Studio, you will need to go backwards and forwards between Movie Studio and Sound Forge, taking note of the Timers and Audio Waveforms to use as guides.
When you have located each section, use the same technique I showed in Movie Studio by dragging out Loop Regions and then pressing R on the keyboard.
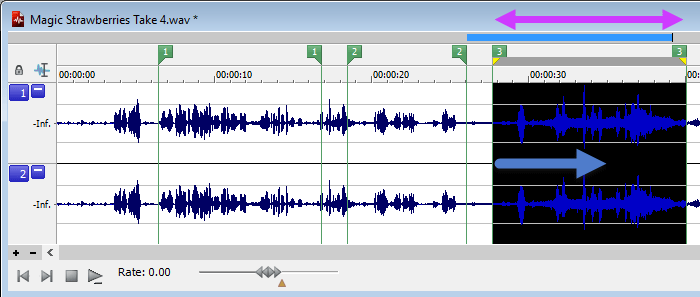
Important Note: When dragging out regions on the Sound Forge timeline, you need to drag from the center line if it is a Stereo audio file, otherwise only one channel will be selected.
Adding Audio FX with Sound Forge Audio Studio
We are now ready to start having some fun !
Step 1
Each time you are ready to add an Audio Effect to your project, you need to first drag out a Loop Region on the timeline, so that it becomes black like in the screen shot above. If you don't do this, any effect you add will be applied to the entire audio track. Of course if you actually want to have it applied to everything, you can skip this step.
Step 2
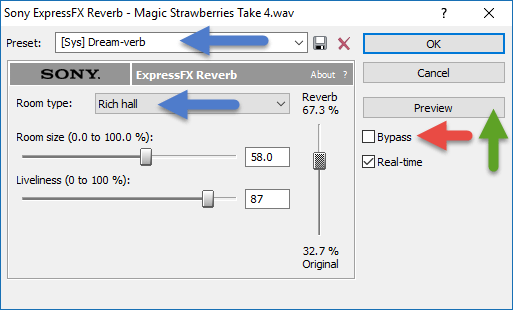
There are two pathways I like to use when selecting an Audio Effect. I either go to Effects in the top menu or FX Favourites/Sony. Most FX windows have similar controls you can experiment with. You will find a number of different Presets to select from the top drop down box. There are often secondary presets as well, inside the control box, like Room Type in Sony ExpressFX Reverb. You can also play around with the slide controls.
Step 3
To hear what the effect sounds like, press the Preview button. If you want to hear the original file with no effect applied, turn on Bypass. Once you are happy with how it sounds, press the OK button and effect will be permanently applied to audio track. If you make a mistake at any time, simply press CTRL + Z to go back in time and un-do changes.
Repeat this process for all sections of your Audio file.
Saving your Audio file and updating changes back into Movie Studio Platinum
This is the easiest step of the entire tutorial. To save changes to the .wav file, go to File and press Save.
This saves the exact same .wav file that is sitting in your Movie Studio Platinum timeline. The only last step to do now, is render/export your Movie Studio project as you normally would.
If you are wondering where the .wav audio file is located on your computer, open the folder that the original video or audio files came from, and here you will see the new .wav file with added audio FX from Sound Forge.
To learn more detail about this tutorial, please watch this video at top of page.
Watch "Magic Strawberries" - video that tutorial was based on

