Sony Vegas Pro comes with four Video Scopes and an extensive range of Video Effect plugins to help you Colour Correct and Colour Grade your Video and Still images.
Almost any video or still image that comes out of a camera, will benefit from some level of Colour Correction in Sony Vegas Pro or Sony Movie Studio Platinum. During this tutorial I will be using Vegas Pro 13, however Movie Studio Platinum users can still follow along and learn quite a lot. If you are a Movie Studio user, you will have many of the same Video Effect plugins that Vegas Pro users have, however you will not have access to Video Scopes which are a Pro feature only.
Colour Correction is a very large topic, so the purpose of this article is to give you a clear understanding of the basics and help explain the meaning of common colour correction terms. Once I have explained some definitions and theory, I will then take you through some real world examples of how to use Video Scopes with some of the Colour Correction Video Effect plugins.
Definitions for Colour Correction
The best place to start is to explain the difference between what Colour Correction and Colour Grading actually means.
Colour Correction can mean many things, but basically it is the process of fixing any problems with the exposure and colour of your original video or still image, so that it looks right.
Colour Grading is the process of altering and enhancing the colour of a video or still image, to create a particular look, feel and mood.
Tonal Range
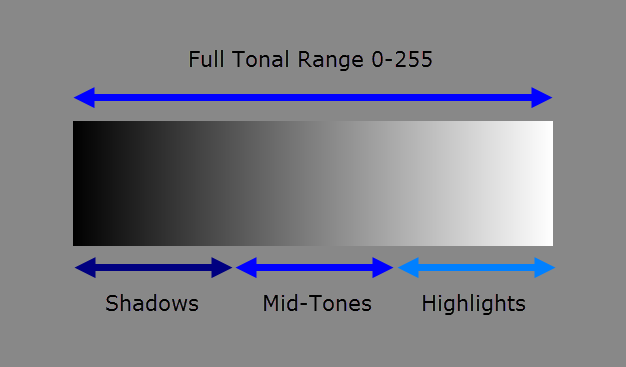
Tonal Range = the range in Brightness Levels from the Darkest to the Lightest - Jet Black to Pure White.
Full Tonal Range extends from RGB values of 0, 0, 0 (Pure Black) to 255, 255, 255 (Pure White).
Understanding Tonal Range is at the heart of colour correction. The easiest place to start is in the world of Black and White. Once you understand Tonal Range expressed as Pure Black to Pure White, it is easy to understand colour in the same way, using the three RGB (Red, Green and Blue) colour channels that make up any colour image.
If the tonal range is quite narrow, the video image will look flat and lack contrast - basically a washed out looking video. Increasing the tonal range gives you whiter whites and deeper blacks, thus increasing the overall contrast of the image. Doing this often has a side effect of slightly increasing the saturation of your colours as well.
Video and DSLR Camera Recording Modes and Picture Styles
Many professional video cameras, DSLR cameras and the latest mirrorless cameras, have special Picture Profiles that allow you to deliberately record to a very flat or neutral Picture Style or Cine Style - meaning a narrow tonal range. You may hear terms like S-Log being mentioned. This may seem counter intuitive to record your original video to a flat picture style, however it means that once you get your video into Sony Vegas Pro or Movie Studio Platinum, there is much greater scope to fully open up the complete tonal range, because the shadows and highlights have not been "baked into" the video at the extreme ends of the spectrum. So if you are lucky enough to have a really good camera that can shoot in these professional modes, learning how to do Colour Correction and Colour Grading is extremely important.
Broadcast Safe Colours
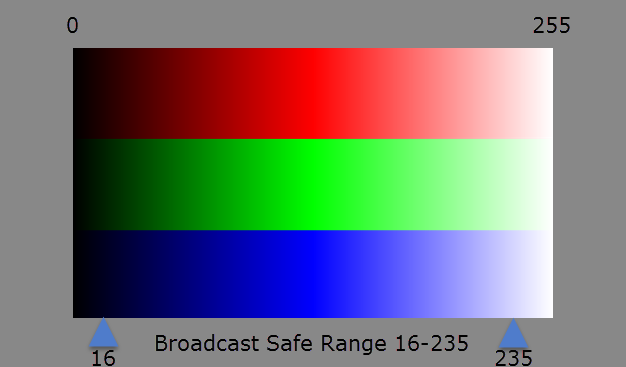
Quite often you will hear the term "Broadcast Safe Colours" being used. This refers to a limit being placed on the Full Tonal Range. This is very important for any video projects to comply with, if they are destined for playback on a TV Station. The reason for this relates more back to the days of analog TV broadcast through glass tube cathode-ray television sets. Colour values that exceeded the broadcast safe range, would display incorrectly on a TV and/or cause audio artifacts to appear. Modern HD Televisions can handle the full range just like your computer monitor, however the specification still remains in place world wide and does still seem to be needed.
Broadcast Safe Colours live between 16, 16, 16 (Safe Black) to 235, 235, 235 (Safe White).
Shadows, Mid-tones and Highlights
Shadows refers to luminance values for anything that sits in the lower third of the tonal range.
Mid-tones refers to luminance values in the middle third of the tonal range.
Highlights refers to luminance values in the upper third of the tonal range.
Gamma
Gamma refers to Mid-tones. Changing Gamma will Brighten or Darken Mid-tones.
Video Scopes available in Vegas Pro
Vegas Pro comes with four different video/colour scopes which are designed to help you analyze your video and help you see exactly what is going on. Using these video scopes will make it easier for you to accurately adjust tonal range, brightness and contrast, hue and saturation, luminance values, gamma values, shadows, mid-tones and highlights. Don't freak out if you are already getting scared by some of these exotic terms. I gaurantee that by the end of this article, it will all make sense and you will have full confidence to dive in at the deep end of the colour pool. I am deliberately make it as simple as possible.
How to turn ON Video Scopes in Vegas Pro
Video Scopes are accessed by going to View - Window Layouts - Colour Correction.
Colour Correction should always be one the last tasks you complete when editing a video project. It is definitely not something you would do at the beginning, before you have sliced and diced your media on the timeline. Once you begin adding Colour Correction Video Effects to the timeline, your CPU will have to do a lot more work. Make sure to pick a good place in each video clip that represents the overall colour and brightness levels of the entire video. Now is also a good time to switch the Preview Window into one of the Best Modes, so that you are seeing the colour accurately while applying Colour Correction.
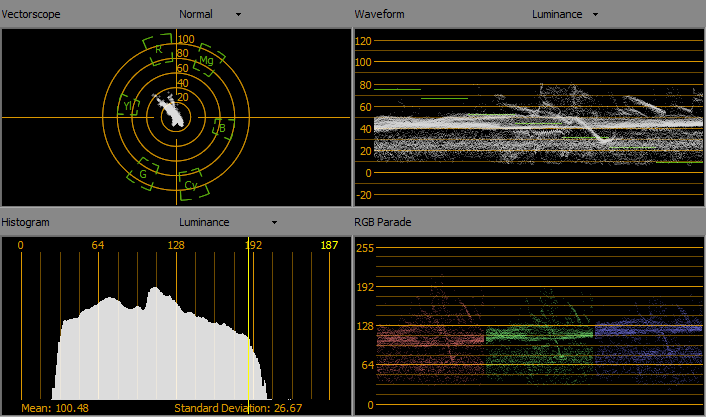
Vectorscope
The Vectorscope plots Hue and Saturation.
Hue = what colour it is.
Saturation = intensity of colour.
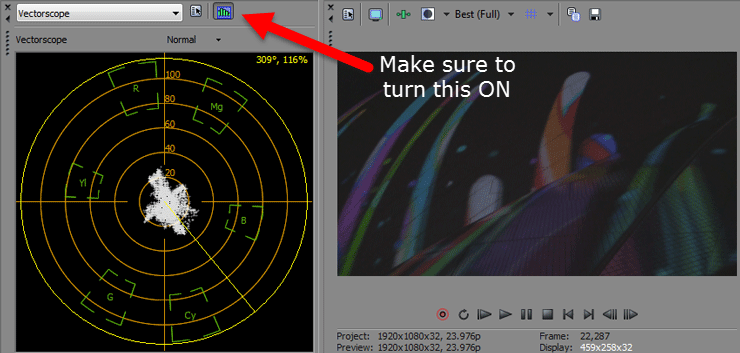
The center of the scope represents zero saturation and no hue (no colour). The further away the dots are from the center, the more saturated the colours are. The six green target areas represent the three primary colours of red, green and blue and the three secondary colours of cyan, magenta and yellow. The center of each target represents the broadcast safe saturation level for that colour.
In example 1 below, all colours fall into the Broadcast Safe zone. If any dots appeared past the safe zones, the Vestorscope would be able to indicate me which Hue (Colour) needs adjusting.
*Make sure to turn ON Update Scopes While Playing, marked by red arrow below.
Example 1 - using the Vectorscope
This is some video I shot from the Sydney Vivid Light Festival, where powerful projectors shine video images onto the Sydney Opera House. All the colours are washed out in the original shot. You can see on the Vectorscope that all the dots are concentrated around the centre and they are relatively dispersed throughout 360° - indicating that there are many different hues (colours) present, but they are not very saturated.
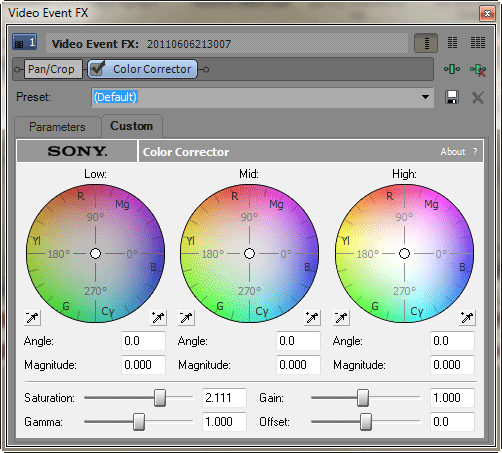
So I then applied the Colour Correction plugin and boosted the Saturation.
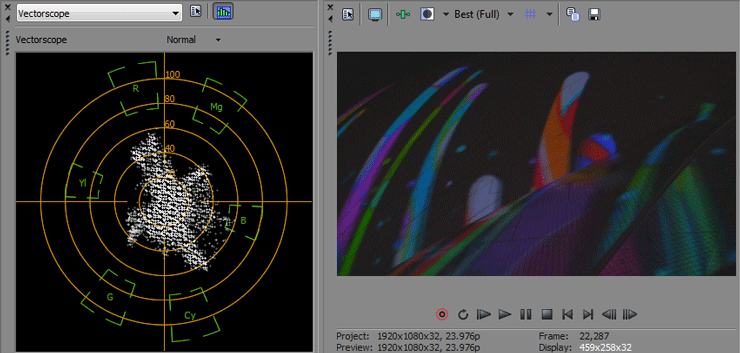
Now you can see all the dots have spread out from the centre, which indicates all the colours are now more saturated. However there are no dots past the green target areas, so I know that the colours are still broadcast safe. In my experience, most video clips look better with at least a little bump in the Saturation.
Waveform
The Waveform scope shows luminance values, which means it is indicating the brightness levels for your video.
Luminance value = Brightness levels.
Looking at the Waveform monitor from left to right corresponds exactly to looking at the Video Preview window from left to right. The higher the dots are vertically, indicates more luminance (brightness).
Example 2 - using the Waveform scope
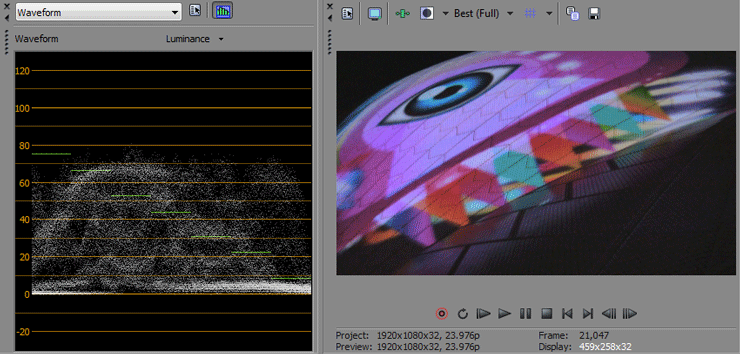
In Example 2 I have shown another part of the same video from example 1. I have delibrately removed the Colour Correction I added above, so that we can see what the raw video looks like in the Waveform scope. Notice how squashed the waveform is ? Which is telling us the the video is very dull and lacks luminance.
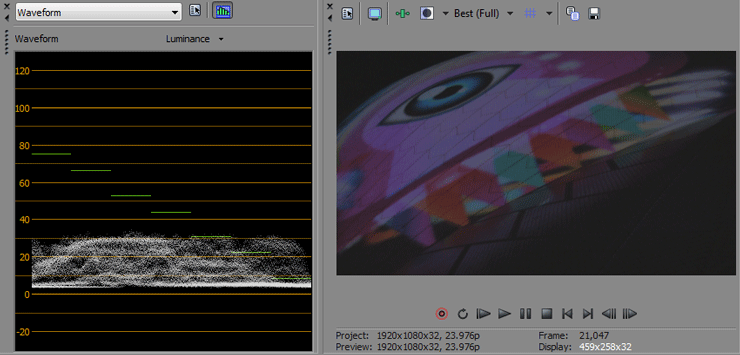
I then applied just the Brightness and Contrast filter and pumped up the Brightness a little bit and the Contrast a lot.
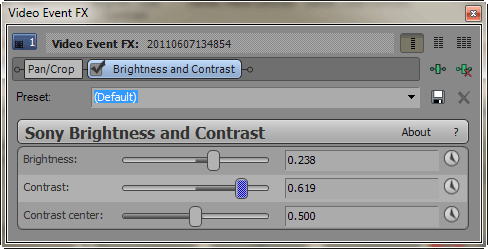
Now the Waveform looks like it can breathe again and we can see a nice distrubution of luminance all the way from zero up to the 80% level mark. Without adding any Colour Correction, the video already looks 100% better than the original.
Histogram
The Histogram displays the Brightness and Contrast of your video.
Brightness = Luminance value.
Contrast = the difference between light and dark.
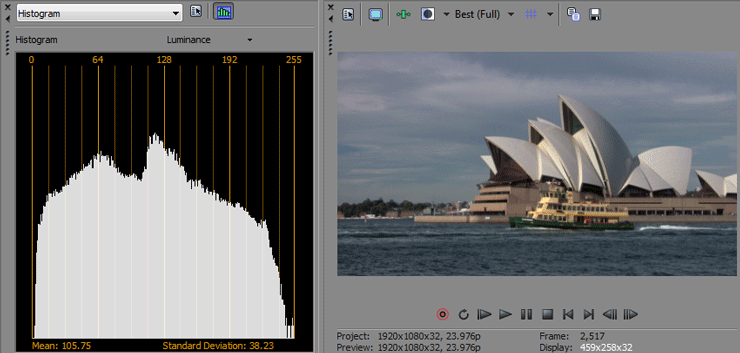
The vertical lines starting from the left at "0" (0=black) represent luminance values and extend all the way to the right at "255" (255=white). The height of each line represents the number of pixels in the image that exhibit a particular luminance value.
Example 3 - using the Histogram
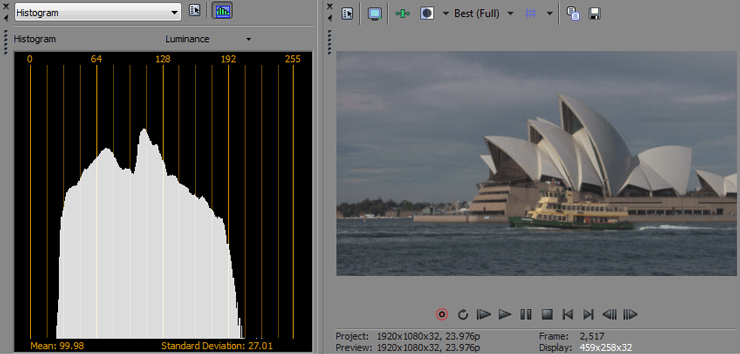
In Example 3 you can see that the image is flat and washed out looking. The Histogram shows that there are no true Blacks in the image and no True Whites, or you could also say that it is lacking Shadows and there are no Highlights. Everything is bunched up in the Mid-tone area.
I then applied the Brightness and Contrast filter.
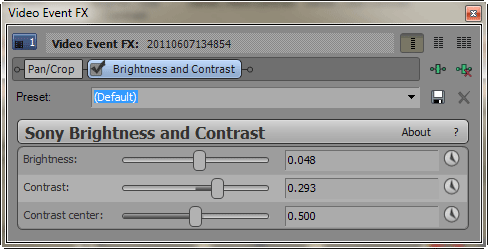
Increasing the Brightness slider moved the entire Histogram output to the right. Increasing the Contrast slider expanded out the entire Histogram output , so now the image has visisble Shadows, Mid-tones and Highlights - giving the image more definition.
RGB Parade
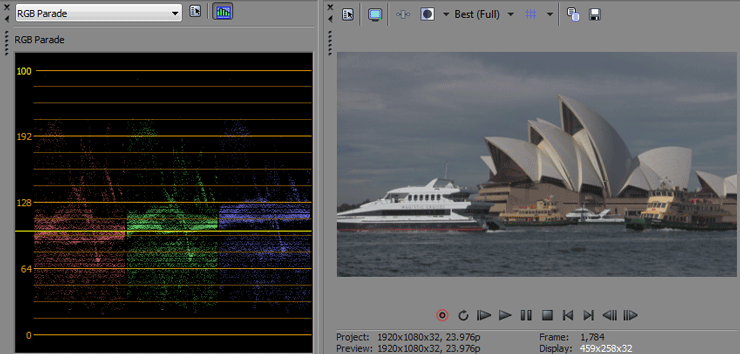
The RGB Parade shows the Luminance (brightness) of individual RGB Components (colour).
RGB = Red, Green and Blue
This is my favourite Video Scope because you can quickly see the brightness levels for each of the three main colour components. If you could stretch out each individual colour band to match the same width of your Preview Window, you would clearly see the corelation between the scope and the image. When you watch the video tutorial at the top of this article, you will see exactly what I mean.
Example 4 - using the RGB Parade
In Example 4 you can see a very strong band of activity in the lower Mid-tone area. There are no pure blacks at the bottom and a large area of no highlights at the top of the spectrum. The tiny bit of activity you can see around the 192 line, represents the luminance of the white boat on the left.
I added Colour Curves to the image and created an "S-Curve".
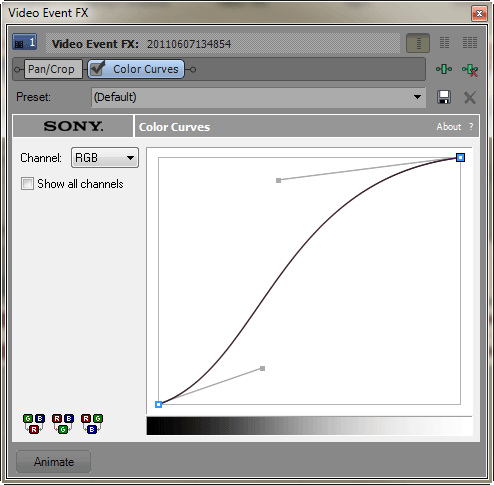
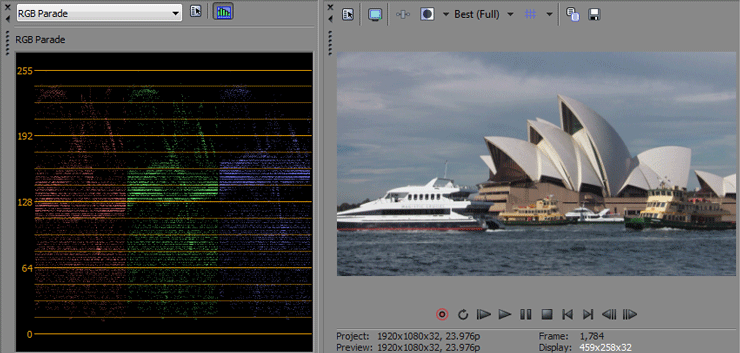
The short bottom handle slightly pushed the image closer to true blacks. The longer top handle I created at the top, gave me the ability to stretch out all the compressed data that was sitting in the lower mid-tone region and also at the same time increase the overall luminance of the whole video. Colour Curves is definitely my favourite Colour Correction tool.
Using Colour Curves, you can also set it to just one Colour Channel if needed and change just that channel - either Red, Green or Blue. This can then be repeated for all three RGB Channels, so that each has it's own curve.
How to quickly make your project Broadcast Safe
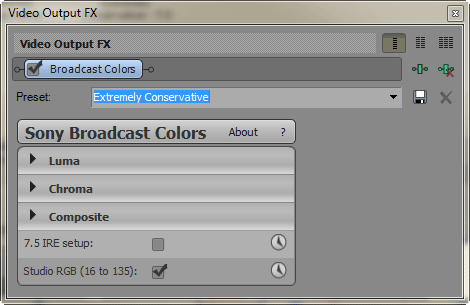
There is a quick way to make sure your Output is Broadcast Safe, by applying the Broadcast Safe filter to the Video Output FX button above the Preview Window. Go to the Video Fx tab and drag Broadcast Colours - Extremely Conservative preset onto the output link. This will clamp everything down so that it does not go past the 16-235 range.
In the video tutorial I explain this in much more detail, so please watch if you want to learn more.

Best Colour Correction Video Fx
I have only touched on some of the Video Fx plugins you can use in Sony Vegas Pro and Movie Studio Platinum, for Colour Correcting and enhancing your video images. As I said at the beginning of this tutorial, Colour Correction is a huge topic full of many varied opinions. I am not a professional colourist, so what I am teaching you is the best of what I know right now. In the video tutorial I go over the core basics taught in this article and expand on a few areas I did go into detail with here.
The best Colour Correction Video Fx available to use are the following:
- Brightness and Contrast
- Levels
- Colour Corrector
- Secondary Colour Corrector
- Colour Curves
- Broadcast (Safe) Colours
I will definitely be making more advanced tutorials on this topic in the near future.
All the best with your projects and if you have any tricky questions, please use the new Movie Studio Zen Forum.

About Derek Moran
Derek Moran is the author of all articles on Movie Studio Zen.
You can find me on YouTube, Facebook, Twitter, Read more about Derek...

