The release of Vegas Pro 15, brings some exciting new changes and options for rendering video with your GPU or CPU now.
Magix has created a new video codec called MAGIX AVC/AAC, which effectively replaces the old Mainconcept AVC/AAC encoder/decoder that has been in Vegas Pro for many, many years.
If you haven't upgraded Vegas Pro for a few years, the best option for rendering most videos now is to use the Magix AVC/AAC encoder. There are pre-made templates for rendering 4K, 1080p and 720p video. Depending on which CPU and GPU your computer uses, you will see different versions of each template which can take advantage of GPU acceleration to speed up your render times.
Topics Covered in this Tutorial
Overview of new MAGIX AVC/AAC Video Codec - Encoder/Decoder
Check your Project Properties are Set Correctly, for Best Quality Results!
How to turn GPU Acceleration On or Off
Instructions for Rendering (Exporting) Video with Vegas Pro 15
Rendering with your CPU, Nvidia NVENC, AMD VCE or Intel QSV
How to Customize Advanced Settings in any Render As (Export) Template
Mobile Phone video recorded with a Variable Frame Rate
How to check if your video is using a Variable Frame Rate or Constant Frame Rate?
How to Convert Variable Frame Rate video into Constant Frame Rate video
Overview of new MAGIX AVC/AAC Video Codec - Encoder/Decoder
The new MAGIX AVC/AAC codec for encoding/decoding, replaces the older Mainconcept AVC/AAC encoder/decoder, that has been part of Vegas Pro for many generations now. This new encoder/decoder is fully optimized to work with Intel® Quick Sync Video (the graphics engine that is part of many Intel CPUs) and all the very latest Nvidia and AMD Radeon hardware architecture. This means that you can now render video using your Graphics Card instead of only using your CPU.
The original build version for Vegas Pro 15 did not include support for AMD graphics cards, however it was added to the program during one of the free build updates during it's lifetime.
If you have a compatible Nvidia graphics card, AMD Radeon graphics card or an Intel CPU that includes Intel® Quick Sync Video, you will see new template options in the Render As window that you can select from.
On my computer I do not have an Intel CPU that includes Intel Quick Sync Video, but I do have a modern Nvidia GPU. This means there are two options I can choose from, in the Render As output templates.
- If you select a template with no (bracketed) options, Vegas will use your CPU to render the project.
- If you select one of the NVIDIA NVENC options, the rendering will be done by your Nvidia graphics card.
- If you select one of the AMD VCE options, your AMD GPU will render your video.
- If you have an Intel CPU that includes Intel® Quick Sync Video, you will see Intel QSV options.
Check your Project Properties are Set Correctly, for Best Quality Results!
Before you get to the Render As window, make sure your Project Properties are set correctly. If your Project Properties don't match the Render As template you select, it can potentially have a BIG negative impact on how long Vegas Pro takes to render your videos and the final video quality.
What Frame Rate do the videos in your project use ?
Sometimes you may be working with mixed video frame sizes and frame rates, in which case you can't match everything perfectly in the Project Properties. However, where you can, always try to match all your media as best as possible.
Important! Working with Variable Frame Rate video from mobile devices
If you are using video that was recorded with a Android phone, Android tablet, Apple iPhone or Apple iPad, it has probably been recorded using a Variable Frame Rate. Variable frame rate videos do not work properly in video editing programs like Vegas Pro, which means you will need to convert it into a Constant Frame Rate video before importing into Vegas Pro. Click here for instructions on how to fix this at the end of this tutorial.
Rule #1 - All the videos in my project use the same Frame Rate
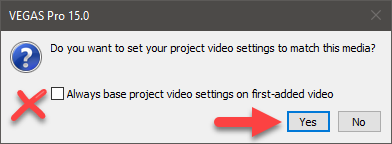
If all the videos in your project came from the same camera and use the same frame rate, your life will remain easy and simple. When you start a new project in Vegas Pro, the program will normally ask if you want to: Set your project properties to match this media? When you say yes to this question, Vegas Pro will automatically set the Project Properties for you.
In this scenario, you can import any one of your videos to set the Project Properties.
Example: All your videos in the same project are 1920x1080p @29.97 fps, which means your project properties will be set to the same frame size and frame rate. When it is time to render the project, you will also be rendering to 1920x1080p @29.97 fps.
Rule #2 - The videos in my project were recorded with two different Frame Rates
When you have a project that uses video with different frame rates, you need to plan ahead before setting your Project Properties. I use a basic rule for working out what to do.
When you mix high frame rate video (example 60 fps) with standard frame rate video (example 30 fps), I would normally set the Project Properties to match the standard frame rate video of 30 fps. This means I would also be rendering at 30 fps and not 60 fps. Setting a project up like this is the safest option and should give you the best quality results!
However, if you set the Project Properties to match the 60 fps videos, when it is time to render your project, Vegas will have to create 30x fake frames every time it renders parts of the project that use 30 fps video. If the video subject is moving very fast (like sport), the 30 fps to 60 fps conversion can sometimes look bad. If the subject of your videos is stationary and not moving much, it will probable look perfectly OK.
In this scenario, remember to import the 30 fps video first, so that Vegas Pro sets the Project Properties at 30 fps.
Rule #3 - 95% of my videos high frame rate and less than 5% are standard frame rate
If your project uses 30 fps video and 60 fps video, but 95% of the video is at 60 fps, then you can set the Project Properties to 60 fps.
In this scenario, remember to import the 60 fps video first, so that Vegas Pro sets the Project Properties at 60 fps.
Rule #4 - There are no rules, just experimentation to see what works best for you!
All my rules are simply guides. Video Editing often has many grey areas, because no two projects are the same. Experimentation is key to finding what works best in each unique project.
In this scenario, use your brain and experience to do what works best for you!
How to turn on GPU Acceleration in Vegas Pro 15
Before you do anything, make sure your preferred Graphics Card is turned on in Vegas.
Go to Options/Preferences/Video - GPU acceleration of video processing
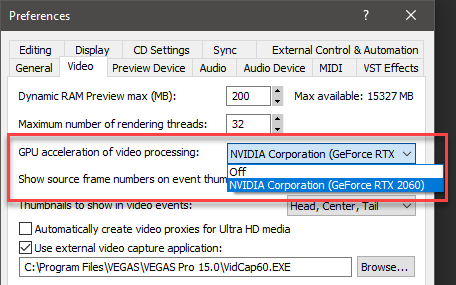
- If you only see the Off option, it means your computer does not have a dedicated graphics card OR you have accidentally connected your monitor to the Motherboard video out port, instead of your dedicated graphics card.
- If you do see one of the GPU options listed below, select your graphics card and then re-boot Vegas to accept the changes.
- If you have problems with Vegas crashing during a render, it is often recommended to try turning OFF your GPU and forcing your CPU to do all of the processing.
Instructions for Rendering (Exporting) Video with Vegas Pro 15
With all the boring but important stuff out of the way, lets have a closer look at how to render video using the new Magix AVC/AAC video codec in Vegas Pro 15!

1. Select the output folder you want to save the video into. One of then most common mistakes people make, is to not check this folder address before they begin a render. If you don't check this, your video could end up in some obscure location on your computer and you start yelling at Vegas like a crazy person!
2. Name your file if you want to give it a unique file name.
3. Select MAGIX AVC/AAC MP4 from the Formats list on left side. This is the best option for making most videos that you want to: play back on your computer, stream over your home network to your Smart TV, upload to YouTube, Vimeo or Facebook.
4. This step is extremely important!
4a. Select a Template that uses the same Frame Rate your Project Properties are set to. If you accidentally choose a template with the wrong Frame Rate, it can slow down your render times dramatically and also effect the visual quality of the video. I see people making this mistake all the time and then they wonder why the video looks bad or took a lifetime to render.
4b. Select a (version) of the Template that uses a specific GPU or CPU to render your video.
5. If you would like to customize more advanced settings, press the Customize Template button now.
If you can't find a template that uses the same frame rate as your project, press the Customize Template button now.
6. If you are ready to render your video using the default template settings, press the Render button now and let the render begin.
Rendering with your CPU, Nvidia NVENC, AMD VCE or Intel QSV
CPU only
If you select a template with no (bracketed) options, Vegas will use your CPU to render the project.
CPU rendering is normally the best option if you require the highest video quality possible.
Nvidia graphics
If you select one of the NVIDIA NVENC options, the rendering will be done by your Nvidia graphics card.
You will need to have a compatible Nvidia graphics card installed, for these templates to be available.
You will also need to have your computer monitor connected via the video port out on your Nvidia GPU.
If you do select an Nvidia NVENC template, you will find advanced render options when you press the Customize Template button in the Render As window. The different settings are fairly well self explanatory.
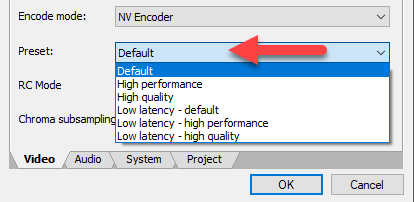
High performance will give you faster render times.
If video quality is important to you, High Quality is the best preset to select.
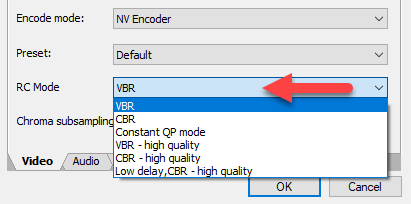
I strongly recommend you always use VBR or VBR - high quality.
VBR = Variable Bit Rate. VBR is more efficient for encoding most videos and will give you better quality and smaller file sizes. When the subject matter is stationary in your videos, the encoder doesn't have to use much bit rate to draw the image. However, when there is fast moving objects and/or detailed subjects like trees and grass, a much higher bit rate will be used only for those sections of your video.
CBR = Constant Frame Rate. When you select this option, each frame will be encoded with the same bit rate. When there is not much happening in the frame, a high constant bit rate is a waste of data and will produce higher file sizes.
AMD Radeon graphics
If you select one of the AMD VCE options, your AMD GPU will render the video.
You will need to have a compatible AMD Radeon graphics card installed, for these templates to be available.
You will also need to have your computer monitor connected via the video port out on your AMD Radeon GPU.
Intel® Quick Sync Video
If you select one of the Intel QSV options, Intel® Quick Sync Video will render your video.
You will need to have a compatible Intel CPU installed, for these templates to be available.
You will also need to have your computer monitor connected via the video port out on your Motherboard.
How to Customize Advanced Settings in any Render As (Export) Template
When you press the Customize Template button, the following window will open for your Video settings.
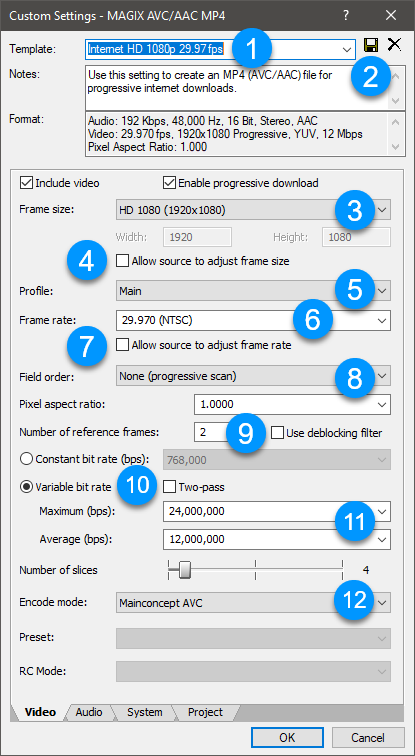
Custom Video Settings
1. When you create custom settings in a default Vegas Pro Template, you can re-name and save it for use in your next project. It will then appear in the full list of Templates shown in the Render As window.
2. Press the Save button to save your new custom template.
3. From the drop down Frame Size options, you can select different Frame Sizes if required. If you need to render a custom frame size (non-standard), select (Custom Frame Size) from the drop down options and then manually enter the Width and Height in pixels.
4. Make sure Allow source to adjust Frame Size is not checked !!!
5. There are three options in the Profile settings: Baseline, Main or High. Most everyday videos are rendered using Main profile settings - if you inspect any random video you find, it will generally be encoded with Main profile. If you are after maximum quality, set to High instead, but be aware that some older devices like TVs, may not be able to decode videos that use the High profile.
6. Here is where you can select a different Frame Rate or enter a custom frame rate. If you are working with 24 fps or 23.976 fps video, you will need to select one the default 25 fps or 29.97 fps templates back in the Render As window and then manually enter 24 fps or 23.976 fps, depending on what your source videos and Vegas project properties are set to.
7. Make sure Allow source to adjust Frame Rate is not checked !!! In many older versions of Vegas Pro, this setting was turned on by default for some unknown reason. Thankfully it is now turned off by default.
8. The Field order for most video is normally encoded as Progressive style video. All video on the websites like YouTube, Vimeo, Facebook and Instagram is progressive style video. This means each frame of video is a complete frame. The only time you would be encoding as Interlaced video (Upper Field First or Lower Field First) is when you are making videos for Blu-ray disc or DVD.
9. The Deblocking fliter is meant to help reduce pixel blocking artifacts that you often see in blue sky or green grass. In reality though, this setting never seems to make much difference. If you do see a lot of pixel block artifacts in your rendered videos, I would recommend you try an advance rendering method using Handbrake instead of Vegas Pro. I have a detailed tutorial on this topic here, if you have the patience and brain power to try something very cool!
10. Like the deblocking filter, Two-pass rendering is meant to improve overall video quality. As the name suggests, this setting performs a double-pass of your project, so takes twice the amount of time to render.
11. The Bit Rate settings directly influence the quality of your video and file size. The higher your Bit Rates are, the more data is available for encoding fine details in your video. Just remember that higher bit rates = larger files sizes. The reverse is also true - if want to make your file sizes smaller, you need to reduce the Bit Rates. Using Variable Bit Rates is always the best option for achieving qood quality and reasonable file sizes.
12. If you have a dedicated Nvidia or AMD Radeon GPU or Intel Quck Sync Video, you can select it from this drop down box. If don't have a dedicated graphics card and don't have an Intel CPU with QSV (Quick Sync Video), the only option will be Mainconcept. This means your CPU will do all of the work in rendering your video.
Custom Audio Settings
If you would like to customize your Audio Settings, select the Audio tab at bottom on window.
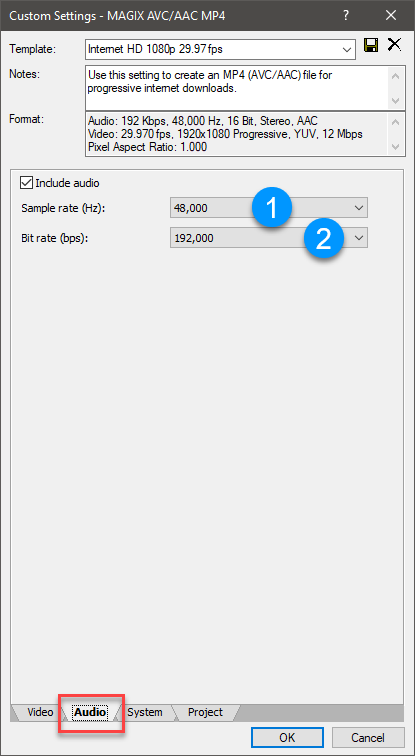
1.The Sample Rate should match your Project Properties and source video properties.
2. The average audio BIt Rate used for most videos is 192,000 kbps. If audio quality is important for you and your project was recorded at a much higher Bit Rate, make sure to select the same Bit Rate your Project Properties and source video audio properties uses.
System & Project tabs
Generally speaking you can ignore the System and Project settings, because the default setting is to match theses settings to your Vegas Pro Project Property settings.
Start Rendering (exporting) your video
If you created custom settings and want to remember what you used for different projects in the future, make sure to re-name and save your custom template, as discussed already, then press OK to close the Custom Settings window.
Now press the Render button to begin rendering (exporting) your video.
Important! Mobile Phone video recorded with a Variable Frame Rate
This is starting to become a major problem for many new video editors who shoot a lot of video with their phones, so it needs to be addressed. If your project is using video recorded from a mobile phone, it will most likely be recorded with a Variable Frame Rate. All video editing programs work best with Constant Frame Rate video and not variable frame rate video. Technically speaking you can import this type of video into Vegas Pro, however in reality it can cause problems and "glitchy" video.
I recommend anyone using variable frame rate video, to first convert it to constant frame rate, before you import it into Vegas.
How to check if your video is using a Variable Frame Rate or Constant Frame Rate?
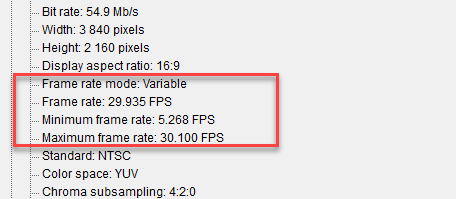
First you need to inspect your video and see if it is using a variable frame rate. There is a free app you can download and install, called MediaInfo. It is safe to download and install on your computer, as just about every computer nerd in the universe uses this app. Please read this tutorial for how to install and setup MediaInfo on your computer.
If your video is using a variable frame rate, you will see this in the MediaInfo metatdata readout.
How to Convert Variable Frame Rate video into Constant Frame Rate video
If you need to convert variable frame rate video into constant frame rate video, I recommend a free open source program called Handbrake. I have a beginners guide tutorial for how to use Handbrake here. For a basic conversion, all you need to read is the first section of this tutorial.

About Derek Moran
Derek Moran is the author of all articles on Movie Studio Zen.
You can find me on YouTube, Facebook, Twitter, Read more about Derek...

