
DISCLOSURE: Movie Studio Zen is supported by its audience. When you purchase through links on this site, we may earn an affiliate commission.
Solved Picture Does Not Fill Frame

This is the first time I have added photos to a project in MS16. The jpg does not fill the screen and I can't find a way to do that. As far as I know, this did not happen in MS 14 which was the last version I used. I'm pretty sure the picture would automatically fill the preview screen. The dimensions of this picture are Width = 7038 x Height 2205. What settings in Pan/Crop do I change? Thanks for your help.
by RobWS
Please Log in or Create an account to join the conversation.
Hi Rob,
Try right click on the image in Pan & Crop and select 'Match Output Aspect'.
Try right click on the image in Pan & Crop and select 'Match Output Aspect'.
Best Regards......George
Last Edit:01 Apr 2019 14:58 by Eagle Six
Please Log in or Create an account to join the conversation.
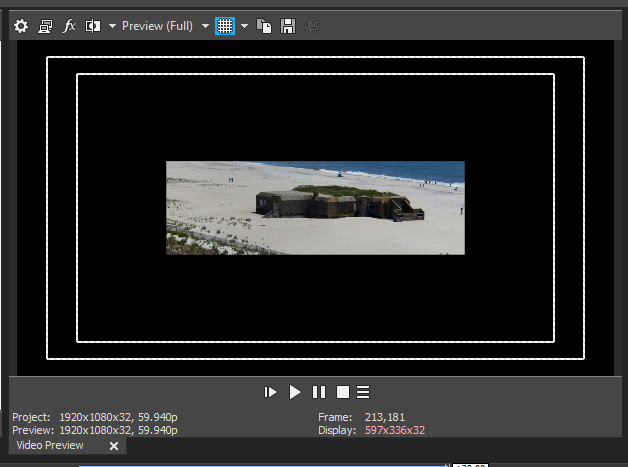
Match Output Aspect produced the change in the attached picture. It still only fills so much of the preview screen and then stops. I have tried all other width, height, X and Y options but all with the same result. The picture only appears to only fill about half of the screen. I will continue to experiment.
by RobWS
Please Log in or Create an account to join the conversation.
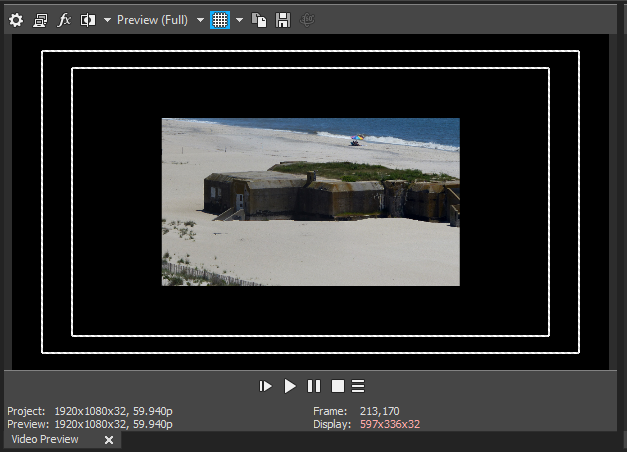
Moments later......I found the problem. My pictures were inserted on Track 2 Picture-in-picture. I moved them to track 3 and now the display is full. So, Track 2 must impose certain restrictions on the media, well hidden, I must say. I could not find any property settings applied to Track 2. Obviously a video track can only contain video, and an audio track can only contain audio. But Track 2, Picture-in-picture is a third type of track. Beware.
Oh, the things we learn by struggling to find what's wrong.
Thanks George "Eagle Six" for taking the time to help.
Oh, the things we learn by struggling to find what's wrong.
Thanks George "Eagle Six" for taking the time to help.
by RobWS
Please Log in or Create an account to join the conversation.
Hi Rob,
I usually work in Vegas Pro, which does not have the default track setup as does Movie Studio Platinum, so never thought of you possibly adding the photo to the default track 2 Picture-in-Picture.
The Picture-in-Picture FX, can be added on the track level or event level. In the Movie Studio default track setup, they have applied the Picture-in-Picture FX effect at the track level (makes sense because you cannot add it to the event, because in default there is no event added yet). If you look closely at the Picture-in-Picture track header you see the FX icon has what appears to me to be a little square, which indicates there is an FX(s) of some kind added to the track. If you click on the track header FX icon, it will open the FX window and you can see there is the Picture-in-Picture FX. The scale is by default set to .500. If you increase this to 1.000, the Picture-in-Picture will essentially fill the screen, although if there are any black borders, doing the Pan&Crop 'Match Output Aspect' will then force the photo (or video) to fill the project resolution preview display.
In Movie Studio (and Vegas Pro) there are really only two different kinds of track, either Video or Audio. Or, you could say Audio and Everything else, keeping in mind they refer to that as Video. In the Video track you can add video, Titles/Text, still photos, etc. The only thing that makes the default track layout in Movie Studio between track 1, track 2, and track 3, is the name of the track. The name has been changed for organization purposes. You can name the tracks anything you want, but renaming them isn't going to change the type of track.
The same applies to track 4 and track 5, which are both Audio tracks. Track 4 is named Audio and by default of it's location below the 3 video tracks above, will use the audio from any video that is placed in Track 1, 2, or 3 (try it out). Track 5 is also an Audio track, but they have renamed it Music, again for organizational purposes.
If you right click anywhere in a blank area of the header display column, below the bottom track, an option will appear that allows you to add either an Audio or Video track. These are the only two types. You can, of course, after adding the track add a name to the track. Hover the pointer over the top left area of the track header and it will attach a little flag that says Track Name, double left click and it will open a 1 line field that you can type in any name you like, then press the enter key.
once you get accustom to adding/deleting tracks, naming and renaming, you can make the changes that fit your project the best. If you are going to add video, photo stills and text all in the same track, you can call that track 'Video, Still, Text' if you like or simply leave the name blank. But as you build larger and more complex projects, it makes sense to then name the tracks similar to the default setup so it is easier to keep things you have added to your project better organized.
Best Regards......George
by Eagle Six
Please Log in or Create an account to join the conversation.
Forum Access
- Not Allowed: to create new topic.
- Not Allowed: to reply.
- Not Allowed: to edit your message.
Moderators: DoctorZen
Time to create page: 0.843 seconds
