
DISCLOSURE: Movie Studio Zen is supported by its audience. When you purchase through links on this site, we may earn an affiliate commission.
Solved Movie Studio Platinum 13 - Jerkey Video Playback After Burning a DVD

Movie Studio Platinum 13 - Jerkey Video Playback After Burning a DVD was created by papablue
Posted 16 Aug 2015 15:21 #1 Hi Derek,
I hope you are doing well? And I hope you a moment for some guidance regarding a recent project of mine. This summer I shot a lot of video while traveling and while my three adult children came to visit with all of my grand children.
I have been using my Sony Movie Studio Platinum 13 program a lot and have been very pleased with the results. I put together several video projects using my Sony HandyCam HDR-CX-330 (AVCHD) camcorder and did the same thing with my most recent project today. If you recall from our previous correspondence, I prefer to but my projects to a DVD versus saving the file on my computer.
When starting each new project I had just been using the "Common presets" option which I recall was AVCHD. And for all of my other recent projects, this method seemed to work well. I recall on some older projects I used the option "Match media settings", but have not been using that option on my newer projects.
But on the project I put together today, after I burnt the DVD and played it on my Sony PS3, the video seemed blurred or jerky when objects move or the camera was panning. The audio is just fine. And I have not had this issue with my other three recent video projects that I started using the "Common presets" option.
The one difference I can think of regarding my protect today is that I inserted iPhone 5 video into the project along with my Sony AVCHD video. I am not sure if that may have made a difference in the playback quality of the overall project.
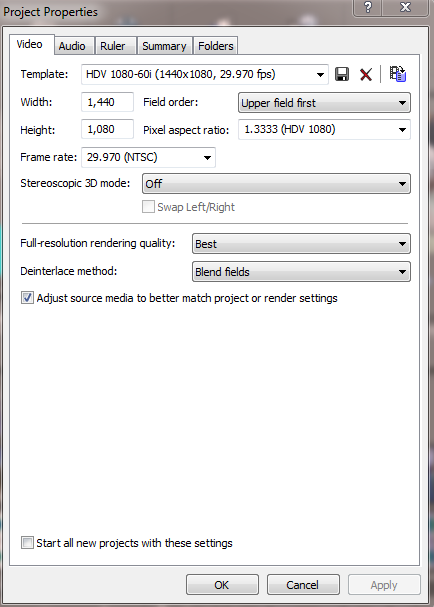
Well, before composing the message, I went back into my project and changed a couple of settings, please see the attached screen shot. I changed the Full resolution rendering quality to "Best". And I checked the box "Adjust source media to better match project or render settings."
And although it may have already been selected, under Template I selected "HDV 1080-60i (1440 x 1080, 29.970 fps)". I am now burning another DVD to see if this will make any difference.
Then after I started to burn this new DVD, I read through your beginner's tutorial for Movie Studio Platinum 13 which recommends using "Match media settings" and selecting a video type that will be used predominantly in the video project.
Well, I am not sure how to bring up "Match media settings" in a project that was already completed and saved. Or how to fix the issue of the jerky playback. Once the new DVD is burnt with the changed settings above I can let you know if it made any improvement in the video playback quality. In the mean time, if you can write back with some pointers, I would greatly appreciate them, as always.
Kind regards.
I hope you are doing well? And I hope you a moment for some guidance regarding a recent project of mine. This summer I shot a lot of video while traveling and while my three adult children came to visit with all of my grand children.
I have been using my Sony Movie Studio Platinum 13 program a lot and have been very pleased with the results. I put together several video projects using my Sony HandyCam HDR-CX-330 (AVCHD) camcorder and did the same thing with my most recent project today. If you recall from our previous correspondence, I prefer to but my projects to a DVD versus saving the file on my computer.
When starting each new project I had just been using the "Common presets" option which I recall was AVCHD. And for all of my other recent projects, this method seemed to work well. I recall on some older projects I used the option "Match media settings", but have not been using that option on my newer projects.
But on the project I put together today, after I burnt the DVD and played it on my Sony PS3, the video seemed blurred or jerky when objects move or the camera was panning. The audio is just fine. And I have not had this issue with my other three recent video projects that I started using the "Common presets" option.
The one difference I can think of regarding my protect today is that I inserted iPhone 5 video into the project along with my Sony AVCHD video. I am not sure if that may have made a difference in the playback quality of the overall project.
Well, before composing the message, I went back into my project and changed a couple of settings, please see the attached screen shot. I changed the Full resolution rendering quality to "Best". And I checked the box "Adjust source media to better match project or render settings."
And although it may have already been selected, under Template I selected "HDV 1080-60i (1440 x 1080, 29.970 fps)". I am now burning another DVD to see if this will make any difference.
Then after I started to burn this new DVD, I read through your beginner's tutorial for Movie Studio Platinum 13 which recommends using "Match media settings" and selecting a video type that will be used predominantly in the video project.
Well, I am not sure how to bring up "Match media settings" in a project that was already completed and saved. Or how to fix the issue of the jerky playback. Once the new DVD is burnt with the changed settings above I can let you know if it made any improvement in the video playback quality. In the mean time, if you can write back with some pointers, I would greatly appreciate them, as always.
Kind regards.
by papablue
Please Log in or Create an account to join the conversation.
Replied by DoctorZen on topic Movie Studio Platinum 13 - Jerkey Video Playback After Burning a DVD
Posted 16 Aug 2015 17:11 #2 Hi Fritz, thanks for posting on Forum.
Sideways movement is always the most difficult thing to film with a video camera. Using a Higher Frame Rate to record with helps to get smoother video and also to record in Progressive Mode and not the older style Interlaced Mode.
Motion Blur
There is also a setting called Re-Sampling in Movie Studio that effects Motion Blur.
Sony has this set to Smart Re-Sample by default, however most people prefer to turn this off for all their projects. Doing this will reduce the amount of Motion Blur you are seeing right now.
Right-click all your video segments on the timeline and go to Switches, then set to Disable Re-Sample.
For any future projects, it is best to do this directly after importing all your videos, before you begin to chop them up into smaller segments.
Mixed Video Types and Setting the Project Properties
When you are working with videos from different devices/formats, I would normally use the Match Media function for the video type that is being used the most in the project. So if you have many videos from a Sony Handy Cam and just a few from an iPhone, use Match Media just once when importing the Handy Cam video. If you had more iPhone video, use Match Media for iPhone videos instead.
I have a feeling that you may have been recording your videos using the lower 1440x1080-60i mode, because that is what you have shown in the screen shot.
For your existing project, I would recommend doing this.
Open the Project Properties window and press the Match Media button.
Then navigate to one the videos from your Sony Handy Cam and select it. Check the Project Properties now and see what it says.
Does it say 1440x1080 or 1920x1080 ?
The video from your iPhone would definitely be 1920x1080 or 1280x720.
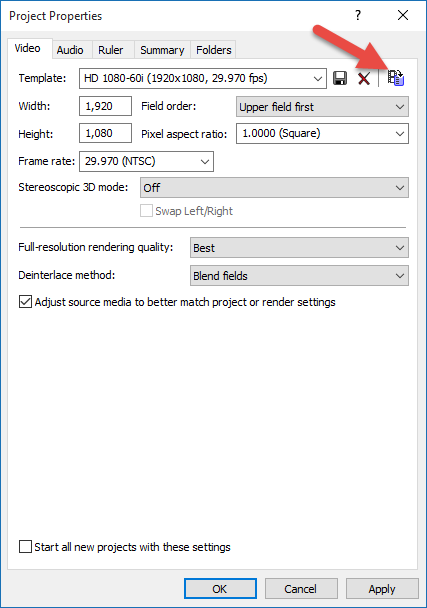
No matter what happens, it is probably best to make the Project Properties look exactly like this screen shot.
Setting your Video Camera's recording mode correctly
I looked up the recording modes for your video camera.
docs.esupport.sony.com/dvimag/2014/HDR-CX330_CX330E_PJ330E_PJ340_PJ340E_PJ350E_guide/en/contents/TP0000241966.html
It has 6 different formats you can record to.
The highest quality recording mode is PS: Max. 28 Mbps 1,920 x 1,080 pixels/60p(*) or 1,920 × 1,080 pixels/50p(**), AVC HD 28 M (PS), 16:9
This is the best mode to use if you are filming high speed content like Sport or Car Racing, because it is recording at 1920x1080-60p frames per second in Progressive style. You can still use this for making DVDs, however if you have Blu-ray burner in your computer and a Blu-ray Player with your TV, you could burn Blu-ray discs to 1280x720-60p or 1920x1080-60i, These are the two main formats supported by Blu-ray and would give you HD video on a disc, instead of Standard Definition video on a DVD.
The next best recording mode just below this is: FX: Max. 24 Mbps 1,920 x 1,080 pixels/60i(*) or 1,920 × 1,080 pixels/50i(**), AVC HD 24 M (FX), 16:9
The is the best recording mode for everyday video. This is using 1920x1080-60i which is 30 odd lines of video and 30 even lines of video, which combines into 30 frames of video. This works very well for making DVDs.
All the other recording modes should be avoided in my opinion. Some of these modes include 1440x1080-60i, which is an inferior Frame Size. In 2015 you should only be using Full HD 1920x1080.
Your camera is records in Dual Mode. You can turn this off to save memory card recording space.
Re-render your project after changing the settings I recommended.
Regards
Derek.
Sideways movement is always the most difficult thing to film with a video camera. Using a Higher Frame Rate to record with helps to get smoother video and also to record in Progressive Mode and not the older style Interlaced Mode.
Motion Blur
There is also a setting called Re-Sampling in Movie Studio that effects Motion Blur.
Sony has this set to Smart Re-Sample by default, however most people prefer to turn this off for all their projects. Doing this will reduce the amount of Motion Blur you are seeing right now.
Right-click all your video segments on the timeline and go to Switches, then set to Disable Re-Sample.
For any future projects, it is best to do this directly after importing all your videos, before you begin to chop them up into smaller segments.
Mixed Video Types and Setting the Project Properties
When you are working with videos from different devices/formats, I would normally use the Match Media function for the video type that is being used the most in the project. So if you have many videos from a Sony Handy Cam and just a few from an iPhone, use Match Media just once when importing the Handy Cam video. If you had more iPhone video, use Match Media for iPhone videos instead.
I have a feeling that you may have been recording your videos using the lower 1440x1080-60i mode, because that is what you have shown in the screen shot.
For your existing project, I would recommend doing this.
Open the Project Properties window and press the Match Media button.
Then navigate to one the videos from your Sony Handy Cam and select it. Check the Project Properties now and see what it says.
Does it say 1440x1080 or 1920x1080 ?
The video from your iPhone would definitely be 1920x1080 or 1280x720.
No matter what happens, it is probably best to make the Project Properties look exactly like this screen shot.
Setting your Video Camera's recording mode correctly
I looked up the recording modes for your video camera.
docs.esupport.sony.com/dvimag/2014/HDR-CX330_CX330E_PJ330E_PJ340_PJ340E_PJ350E_guide/en/contents/TP0000241966.html
It has 6 different formats you can record to.
The highest quality recording mode is PS: Max. 28 Mbps 1,920 x 1,080 pixels/60p(*) or 1,920 × 1,080 pixels/50p(**), AVC HD 28 M (PS), 16:9
This is the best mode to use if you are filming high speed content like Sport or Car Racing, because it is recording at 1920x1080-60p frames per second in Progressive style. You can still use this for making DVDs, however if you have Blu-ray burner in your computer and a Blu-ray Player with your TV, you could burn Blu-ray discs to 1280x720-60p or 1920x1080-60i, These are the two main formats supported by Blu-ray and would give you HD video on a disc, instead of Standard Definition video on a DVD.
The next best recording mode just below this is: FX: Max. 24 Mbps 1,920 x 1,080 pixels/60i(*) or 1,920 × 1,080 pixels/50i(**), AVC HD 24 M (FX), 16:9
The is the best recording mode for everyday video. This is using 1920x1080-60i which is 30 odd lines of video and 30 even lines of video, which combines into 30 frames of video. This works very well for making DVDs.
All the other recording modes should be avoided in my opinion. Some of these modes include 1440x1080-60i, which is an inferior Frame Size. In 2015 you should only be using Full HD 1920x1080.
Your camera is records in Dual Mode. You can turn this off to save memory card recording space.
Re-render your project after changing the settings I recommended.
Regards
Derek.
ℹ️ Remember to turn everything off at least once a week, including your brain, then sit somewhere quiet and just chill out.
Unplugging is the best way to find solutions to your problems. If you would like to share some love, post a customer testimonial or make a donation.
Unplugging is the best way to find solutions to your problems. If you would like to share some love, post a customer testimonial or make a donation.
Last Edit:16 Aug 2015 17:18 by DoctorZen
The following user(s) said Thank You: papablue
Please Log in or Create an account to join the conversation.
Replied by papablue on topic Movie Studio Platinum 13 - Jerkey Video Playback After Burning a DVD
Posted 17 Aug 2015 10:22 #3 Hi Derek,
Thank you so much for the help! It all worked very well:
Motion Blur - on the video segments I switched to Disable Re-Sample. What a cool tool.
Mixed Video Types and Setting the Project Properties - I found and used the Match media button to click on one of the Sony Handy Cam videos. Sure enough your guess was correct, it came up as 1440x1080! I have been shooting in this lower mode. I went back into my project, opened Project Properties, and selected the template that you show in the screen shot "HD-1080-60i (1920x1080, 29.970 fps)". I made sure the other settings matched the screen shot as well.
Setting your Video Camera's recording mode correctly - you really went the extra mile to provide the link to the recording modes for my Sony Handy Cam! What a great helpful tool. I will change the recording mode this afternoon. It sounds like the best day-to-day setting should be FX: Max. 24 Mbps 1,920 x 1,080 pixels/60i(*) or 1,920 × 1,080 pixels/50i(**), AVC HD 24 M (FX), 16:9. Just one follow-up question please. It sounds like this recording mode would still work when making Blue-ray discs? I really did not think of checking these settings when I first bought the camera, and up to this point was not well-versed in the different recording modes.
Dual Mode - sure has heck, my camera was also defaulted to record in this mode. When transferring the videos to my computer, this explains why there were two sets of video files. Since I author individual video files to create vide projects, I really do not need to share the original video files. So as you recommended I turned this feature "off".
The Bottom Line - after following all of your suggestions I re-rendered my project and no more blurry videos! Everything was clear and crisp. I can't thank you enough, your suggestions and information were very helpful.
All the best!
by papablue
Please Log in or Create an account to join the conversation.
Replied by DoctorZen on topic Movie Studio Platinum 13 - Jerkey Video Playback After Burning a DVD
Posted 17 Aug 2015 14:04 #4 Wow! That's an excellent result. :woohoo:
I am glad this is now posted on the Forum, because I gaurantee that many people will be in a similar situation and can learn from this.
If you are living in an NTSC country like the USA, make sure to only use 60p/60i or 24p.
If you live in a PAL country like most or Europe, record to 50p/50i or 24p.
NTSC and PAL are video formats, just in case you are not familiar with these terms.
ℹ️ Remember to turn everything off at least once a week, including your brain, then sit somewhere quiet and just chill out.
Unplugging is the best way to find solutions to your problems. If you would like to share some love, post a customer testimonial or make a donation.
Unplugging is the best way to find solutions to your problems. If you would like to share some love, post a customer testimonial or make a donation.
by DoctorZen
Please Log in or Create an account to join the conversation.
Forum Access
- Not Allowed: to create new topic.
- Not Allowed: to reply.
- Not Allowed: to edit your message.
Moderators: DoctorZen
Time to create page: 1.029 seconds
