
DISCLOSURE: Movie Studio Zen is supported by its audience. When you purchase through links on this site, we may earn an affiliate commission.
Solved Creating a highlighter effect
- MrGrunthunter
-
 Offline Topic Author
 - Zen Level 5
-

- Posts: 248
- Thank you received: 40
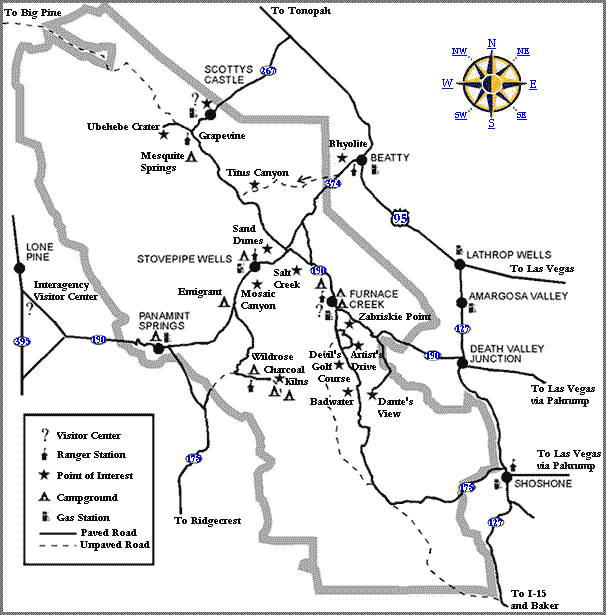
I am using Vegas Pro 19 and have a .png image of a map showing destinations that I want to highlight as I'm creating a narration describing them. I want to have something like a highlighter box show up over the individual text on the map for each of the destinations. How do I create a transparent box that I can move around over the image? If it was text that I created I've found out how to do that but I can't figure out how to create some sort of transparent mask to do that. Is it possible?
DESKTOP: Dell PC WINDOWS 10 PRO, 64-bit, Ver:1607, OS BLD: 14393.1066
INTEL Core: i7-4790, CPU @3.60 GHz, Inst RAM:16.0 GB
GeForce GTX 745, Driver ver: 376.53, Tot avail grap: 12225 MB, Ded vid mem: 4096 MB DDR3
Shared Sys Mem: 8159 MB, DirectX Runtime Ver:12.0
LAPTOP: MSI GE72MVR 7RG
GTX-1070
INTEL Core: i7-4790, CPU @3.60 GHz, Inst RAM:16.0 GB
GeForce GTX 745, Driver ver: 376.53, Tot avail grap: 12225 MB, Ded vid mem: 4096 MB DDR3
Shared Sys Mem: 8159 MB, DirectX Runtime Ver:12.0
LAPTOP: MSI GE72MVR 7RG
GTX-1070
Last Edit:16 Aug 2022 14:07 by MrGrunthunter
Please Log in or Create an account to join the conversation.
Hi MrGrunthunter
There's probably a couple of different ways you could do this...
Here is my method:
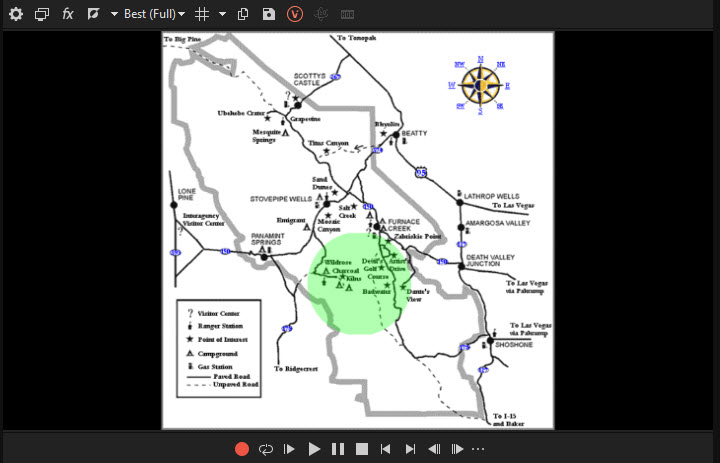
1. Go to Media Generators tab and drag a Solid Colour onto a new Video Track above your Map Track.
2. Use the Opacity Slider for solid colour track, to make it transparent.

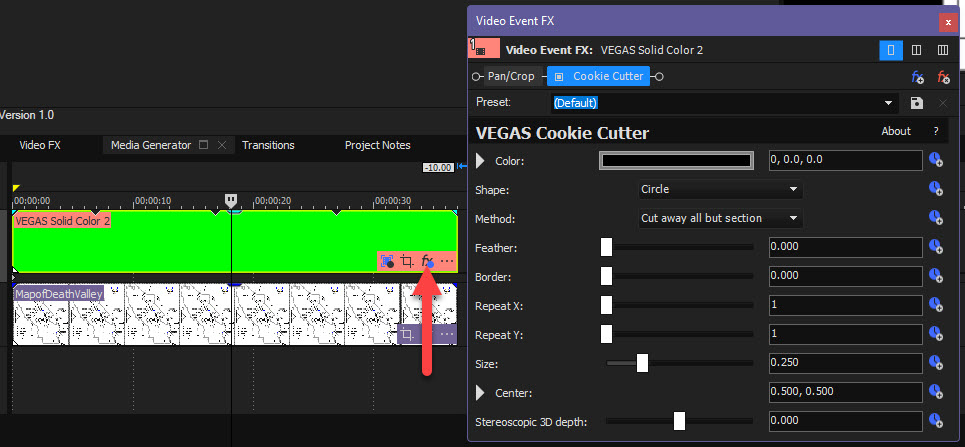
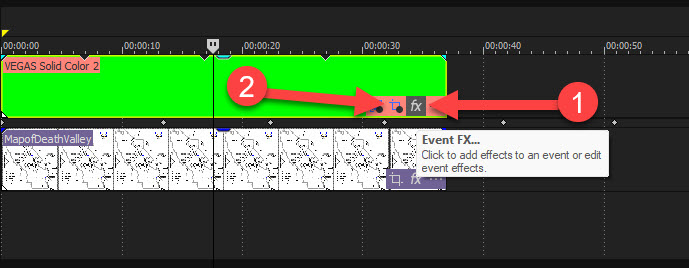
3. Press Fx button for Solid Colour event and add the Cookie Cutter tool - select Shape you want to use.
You could do everything that comes next inside of the Cookie Cutter tool (using Key-Frames), but I'm going to use Track Motion next.
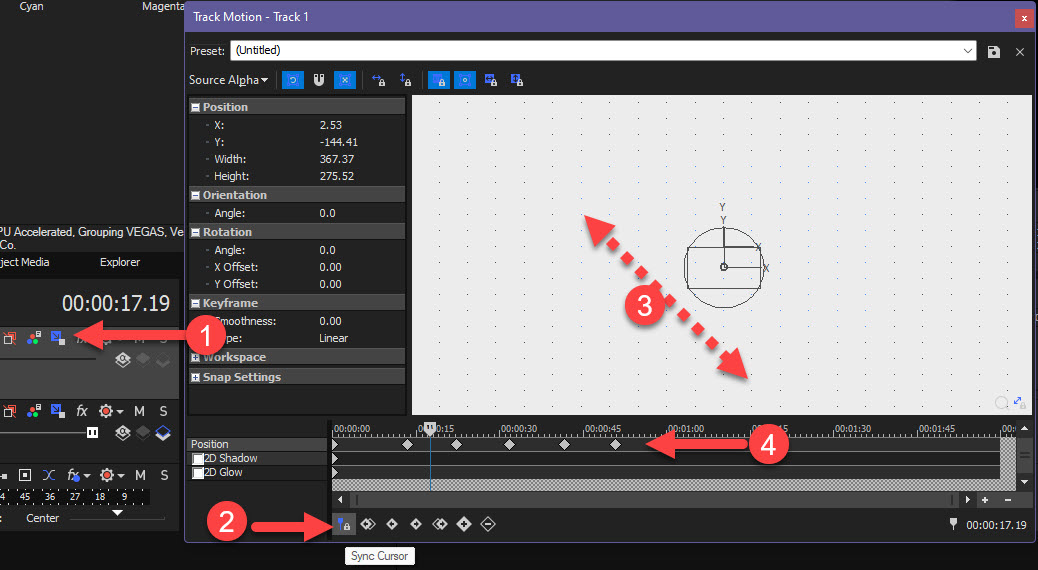
4. Press Track Motion button for Solid Colour video track.
Press Sync to Cursor button, so changes show in Preview Window - be careful, because every time you move this tool, a new key-frame will be added!
You can re-size and re-position your transparent shape over the map.
Then move the Key-Frame cursor forward a few frames, and now move the shape to next place on map - adding a key-frame for each new step.
Repeat process.....
Tip: Zoom in on key-frame timeline, so you have more accurate control, which equals smoother motion.
Regards
Derek
There's probably a couple of different ways you could do this...
Here is my method:
1. Go to Media Generators tab and drag a Solid Colour onto a new Video Track above your Map Track.
2. Use the Opacity Slider for solid colour track, to make it transparent.
3. Press Fx button for Solid Colour event and add the Cookie Cutter tool - select Shape you want to use.
You could do everything that comes next inside of the Cookie Cutter tool (using Key-Frames), but I'm going to use Track Motion next.
4. Press Track Motion button for Solid Colour video track.
Press Sync to Cursor button, so changes show in Preview Window - be careful, because every time you move this tool, a new key-frame will be added!
You can re-size and re-position your transparent shape over the map.
Then move the Key-Frame cursor forward a few frames, and now move the shape to next place on map - adding a key-frame for each new step.
Repeat process.....
Tip: Zoom in on key-frame timeline, so you have more accurate control, which equals smoother motion.
Regards
Derek
ℹ️ Remember to turn everything off at least once a week, including your brain, then sit somewhere quiet and just chill out.
Unplugging is the best way to find solutions to your problems. If you would like to share some love, post a customer testimonial or make a donation.
Unplugging is the best way to find solutions to your problems. If you would like to share some love, post a customer testimonial or make a donation.
by DoctorZen
The following user(s) said Thank You: MrGrunthunter
Please Log in or Create an account to join the conversation.
- MrGrunthunter
- Offline Topic Author
- Zen Level 5
-
- Posts: 248
- Thank you received: 40
Ah Ha ! I see I needed to create a dedicated track for it. I was trying to use the pan/crop tool and couldn't figure out how to make it transparent. I followed your instructions (graphics were very helpful BTW) and found the slider. The only thing I don't see is a way to stretch the rectangle, only make it bigger or smaller. Is there a way to stretch it wider for longer text?
DESKTOP: Dell PC WINDOWS 10 PRO, 64-bit, Ver:1607, OS BLD: 14393.1066
INTEL Core: i7-4790, CPU @3.60 GHz, Inst RAM:16.0 GB
GeForce GTX 745, Driver ver: 376.53, Tot avail grap: 12225 MB, Ded vid mem: 4096 MB DDR3
Shared Sys Mem: 8159 MB, DirectX Runtime Ver:12.0
LAPTOP: MSI GE72MVR 7RG
GTX-1070
INTEL Core: i7-4790, CPU @3.60 GHz, Inst RAM:16.0 GB
GeForce GTX 745, Driver ver: 376.53, Tot avail grap: 12225 MB, Ded vid mem: 4096 MB DDR3
Shared Sys Mem: 8159 MB, DirectX Runtime Ver:12.0
LAPTOP: MSI GE72MVR 7RG
GTX-1070
Please Log in or Create an account to join the conversation.
If you want to create a long skinny rectangular box, I recommend using a different method.
As I said in my first reply, there are many different ways to achieve this type of effect.
I recommend you use the Masking Tool instead.
1. Delete the Cookie Cutter tool completely - where not using that now!
2. Open the Event Pan/Crop tool for the Solid Colour event.
3. Turn on Mask
4. Drag Key-Frame timeline cursor to the 0:00 point
5. Turn Rectangle Creation Tool (left side)
6. Probably a good idea to drag corner of the Video Event FX window, to make it much larger for better control.
You can also use the Wheel on your Muse to Zoom In if needed.
Now drag out a rectangle to the size you need.
7. From this point forward, you need to be very careful creating key-frames - they will create automatically when you make changes - you may need to delete some you don't want!
ℹ️ Remember to turn everything off at least once a week, including your brain, then sit somewhere quiet and just chill out.
Unplugging is the best way to find solutions to your problems. If you would like to share some love, post a customer testimonial or make a donation.
Unplugging is the best way to find solutions to your problems. If you would like to share some love, post a customer testimonial or make a donation.
Last Edit:16 Aug 2022 13:00 by DoctorZen
The following user(s) said Thank You: MrGrunthunter
Please Log in or Create an account to join the conversation.
- MrGrunthunter
- Offline Topic Author
- Zen Level 5
-
- Posts: 248
- Thank you received: 40
Well, that was awesome and worked perfectly. I would never had figured that out. Many thanks Derek. You definitely are my hero when it comes to Movie Studio and Vegas Pro. ")
Be safe and stay healthy. Want you to know your time in solving my problem is greatly appreciated.
Mike
Be safe and stay healthy. Want you to know your time in solving my problem is greatly appreciated.
Mike
DESKTOP: Dell PC WINDOWS 10 PRO, 64-bit, Ver:1607, OS BLD: 14393.1066
INTEL Core: i7-4790, CPU @3.60 GHz, Inst RAM:16.0 GB
GeForce GTX 745, Driver ver: 376.53, Tot avail grap: 12225 MB, Ded vid mem: 4096 MB DDR3
Shared Sys Mem: 8159 MB, DirectX Runtime Ver:12.0
LAPTOP: MSI GE72MVR 7RG
GTX-1070
INTEL Core: i7-4790, CPU @3.60 GHz, Inst RAM:16.0 GB
GeForce GTX 745, Driver ver: 376.53, Tot avail grap: 12225 MB, Ded vid mem: 4096 MB DDR3
Shared Sys Mem: 8159 MB, DirectX Runtime Ver:12.0
LAPTOP: MSI GE72MVR 7RG
GTX-1070
Last Edit:16 Aug 2022 13:45 by MrGrunthunter
The following user(s) said Thank You: DoctorZen
Please Log in or Create an account to join the conversation.
Forum Access
- Not Allowed: to create new topic.
- Not Allowed: to reply.
- Not Allowed: to edit your message.
Moderators: DoctorZen
Time to create page: 0.746 seconds
