In this tutorial I show how to render high quality "intermediate" video with Vegas using Avid's DNxHD codec, which is one the best "edit friendly" formats for editing and sharing with other editors and video FX programs.
The instructions in this tutorial will work for both Vegas Pro and Vegas Movie Studio Platinum users.
What is the purpose and Uses for this tutorial ?
The rendering technique taught in this tutorial can be used for many different types of situations.
- The first reason I am making this tutorial today, is to help out Vegas Movie Studio Platinum users who would like to render high quality video with Handbrake. Vegas Pro users are already able to output video directly into Handbrake, using a script function and a process called Frame Serving. However, Vegas Movie Studio Platinum users don't have access to script functions, so if they want to render video with Handbrake, they need to first render/export a high quality intermediate format video with Vegas Movie Studio and then do a second render with Handbrake.
- It is never a good idea to do double renders of a project that was rendered to a final delivery format, because it can lead to quality loss during each new render. However if you work with a high quality intermediate format like the Avid's DNxHD codec first, you will not experience any quality loss after a second render with Handbrake.
- Vegas Pro and Vegas Movie Studio Platinum users who need to send their work to another program or another editor, for additional work that needs to be done with a different program.
- Whether you are using Vegas Movie Studio Platinum or Vegas Pro, Avid's DNxHD is one of the best options for creating intermediate "edit friendly" video, that will not degrade while you are creating your projects.
- If the video recorded from your camera experiences a lot of lag in the Preview window while you are editing, a better way to edit your video is to first convert it to Avid DNxHD. DNxHD is much easier for your CPU to process in real time, which means zero or near to zero lag while you are editing. It is also a good format to use if you have a lot of video transitions in your project.
Topics covered in this tutorial
What is Avid DNxHD ?
What is an Intermediate format ?
Different types of Intermediate Lossless formats
Types of uses for Lossless Codec formats
What is a Final Delivery format ?
Where can I get the Avid DNxHD Codec and how to install ?
How to Render Video in Vegas, using Avid's DNxHD Codec ?
Higher DNxHD Resolutions and Frame Rates - 50p, 60p and 4K
Beginners Guide for how to use Handbrake
What is Avid DNxHD ?
Avid DNxHD and DNxHR Codec ("Digital Nonlinear Extensible High Definition") is a high-definition video post-production codec developed by Avid for multi-generation compositing with reduced storage and bandwidth requirements. DNxHD and DNxHR is a video codec intended to be usable as both an intermediate format suitable for use while editing and as a presentation format. DNxHD and DNxHR data is typically stored in an MXF container, although it can also be stored in a QuickTime .mov container.
What is an Intermediate format ?
An intermediate format is a "lossless" codec that doesn't lose quality during the export (render) process. Intermediate formats use very low levels of compression, which means they are much larger in file size, but also much easier to edit with in Vegas. The type of video that comes out of an average consumer grade video camera, is normally highly compressed and a lot smaller in file size. Due to this high level of compression, play back in the Vegas preview window while editing is often slow at times, because your CPU and GPU is having to decompress the video in real time.
When you convert a compressed video like AVCHD into an intermediate format like Avid DNxHD codec, the file is dramatically decompressed. This makes it much easier to play back in the preview window while editing.
Different types of Intermediate Lossless formats
This tutorial is concentrating mainly on the use of Avid DNxHD. It is up to you to decide which intermediate format works best for your workflow and editing environment. The two best types of "lossless" intermediate formats you can use are Avid's DNxHD or Cineform. Some Vegas Pro users have also been using XAVC Intra format, which is only available in Vegas Pro.
I have also made a separate tutorial on how to render/export using Cineform codec. The instructions for how to export using Cineform are very similar to this tutorial.
If you are interested in wanting to try XAVC Intra format, there are two ways you can do this. Vegas Pro users have an option to render directly to this format. You can also download Sony's free Catalyst Browse program, which has the ability to transcode (convert) video from your camera into the "edit friendly" XAVC Intra format.
Types of uses for Lossless Codec formats
There are times where you need to do things like the following:
- Converting the video from your camera to make it easier to edit with in the Preview window
- Transfer your already edited footage from one application to another.
- Transfer your already edited footage from one video project to another.
- You need a format that’s more suitable for editing.
- Archiving your edited footage.
What is a Final Delivery format ?
Final delivery “end user” viewing formats are codecs like h.264, DivX/XViD, WMV, mpeg-4, mpeg2, mpeg, FLV and many more. These are all “lossy” codecs and are meant for distribution and user viewing only. They compress very well but being lossy it means that the quality is not as good as the original footage. This is ok though, as most people don’t notice much, and having small file sizes helps with the delivery and easier playback aspects.
Where can I get the Avid DNxHD Codec and how to install ?
Vegas Pro and Vegas Movie Studio Platinum do not come packaged with the Avid DNxHD Codec, however you can install DNxHD yourself and then render your video into a .mov file container using the DNxHD codec. Avid DNxHD can be downloaded for free, direct from Avid.
Current Installer for Avid QuickTime Codecs LE
Download page: Codecs LE_2.7.3_Win
Once you have downloaded the installer you must run it to install the codecs. Please make sure that Vegas Pro or Vegas Movie Studio Platinum is not running when you perform the installation.
How to Render Video in Vegas, using the AVid DNxHD Codec ?
The following instructions will work the same in any version of Vegas Pro or Vegas Movie Studio Platinum.
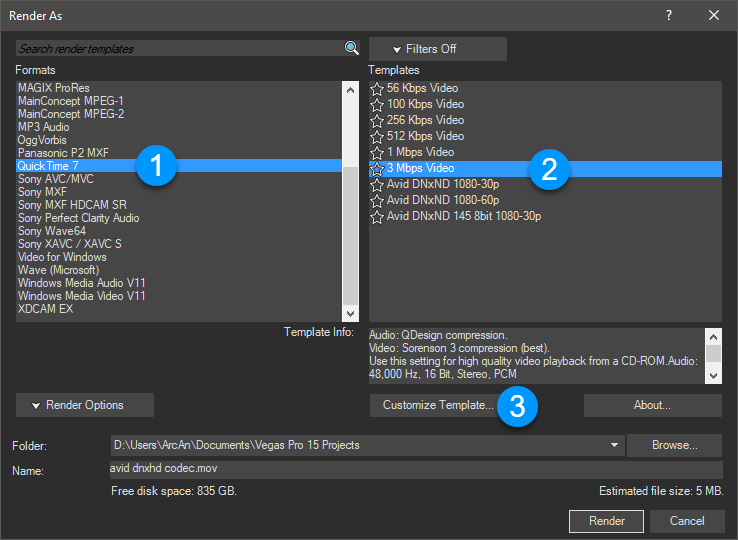
Step 1 - Open Render As and select Quicktime 7 3Mbps Video
For my test example, I will be working with 1920x1080-29.97p video. Any video that is 1920x1080 or less and using a Frame Rate of 29.97 fps or less, is available from the list of output profiles for Avid DNxHD.
Please note: If you are working with 50p, 60p and/or 4K video, make sure to read the special section here.
Vegas Pro users go to File/Render As
Vegas Movie Studio Platinum users will have different pathways to get to the same Render As window, depending on which version of Platinum they are using. Either go to Project/Render As or Make Movie/Save to Hard Drive/Advanced Options - now you are in the Render As window.
Select Quicktime 7 and 3 Mbps Video
Then press the Customize button
Update October 2020: Quicktime is now a deprecated feature in Vegas Movie Studio Platinum 17 and Vegas Pro 17 or newer.
To turn back on, go to:
Options/Preferences/Deprecated Features - Enable the Quicktime plugin.
You will also need to install Quicktime 7.7.9 to see it as an option in the Render As window.
Download Quicktime 7.7.9 from links in this FAQ here.
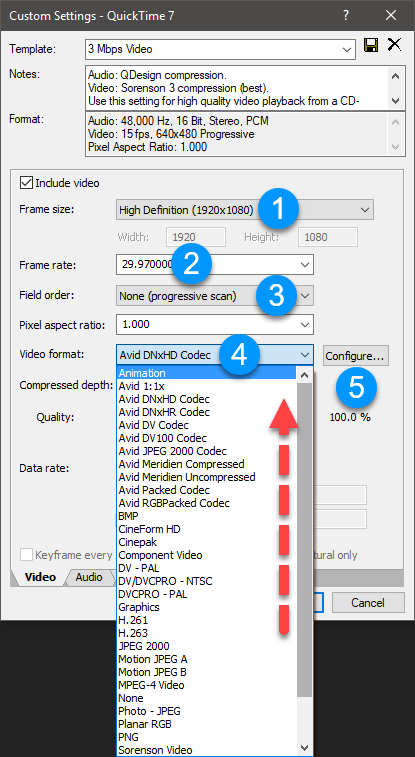
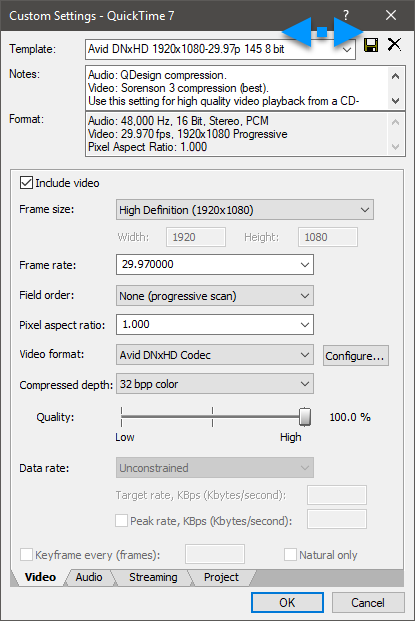
Step 2 - Configure Settings in the Custom Settings window
1. Set the Frame Size
2. Set the Frame Rate
3. Set to Progressive or Interlaced - most people would be using Progressive in 2018
4. Select Avid DNxHD Codec from drop down box (scroll up to reveal hidden options)
5. Then finally press the Configure button
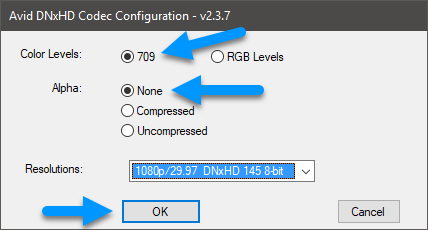
Step 3 - Configure Avid DNxHD Codec
In the Avid DNxHD Codec Configuration window, select 709 as the Color levels if you are working in HD.
Select None as the Alpha channel unless you need to preserve alpha transparency, but for normal video this is not needed.
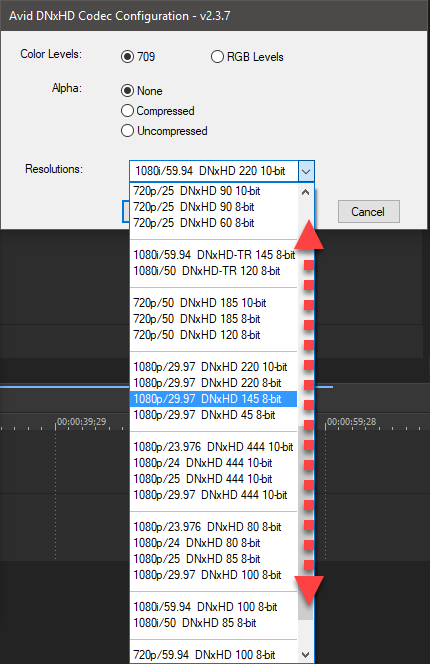
Open the drop down box to reveal all available Frame Size, Frame Rate and Quality options for encoding to Avid DNxHD. Be patient and have good look at all the options, because there are many different groups to look at!
The number that comes after DNxHD is the Data Rate quality setting, followed by Bit Depth.
The highest quality setting available is DNxHD 220 10 bit - this will render a video at 220 Mbps and produce a very large file and is probably overkill for most people. On the lowest end of the spectrum is DNxHD 36 8 bit, which would render a 36 Mbps video.
For my example above, I have selected 1920x1080-29.97p DNxHD 145 8-bit, which will be encoded at 145 Mbps.
Special Note: Higher DNxHD Resolutions and Frame Rates - 50p, 60p and 4K Video
1920x1080-50p and 1920x1080-60p Video
The free Avid DNxHD codec does have a few limitations in the available output profiles, compared to using Cineform, which does not have any limitations. However, because we are also using Quicktime and Vegas to render our video, you can trick Avid DNxHD into rendering higher frame rates like 50p and 60p which are technically not allowed.
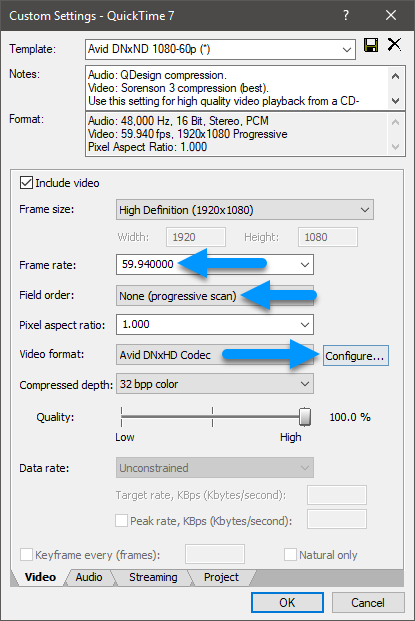
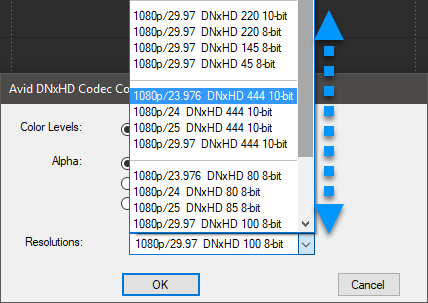
If you are working with 1920x1080-50p or 1920x1080-60p, make sure to manually set your desired 50 fps or 60 fps Frame Rate in the Custom Settings for Quicktime 7 window and also select an Output Profile in the DNxHD settings, that uses exactly half the frame rate of your actual video. When the video gets rendered, Vegas will use the higher 50fps or 59.94fps Frame Rate set in the Custom Settings for Quicktime 7 and not the lower frame rate from DNxHD settings. I know what I have said sounds a little confusing, so here are some screen shots to explain what I mean.
1. Set the Frame Rate to 50 or 59.94 in the Custom Settings for Quicktime 7 window.
2. Press the Configure button and select a 29.97p profile if wanting to output 59.94(60)p video.
Select a 25p profile if wanting to output a 50p video.
3840x2160 4K Video
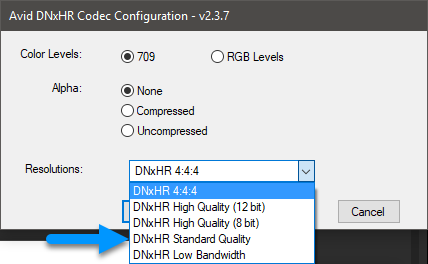
DNxHD only allows a maximum output resolution of 1920x1080, however in the drop down list you can select DNxHR if working with 4K (3840x2160) video. Then press the Configure button and select from one of the 5 output profiles available: DNxHR 4:4:4, High Quality (12 bit), HIgh Quality (8 bit), Standard Quality or Low Bandwidth.

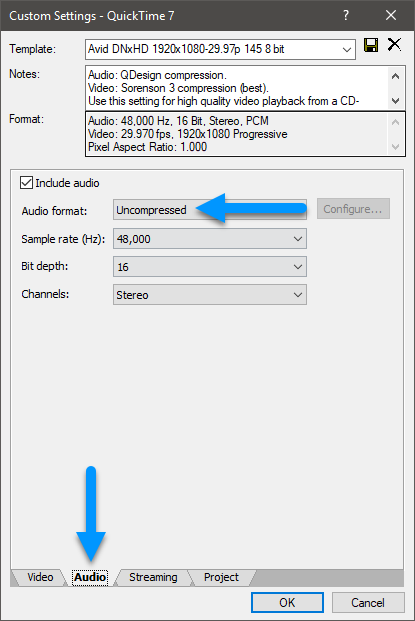
Step 4 - Configure Audio Settings
Go to the Audio tab and set Audio Format = Uncompressed
Step 4 - Naming and Saving your New Custom Template
Just like any other rendering template, you may like to Name and Save a new Custom Avid DNxHD template. Then next time you want to render a video to Avid DNxHD, you can simply select your saved Template from the Render As window and start rendering, without having to go deep into the settings.
Step 5 - Start rendering to Avid DNxHD!
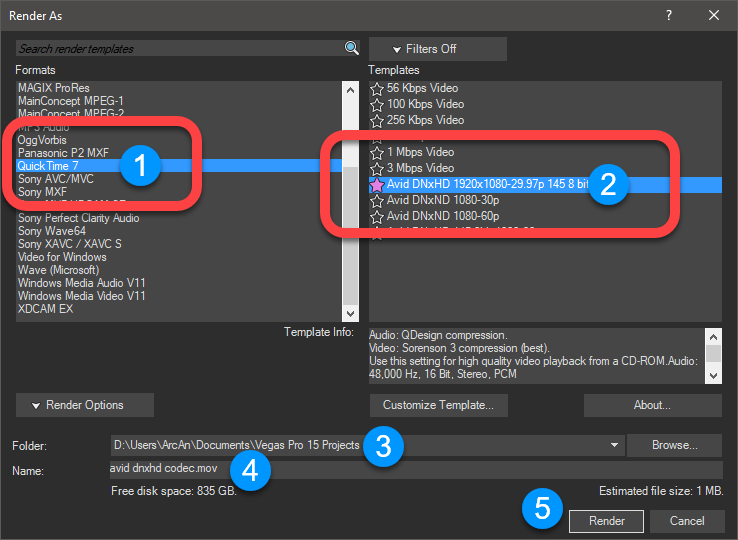
Before you begin rendering, always remember to check your Output Folder location is set correctly and to Name your video file. Then press the Render button and wait for the magical leprechauns hiding in your computer to create your first video using the Avid DNxHD Codec.
Beginners Guide for how to use Handbrake
If you would now like to render your final delivery video using Handbrake, I recommend you read my detailed beginners guide for how to use Handbrake here:
How to use Handbrake 1.1.1 - Beginners Guide for Exporting Video
Acknowledgement and Thank You
I would like to acknowledge the original source for this tutorial. It was many years ago that I discovered this tutorial on John Rofrano's website. John Rofrano is one of the best and most knowledgeable teachers on how to use Vegas Pro. You will often find John helping out people on the official Vegas Pro forums and the Creative Cow Vegas Pro forum.
I also need to thank George from the Movie Studio Zen Forum, who taught me the trick about rendering 50p and 60p DNxHD video, using the combination of a high frame setting in Vegas and a half frame rate output profile in Avid DNxHD.
Related Topics and Tutorials
How to export Cineform video with Vegas Pro and Vegas Movie Studio
How to export video from Vegas Pro to Handbrake
How to export video from Vegas Movie Studio Platinum to Handbrake
How to use Handbrake 1.1.1 - Beginners Guide for Exporting Video

About Derek Moran
Derek Moran is the author of all articles on Movie Studio Zen.
You can find me on YouTube, Facebook, Twitter, Read more about Derek...

