In this tutorial I show how to render high quality "intermediate" video with Vegas using the Cineform codec, which is one the best "edit friendly" formats for editing and sharing with other editors and video FX programs.
The instructions in this tutorial will work for both Vegas Pro and Vegas Movie Studio Platinum users.
What is the purpose of this tutorial ?
The rendering technique taught in this tutorial can be used for many different types of situations.
- Vegas Pro and Vegas Movie Studio Platinum users who need to send their work to another program or another editor, for additional work that needs to be done with a different program.
- Whether you are using Vegas Movie Studio Platinum or Vegas Pro, Cineform is one of the best options for creating intermediate "edit friendly" video, that will not degrade while you are creating your projects.
- If the video recorded from your camera experiences a lot of lag in the Preview window while you are editing, a better way to edit your video is to first convert it to Cineform. Cineform is much easier for your CPU to process in real time, which means zero or near to zero lag while you are editing. It is also a good format to use if you have a lot of video transitions in your project.
Topics covered in this tutorial
What is Cineform ?
What is an Intermediate format ?
Different types of Intermediate Lossless formats
Types of uses for Lossless Codec formats
What is a Final Delivery format ?
Where can I get the Cineform Codec and how to install ?
How to Render Video in Vegas, using the Cineform Codec ?
What is Cineform ?
CineForm is an Intermediate Codec that was originally designed in 2002 for compressed Digital Intermediate workflows for film and television applications using HD or higher resolution media. CineForm media is most commonly wrapped within AVI or MOV files types. The codec uses a constant quality design, such that the data rate will vary based on the source image data. In 2011 GoPro bought Cineform and began including the Cineform codec with their free GoPro Studio editing software. In 2017 GoPro stopped development of Cineform and GoPro Studio and decided to make Cineform an Open Source product.
How you can get access to the Cineform codec in 2018 and beyond, is explained further down in this article.
What is an Intermediate format ?
An intermediate format is a "lossless" codec that doesn't lose quality during the export (render) process. Intermediate formats use very low levels of compression, which means they are much larger in file size, but also much easier to edit with in Vegas. The type of video that comes out of an average consumer grade video camera, is normally highly compressed and a lot smaller in file size. Due to this high level of compression, play back in the Vegas preview window while editing is often slow at times, because your CPU and GPU is having to decompress the video in real time.
When you convert a compressed video like AVCHD into an intermediate format like Cineform codec, the file is dramatically decompressed. This makes it extremely easy to play back in the preview window while editing.
Different types of Intermediate Lossless formats
This tutorial is concentrating only on the use of Cineform. It is up to you to decide which intermediate format works best for your workflow and editing environment. The two best types of "lossless" intermediate formats you can use are Cineform or Avid's DNxHD. Some Vegas Pro users have also been using XAVC Intra format, which is only available in Vegas Pro.
I have also made a separate tutorial on how to render/export using Avid's DNxHD codec. The instructions for how to export using DNxHD are very similar to this tutorial.
If you are interested in wanting to try XAVC Intra format, there are two ways you can do this. Vegas Pro users have an option to render directly to this format. You can also download Sony's free Catalyst Browse program, which has the ability to transcode (convert) video from your camera into the "edit friendly" XAVC Intra format.
Types of uses for Lossless Codec formats
There are times where you need to do things like the following:
- Converting the video from your camera to make it easier to edit with in the Preview window
- Transfer your already edited footage from one application to another.
- Transfer your already edited footage from one video project to another.
- You need a format that’s more suitable for editing.
- Archiving your edited footage.
What is a Final Delivery format ?
Final delivery “end user” viewing formats are codecs like h.264, DivX/XViD, WMV, mpeg-4, mpeg2, mpeg, FLV and many more. These are all “lossy” codecs and are meant for distribution and user viewing only. They compress very well but being lossy it means that the quality is not as good as the original footage. This is ok though, as most people don’t notice much, and having small file sizes helps with the delivery and easier playback aspects.
Where can I get the Cineform Codec and how to install ?
Vegas Pro and Vegas Movie Studio Platinum don't come packaged with the Cineform Codec, however you can install Cineform yourself and then render your video into an .avi or .mov file container using the Cineform codec.
To get the Cineform Codecs installed on your computer, you will need to install an old version of GoPro Studio from GoPro. Use the link below and then install GoPro Quick. The codecs will be installed automatically for you.
https://software.gopro.com/PC/GoPro_Quik-WinInstaller-2.3.0.5383.exe
How to Render Video in Vegas, using the Cineform Codec ?
The following instructions will work the same in any version of Vegas Pro or Vegas Movie Studio Platinum.
In this tutorial I show how to render Cineform using a .avi file container, however you can also render Cineform using .mov (Quicktime). If you would like to render to .mov instead, combine the instructions in this alternate Avid DNxHD tutorial and the steps below, and select Cineform instead of DNxHD.
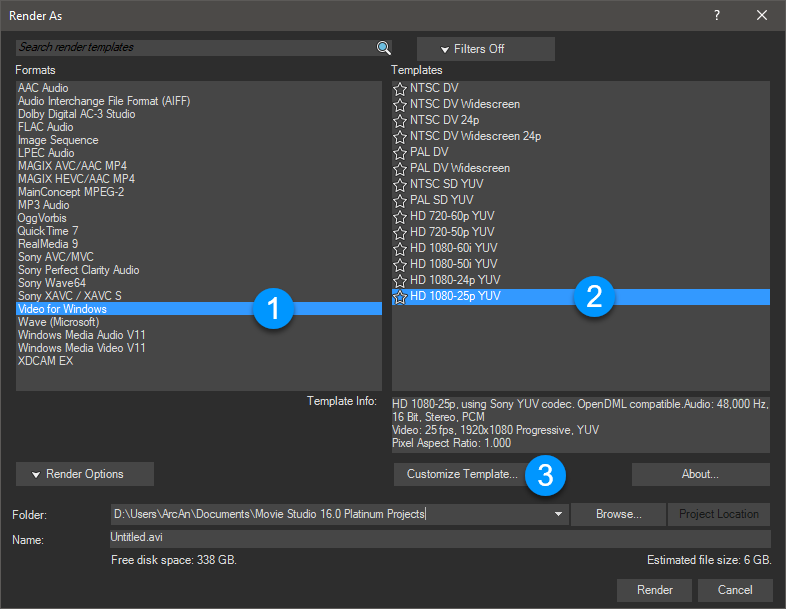
Step 1 - Open Render As and select Video for Windows.avi
Vegas Pro users go to File/Render As
Vegas Movie Studio Platinum users will have different pathways to get to the same Render As window, depending on which version of Platinum they are using. Either go to Project/Render As or Make Movie/Save to Hard Drive/Advanced Options - now you are in the Render As window.
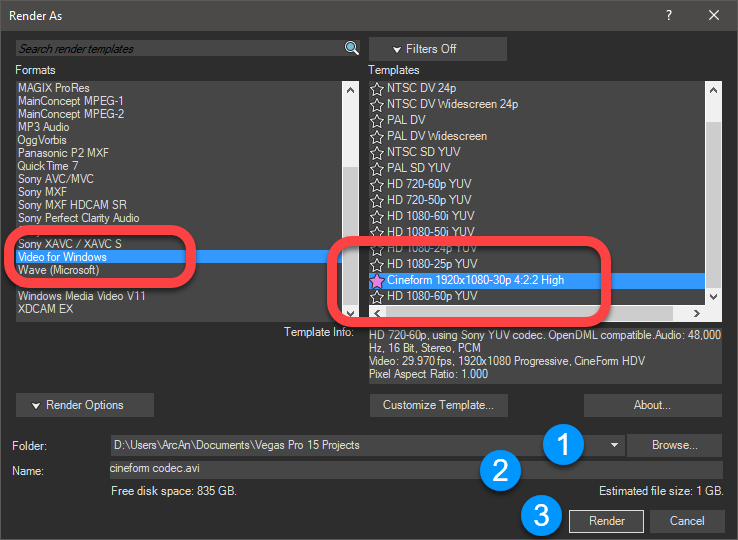
1. Select Video for Windows in the Formats list (left side).
2. The Template (right side) options listed are limited, however do not worry if you can't find a template that matches your source video's Frame Size and Frame Rate, because we can create a new Custom Template in the next window! If you don't see a template that matches your video and/or project properties, just select HD 1080-25p YUV to start with and then we will edit it!
3. Press Customize Template.
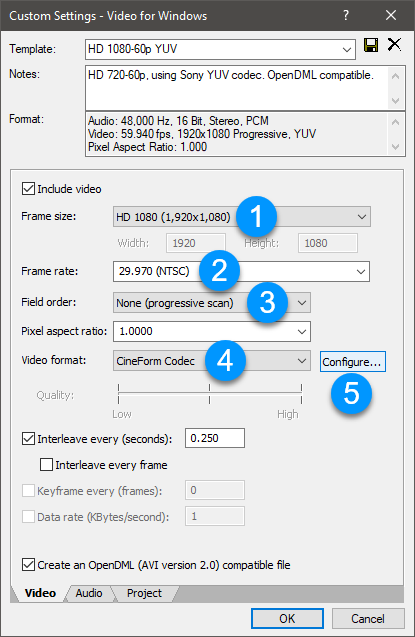
Step 2 - Configure Settings in the Custom Settings window
1. Set the Frame Size
2. Set the Frame Rate
3. Set to Progressive or Interlaced - most people would be using Progressive in 2018
4. Select Cineform Codec from drop down box
5. Then finally press the Configure button
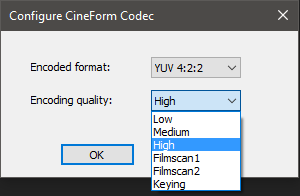
Step 3 - Configure Cineform Codec
First you need to set which Encoding format you want to use, which is referring to the Bit Depth of Colour Space.
Most video you have ever watched, is encoded to 4:2:0
99% of users will select YUV 4:2:2
Selecting RGB 4:4:4 or RGBA 4:4:4:4 is complete overkill.

Next select the Encoding quality you want to use.
Low, Medium and High are the most commonly used quality settings.
The higher you set this, the larger your file size will be.
Personally, I normally select High.
Filmscan1, Filmscan2 and Keying, speak for themselves.
If you are scanning film to convert to digital or plan to do Alpha Channel keying, you need to select one of these super high quality settings.
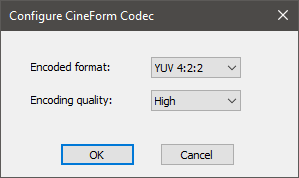
Step 4 - Naming and Saving your New Custom Template
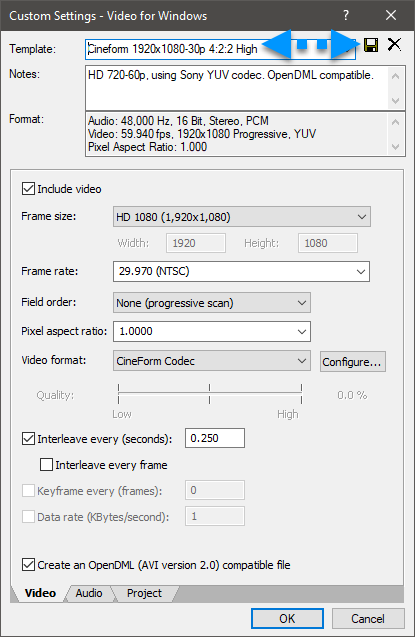
Just like any other rendering template, you may like to Name and Save a new Custom Cineform template. Then next time you want to render a video to Cineform, you can simply select your saved Template from the Render As window and start rendering, without having to go deep into the settings.
Step 5 - Start rendering to Cineform!
Before you begin rendering, always remember to check your Output Folder location is set correctly and to Name your video file. Then press the Render button and wait for the magical elves hiding in your computer to create your first video using the Cineform Codec.
Related Topics and Tutorials
How to export Avid DNxHD video with Vegas Pro and Vegas Movie Studio Platinum
How to export video from Vegas Pro to Handbrake
How to export video from Vegas Movie Studio Platinum to Handbrake
How to use Handbrake 1.1.1 - Beginners Guide for Exporting Video

About Derek Moran
Derek Moran is the author of all articles on Movie Studio Zen.
You can find me on YouTube, Facebook, Twitter, Read more about Derek...

