
DISCLOSURE: Movie Studio Zen is supported by its audience. When you purchase through links on this site, we may earn an affiliate commission.
Solved How he made that transition between videos?

Hello,
Recently I was watching that video .
And I would like to know, how that guy made transition, which is shown on 5:17 - 5:24.
That transition looks like Zoom Out, Top-Left in Zoom category of Transitions section. But by default that transition is disappears completely in Movie Studio. And that guy made somehow to keep it as picture in picture effect, and then that small second video just disappeared smoothly as Fade-Out.
Do you have any ideas, how it was done?
Last Edit:30 Jan 2017 13:27 by 9190
Please Log in or Create an account to join the conversation.
- MrGrunthunter
-
 Offline
 - Zen Level 5
-

- Posts: 248
- Thank you received: 40
Replied by MrGrunthunter on topic How he made that transition between videos?
Posted 30 Jan 2017 15:16 #2 My guess would be that he added a second video track, synced them and then used Pan & Crop in one video to expose the other video track.
DESKTOP: Dell PC WINDOWS 10 PRO, 64-bit, Ver:1607, OS BLD: 14393.1066
INTEL Core: i7-4790, CPU @3.60 GHz, Inst RAM:16.0 GB
GeForce GTX 745, Driver ver: 376.53, Tot avail grap: 12225 MB, Ded vid mem: 4096 MB DDR3
Shared Sys Mem: 8159 MB, DirectX Runtime Ver:12.0
LAPTOP: MSI GE72MVR 7RG
GTX-1070
INTEL Core: i7-4790, CPU @3.60 GHz, Inst RAM:16.0 GB
GeForce GTX 745, Driver ver: 376.53, Tot avail grap: 12225 MB, Ded vid mem: 4096 MB DDR3
Shared Sys Mem: 8159 MB, DirectX Runtime Ver:12.0
LAPTOP: MSI GE72MVR 7RG
GTX-1070
Please Log in or Create an account to join the conversation.
Replied by DoctorZen on topic How he made that transition between videos?
Posted 30 Jan 2017 17:42 #3 Event Pan/Crop is not the tool that was used.
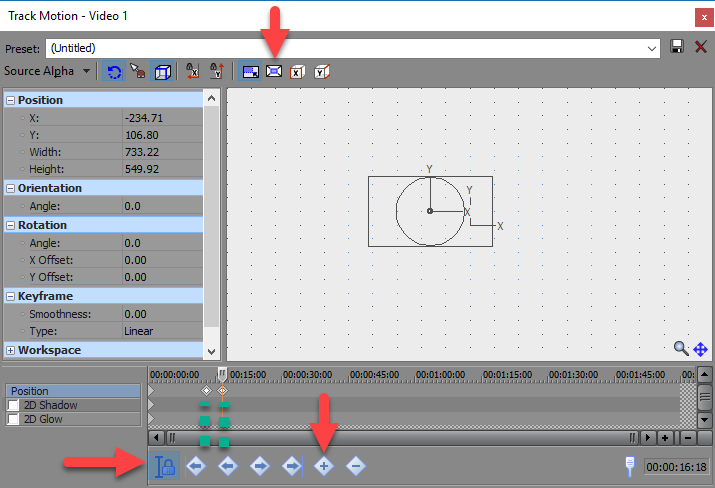
To create this effect, Key Frames were added to the Track Motion window for video that shrinks in size.
Video that shrinks is placed on a separate video track above the video that is revealed, which is on a second track.
Then press Track Motion button for video track 1.
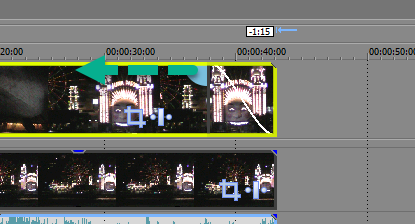
*Dotted green lines are showing where the Key Frame points are located.

Make sure Scale about Center at top is turned OFF.
Make sure Sync to Cursor is turned ON.
Move cursor along to the point where you want transition to begin and Add a New Key Frame by pressing + button.
Now move cursor along a few seconds (length of transition) and then re-size and re-position the Video Frame inside Track Motion window - this will automatically create a new key frame.
That's it.
To create this effect, Key Frames were added to the Track Motion window for video that shrinks in size.
Video that shrinks is placed on a separate video track above the video that is revealed, which is on a second track.
Then press Track Motion button for video track 1.
*Dotted green lines are showing where the Key Frame points are located.
Make sure Scale about Center at top is turned OFF.
Make sure Sync to Cursor is turned ON.
Move cursor along to the point where you want transition to begin and Add a New Key Frame by pressing + button.
Now move cursor along a few seconds (length of transition) and then re-size and re-position the Video Frame inside Track Motion window - this will automatically create a new key frame.
That's it.
ℹ️ Remember to turn everything off at least once a week, including your brain, then sit somewhere quiet and just chill out.
Unplugging is the best way to find solutions to your problems. If you would like to share some love, post a customer testimonial or make a donation.
Unplugging is the best way to find solutions to your problems. If you would like to share some love, post a customer testimonial or make a donation.
Last Edit:30 Jan 2017 17:43 by DoctorZen
The following user(s) said Thank You: 9190
Please Log in or Create an account to join the conversation.
- MrGrunthunter
- Offline
- Zen Level 5
-
- Posts: 248
- Thank you received: 40
Replied by MrGrunthunter on topic How he made that transition between videos?
Posted 31 Jan 2017 01:39 #4 Well ... I sit here redfaced again. Listen to Derek, not me 9190. He is absolutely correct .... as usual! I was to quick with my keyboard! I was just thinking about a 'static' split screen and NOT the dynamic transition that is in the subject video clip. I am very new to using the Track Motion tool and keep forgetting about it. I guess I was half correct in that a second video track was added but after that I fell on my face 
Sorry Derek ............ I will lock up my keyboard for the next month and just read and learn.
Sorry Derek ............ I will lock up my keyboard for the next month and just read and learn.
DESKTOP: Dell PC WINDOWS 10 PRO, 64-bit, Ver:1607, OS BLD: 14393.1066
INTEL Core: i7-4790, CPU @3.60 GHz, Inst RAM:16.0 GB
GeForce GTX 745, Driver ver: 376.53, Tot avail grap: 12225 MB, Ded vid mem: 4096 MB DDR3
Shared Sys Mem: 8159 MB, DirectX Runtime Ver:12.0
LAPTOP: MSI GE72MVR 7RG
GTX-1070
INTEL Core: i7-4790, CPU @3.60 GHz, Inst RAM:16.0 GB
GeForce GTX 745, Driver ver: 376.53, Tot avail grap: 12225 MB, Ded vid mem: 4096 MB DDR3
Shared Sys Mem: 8159 MB, DirectX Runtime Ver:12.0
LAPTOP: MSI GE72MVR 7RG
GTX-1070
The following user(s) said Thank You: DoctorZen
Please Log in or Create an account to join the conversation.
Replied by DoctorZen on topic How he made that transition between videos?
Posted 31 Jan 2017 02:19 #5 It's all cool MrGRUNTHUNTER 
Understanding the difference between Event Pan/Crop and Track Motion, can really "do your head in" when in learning mode.
I experienced the exact same confusion, many years ago myself.
Every week I get the same questions about the use of these 2 tools, from a wide range of different users.
Everyone experiences the same confusion, until the light goes on - this is normal.
I have added this to my new tutorial list and will make a video about it soon.
Cheers")
Understanding the difference between Event Pan/Crop and Track Motion, can really "do your head in" when in learning mode.
I experienced the exact same confusion, many years ago myself.
Every week I get the same questions about the use of these 2 tools, from a wide range of different users.
Everyone experiences the same confusion, until the light goes on - this is normal.
I have added this to my new tutorial list and will make a video about it soon.
Cheers
ℹ️ Remember to turn everything off at least once a week, including your brain, then sit somewhere quiet and just chill out.
Unplugging is the best way to find solutions to your problems. If you would like to share some love, post a customer testimonial or make a donation.
Unplugging is the best way to find solutions to your problems. If you would like to share some love, post a customer testimonial or make a donation.
by DoctorZen
Please Log in or Create an account to join the conversation.
Wow, that's great! I was carefully following instructions and in the end I've got the right result! Thank you DoctorZen! Perfect explanation! So, it's smarter than I thought, and not just a usual transition. I thought that guy in his video was just using various types of transitons.
But now I wonder, how to finish this effect, to make that reduced size video smoothly disappear like Fade-Out…
MRGRUNTHUNTER, thank you too for your wish to help. )
Upd: great to know that DoctorZen is going to make video tutorial about those tools.
But now I wonder, how to finish this effect, to make that reduced size video smoothly disappear like Fade-Out…
MRGRUNTHUNTER, thank you too for your wish to help. )
Upd: great to know that DoctorZen is going to make video tutorial about those tools.
Last Edit:31 Jan 2017 06:08 by 9190
Please Log in or Create an account to join the conversation.
Replied by DoctorZen on topic How he made that transition between videos?
Posted 31 Jan 2017 07:47 #7how to finish this effect, to make that reduced size video smoothly disappear like Fade-Out…
Do know how to create an everyday fade ?
Drag top corner of video on timeline and fade out will be created.
If you want to get fancy, you can also drag any Transition onto the top left or right corner of a video event on the timeline.
If you are using Movie Studio Platinum 13, you will have to enter FADE Edit mode at bottom of timeline.
If you using older versions, you don't have to change into a different edit mode.
ℹ️ Remember to turn everything off at least once a week, including your brain, then sit somewhere quiet and just chill out.
Unplugging is the best way to find solutions to your problems. If you would like to share some love, post a customer testimonial or make a donation.
Unplugging is the best way to find solutions to your problems. If you would like to share some love, post a customer testimonial or make a donation.
Last Edit:17 Feb 2017 23:08 by DoctorZen
Please Log in or Create an account to join the conversation.
Yes, thank you. I didn't have time to update my message (was busy), before your answer. I wanted to update my message because later I understood myself that next steps can be done just from the main window on Timeline (not from that Track Motion window) like usual work with track – Fade-In/Out etc. I use Composite Level tool, because I have to make switches between tracks in the middle of the video (not in the end). And while I expose lower track, I have to return back the main upper track which was reduced in size. And that's what I meant, when was asking, how to bring back upper track back to normal size for further exposure. So, what I've done: first I applied envelope points on Composite Level line to Fade-Out small video (upper track) and then in Track Motion window I put cursor in the last frame of Fade-Out and added new key frame, then moved cursor one more frame and right clicked on that rectangle with circle and Y/X letters and chose "Restore_Box", automatically creating one more key frame. And size/position of upper track was immediately (during just one frame) returned to its normal value and now it's ready again for further exposure. Don't quite understand what does it mean "Restore_View" option in that context menu though.
Last Edit:31 Jan 2017 09:52 by 9190
Please Log in or Create an account to join the conversation.
Replied by DoctorZen on topic How he made that transition between videos?
Posted 31 Jan 2017 09:32 #9 Restore View in the Track Motion window, restores the workspace view.
Example:
If you use the wheel on your mouse, you can zoom out the workspace.
You can also drag the dotted area left/right or up/down.
Right-click/Restore View, restores the workspace view.
Example:
If you use the wheel on your mouse, you can zoom out the workspace.
You can also drag the dotted area left/right or up/down.
Right-click/Restore View, restores the workspace view.
ℹ️ Remember to turn everything off at least once a week, including your brain, then sit somewhere quiet and just chill out.
Unplugging is the best way to find solutions to your problems. If you would like to share some love, post a customer testimonial or make a donation.
Unplugging is the best way to find solutions to your problems. If you would like to share some love, post a customer testimonial or make a donation.
by DoctorZen
Please Log in or Create an account to join the conversation.
Ah, I see. Now I understand. So that Restore View is just about managing the view of workspace and doesn't affect video itself. Thanks again!
I would like to better understand those tools, they look interesting. So, will wait for your video about this.
I would like to better understand those tools, they look interesting. So, will wait for your video about this.
by 9190
Please Log in or Create an account to join the conversation.
Forum Access
- Not Allowed: to create new topic.
- Not Allowed: to reply.
- Not Allowed: to edit your message.
Moderators: DoctorZen
Time to create page: 1.023 seconds
